In my previous blogpost, we dug into how to create the different object types used by agents, more specifically Agent Identity Blueprints, Agent Identity Blueprint Principals, Agent Identities and Agent Users. Now we will try to authenticate as them, and also see what our logs say, so we can detect usage!
As a quick reference, partially for myself, these are identifiers for my setup (So you can more easily understand the screenshots aswell):
- Agent Identity Blueprint
- Name: Blogpost Agent 1
- App id / Blueprint id: 9471f355-173a-4466-b142-3d4acf848b03
- Agent Identity Blueprint Principal object id: bf31e1f8-803f-4e95-bcc4-6d1008c09f0c
- Agent Identity
- Name: Blogpost Agent Identity 1
- Object id: cd77c677-16ea-4f9d-b5b1-0aab1841694c
- Agent User:
- Name: Blogpost Agent Identity 1 User
- UserPrincipalName: 7acd14d47a62@dev.goodworkaround.com
- Object id: 629db438-941d-4e66-a9ef-bbe70e6cf3ac
- Agent Identity
- Name: Blogpost Agent Identity 2
- Object id: dfd8586f-ed96-4632-8719-4c30bf5521fd
- My tenant id: 237098ae-0798-4cf9-a3a5-208374d2dcfd
Now, for authentication we have several goals, each addressing different flows as documented by Microsoft:
- Use Blogpost Agent Identity 1 and 2 autonomously (Autonomous app flow)
- Sign in as Blogpost Agent Identity 1 User (Agent user flow)
- Allow Blogpost Agent Identity 2 to access something on behalf of a signed in user (On behalf of flow)
Let’s start on the autonomous part. I will be working directly with the HTTP calls for getting tokens, to ensure we understand what is going on here.
Autonomous app flow – Getting an access token for an Agent Identity
The Microsoft documentation contains the below picture, which illustrates what we need to do:
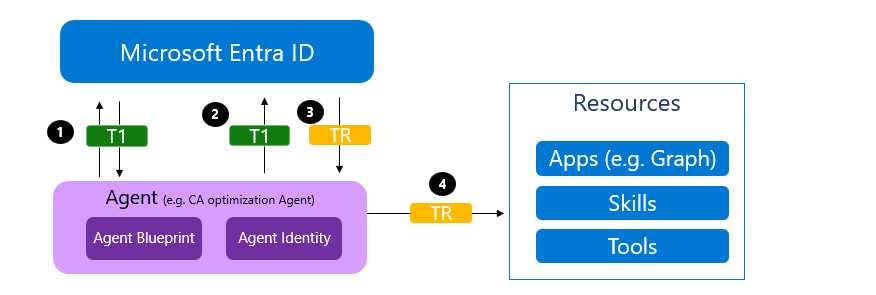
- We authenticate as the Blueprint, getting an access token signed by Entra, targeted towards the scope api://AzureADTokenExchange/.default (Common for federated credentials) – this is called token T1
- We authenticate as the Agent Identity, by providing a client assertion (which is T1), just as we would do when using federated credentials. Entra will issue token TR (Token for resource), which is the token we will use to access things such as Microsoft Graph.
At the same time, I will be implementing these new methods into Fortytwo’s EntraIDAccessToken PowerShell module. From a protocol standpoint, there is one new thing to take care of here, and that is the new fmi_path parameter for the token endpoint.
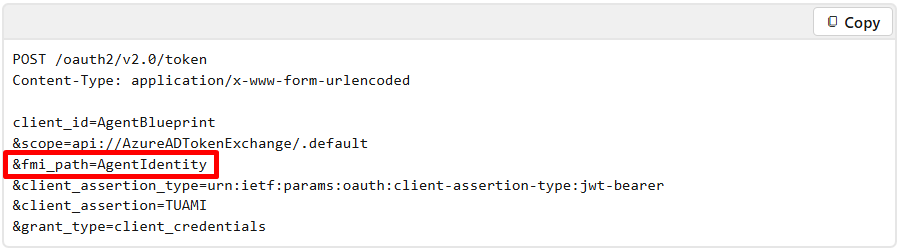
This is essentially a way for us to say to Entra ID that we need a token for authenticating as this particular Agent Identity. This also means that if we have two different Agent Identities, we cannot request a single Blueprint token and use that to authenticate to both Agent Identities, instead we need two Blueprint tokens, each with different fmi_path values.
Step 1 – Getting token for the Blueprint
In the below request, we use a client secret (not recommended, but nice for testing) to authenticate as the Agent Identity Blueprint (9471f355-173a-4466-b142-3d4acf848b03), providing the fmi_path of cd77c677-16ea-4f9d-b5b1-0aab1841694c. which is Blogpost Agent Identity 1.
POST https://login.microsoftonline.com/237098ae-0798-4cf9-a3a5-208374d2dcfd/oauth2/v2.0/token

client_id=9471f355-173a-4466-b142-3d4acf848b03
&client_secret=n97...
&fmi_path=cd77c677-16ea-4f9d-b5b1-0aab1841694c
&grant_type=client_credentials
&scope=api://AzureADTokenExchange/.default
Looking at the returned access token is not really all that interesting. The audience is fb60f99c-7a34-4190-8149-302f77469936, as expected (The appid of the token exchange), but the subject looks somewhat interesting. The last part of it contains the value we provided in the fmi_path, so this is apparently used for targeting the access token (As it is treated stateless in Entra).
{
  "typ": "JWT",
  "alg": "RS256",
  "kid": "PcX98GX420T1X6sBDkzhQmqgwMU"
}.{
  "aud": "fb60f99c-7a34-4190-8149-302f77469936",
  "iss": "https://login.microsoftonline.com/237098ae-0798-4cf9-a3a5-208374d2dcfd/v2.0",
  "iat": 1770040571,
  "nbf": 1770040571,
  "exp": 1770044471,
  "aio": "ASQA2/8bAAAA3gn55pV1NWN6lu6zGbb2FVlDEe3TjuRLEyYH6WS1thc=",
  "azp": "9471f355-173a-4466-b142-3d4acf848b03",
  "azpacr": "1",
  "idtyp": "app",
  "oid": "bf31e1f8-803f-4e95-bcc4-6d1008c09f0c",
  "rh": "1.AUsArphwI5gH-UyjpSCDdNLc_Zz5YPs0epBBgUkwL3dGmTYAAABLAA.",
  "sub": "/eid1/c/pub/t/rphwI5gH-UyjpSCDdNLc_Q/a/VfNxlDoXZkSxQj1Kz4SLAw/cd77c677-16ea-4f9d-b5b1-0aab1841694c",
  "tid": "237098ae-0798-4cf9-a3a5-208374d2dcfd",
  "uti": "VC6mMmJisEGiNDlxhhlNAA",
  "ver": "2.0",
  "xms_act_fct": "9 3",
  "xms_ficinfo": "CAAQABgAIAAoAjAA",
  "xms_ftd": "SB_ad3RCDp430LUHcVbmihDpGAwu_vVGAWbECqf8bbMBZXVyb3Blbm9ydGgtZHNtcw",
  "xms_idrel": "26 7",
  "xms_sub_fct": "3 9"
}
Step 2 – Using the blueprint token to get a token for the Agent Identity
Now we can send our second request, where we use the token from Step 1 to get the token we actually want:
POST https://login.microsoftonline.com/237098ae-0798-4cf9-a3a5-208374d2dcfd/oauth2/v2.0/token

client_id=cd77c677-16ea-4f9d-b5b1-0aab1841694c
&client_assertion_type=urn:ietf:params:oauth:client-assertion-type:jwt-bearer
&grant_type=client_credentials
&scope=https://graph.microsoft.com/.default
&client_assertion=eyJ0eXAiOiJKV1QiLCJhbGciOiJSUzI1NiIsImtpZCI6IlBjWDk4...
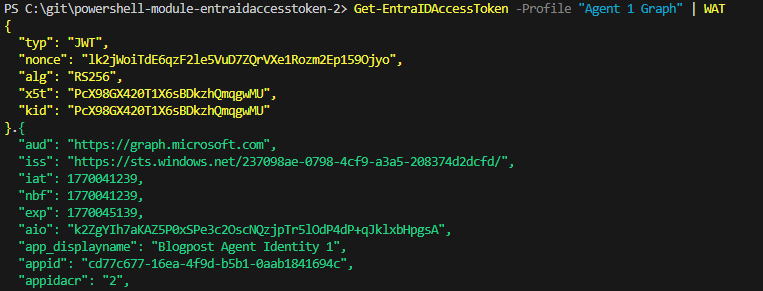
From this, we will now get a new access token – the token we actually want:
{
  "typ": "JWT",
  "nonce": "lk2jWoiTdE6qzF2le5VuD7ZQrVXe1Rozm2Ep159Ojyo",
  "alg": "RS256",
  "x5t": "PcX98GX420T1X6sBDkzhQmqgwMU",
  "kid": "PcX98GX420T1X6sBDkzhQmqgwMU"
}.{
  "aud": "https://graph.microsoft.com",
  "iss": "https://sts.windows.net/237098ae-0798-4cf9-a3a5-208374d2dcfd/",
  "iat": 1770041239,
  "nbf": 1770041239,
  "exp": 1770045139,
  "aio": "k2ZgYIh7aKAZ5P0xSPe3c2OscNQzjpTr5lOdP4dP+qJklxbHpgsA",
  "app_displayname": "Blogpost Agent Identity 1",
  "appid": "cd77c677-16ea-4f9d-b5b1-0aab1841694c",
  "appidacr": "2",
  "idp": "https://sts.windows.net/237098ae-0798-4cf9-a3a5-208374d2dcfd/",
  "idtyp": "app",
  "oid": "cd77c677-16ea-4f9d-b5b1-0aab1841694c",
  "rh": "1.AUsArphwI5gH-UyjpSCDdNLc_QMAAAAAAAAAwAAAAAAAAAAAAABLAA.",
  "sub": "cd77c677-16ea-4f9d-b5b1-0aab1841694c",
  "tenant_region_scope": "EU",
  "tid": "237098ae-0798-4cf9-a3a5-208374d2dcfd",
  "uti": "FCPTgFNbZ0-4hNoqwYtNAA",
  "ver": "1.0",
  "wids": [
    "0997a1d0-0d1d-4acb-b408-d5ca73121e90"
  ],
  "xms_act_fct": "3 11 9",
  "xms_ftd": "JgOsjwEiCLhubn6bkEtOah3cTMQdNLrYTB3L8MDuhXsBZXVyb3Bld2VzdC1kc21z",
  "xms_idrel": "7 24",
  "xms_par_app_azp": "9471f355-173a-4466-b142-3d4acf848b03",
  "xms_rd": "0.42LlYBJi9BYS4WAXEuDzP_880TvYd_4Unyld6UtXAUU5hQQuBks4qHAqOm9YPZHxTfH1EKAoh5AAMwMEHIDSQFFuIYE1PBPetSpmBa-tnsDPv49luhQfB5cQl6G5uYGBiYGpuSEA",
  "xms_sub_fct": "9 3 11",
  "xms_tcdt": 1681123817,
  "xms_tdbr": "EU",
  "xms_tnt_fct": "3 6"
}
Here we can see that audience is Microsoft Graph, that the appid is the client id of the Blogpost Agent Identity 1 and we have a claim xms_par_app_azp that points to the blueprint app id.
A simpler way with the EntraIDAccessToken module
I have added agent identity stuff into the open source EntraIDAccessToken PowerShell module, where we can do things very simple:
# Step 1 - Add a client secret access token profile for the Blueprint (can be replaced with other access token profiles)
Add-EntraIDClientSecretAccessTokenProfile -TenantId "237098ae-0798-4cf9-a3a5-208374d2dcfd" -ClientId "9471f355-173a-4466-b142-3d4acf848b03" -Scope "api://AzureADTokenExchange/.default" -Name "Blueprint"

# Step 2 - Add a federated credential access token profile for Agent 1, using the Blueprint access token profile as federated credential
Add-EntraIDFederatedCredentialTokenProfile -Name "Agent 1 Graph" -TenantId "237098ae-0798-4cf9-a3a5-208374d2dcfd" -ClientId "cd77c677-16ea-4f9d-b5b1-0aab1841694c" -FederatedAccessTokenProfile Blueprint -AgentIdentity

# Get and print the access token
Get-EntraIDAccessToken -Profile "Agent 1 Graph" | WAT
What about permissions and scopes?
Up until now, we have not talked about which permissions the Agent Identity has. We have been able to get an access token for Microsoft Graph, however, we have not talked about what we can access..
Something that is new with the blueprint pattern, is inheritable permissions. These are permissions that are inherited from the blueprint, by the Agent Identities. We can now add an inheritable permission to Microsoft Graph like this:
POST https://graph.microsoft.com/beta/applications/microsoft.graph.agentIdentityBlueprint/9471f355-173a-4466-b142-3d4acf848b03/inheritablePermissions

{
  "resourceAppId": "00000003-0000-0000-c000-000000000000",
  "inheritableScopes": {
    "@odata.type": "microsoft.graph.enumeratedScopes",
    "scopes": [
      "User.Read",
      "User.Read.All",
      "GroupMember.Read.All"
    ]
  }
}
However, this is not for application permissions! These are only for delegated permissions. That means that in order to get the above permissions, we need a user signing in (On behalf of flow), but in this blog post we are talking about the autonomous agent flow. OBO flow will be covered later.
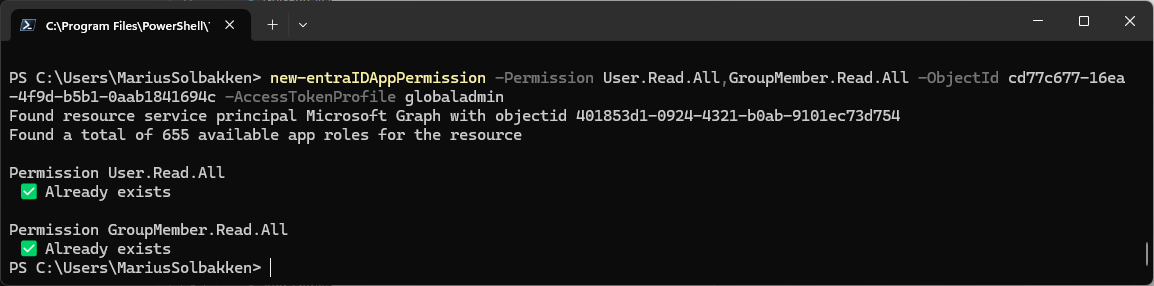
In order to get application permissions in our access token scope (roles claim), there is no admin consent UI or anything we can use. Instead we need to create an app role assignment on the Microsoft Graph service principal (Which is the underlying admin consent feature…). The EntraIDAccessToken module has a cmdlet New-EntraIDAppPermission, that can help us with this.
New-EntraIDAppPermission -Permission User.Read.All,GroupMember.Read.All -ObjectId cd77c677-16ea-4f9d-b5b1-0aab1841694c
Now we can use our Agent 1 to get access token (Using the Blueprint) and we can see that correct roles:
Add-EntraIDClientSecretAccessTokenProfile -TenantId "237098ae-0798-4cf9-a3a5-208374d2dcfd" -ClientId "9471f355-173a-4466-b142-3d4acf848b03" -Scope "api://AzureADTokenExchange/.default" -Name "Blueprint"

Add-EntraIDFederatedCredentialTokenProfile -Name "Agent 1" -TenantId "237098ae-0798-4cf9-a3a5-208374d2dcfd" -ClientId "cd77c677-16ea-4f9d-b5b1-0aab1841694c" -FederatedAccessTokenProfile Blueprint -AgentIdentity -Scope "https://graph.microsoft.com/.default"

Get-EntraIDAccessToken -Profile "Agent 1" | Write-EntraIDAccessToken
This will now return a JWT with the following scopes:
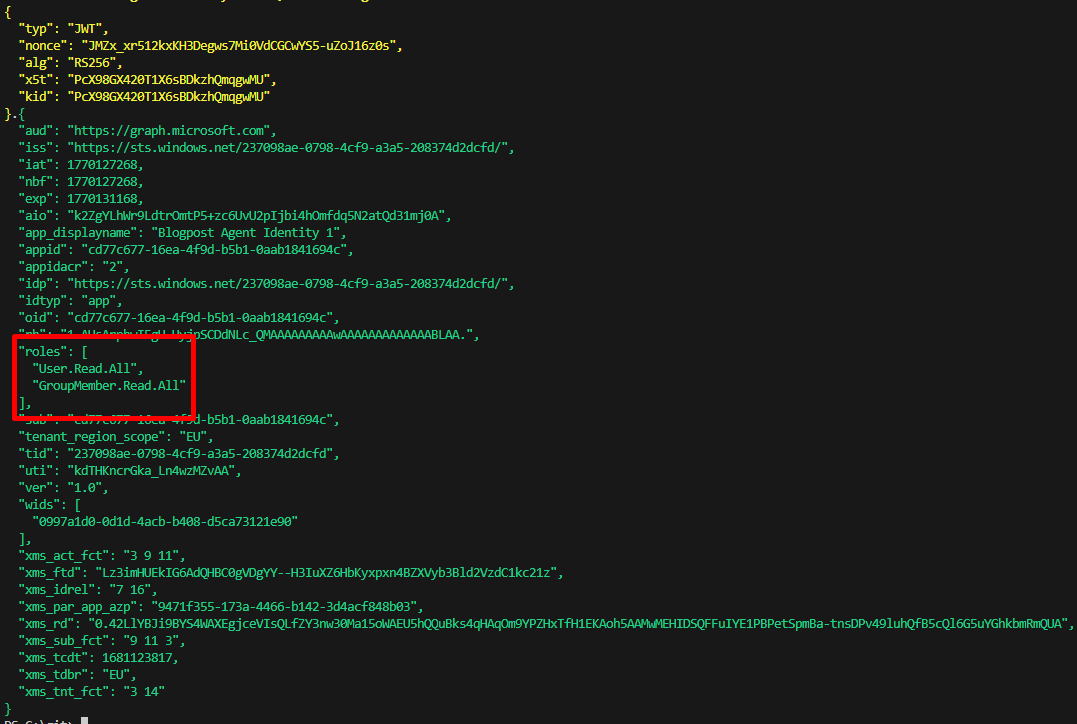
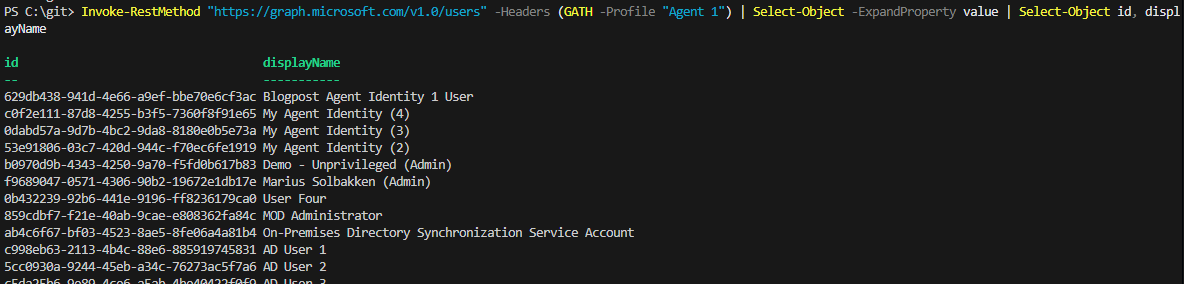
And we can now validate that we can use the token to read users:
Invoke-RestMethod "https://graph.microsoft.com/v1.0/users" -Headers (GATH -Profile "Agent 1") | Select-Object -ExpandProperty value | Select-Object id, displayName
Ok, so that was Graph application permissions covered. Now, what about other accesses?
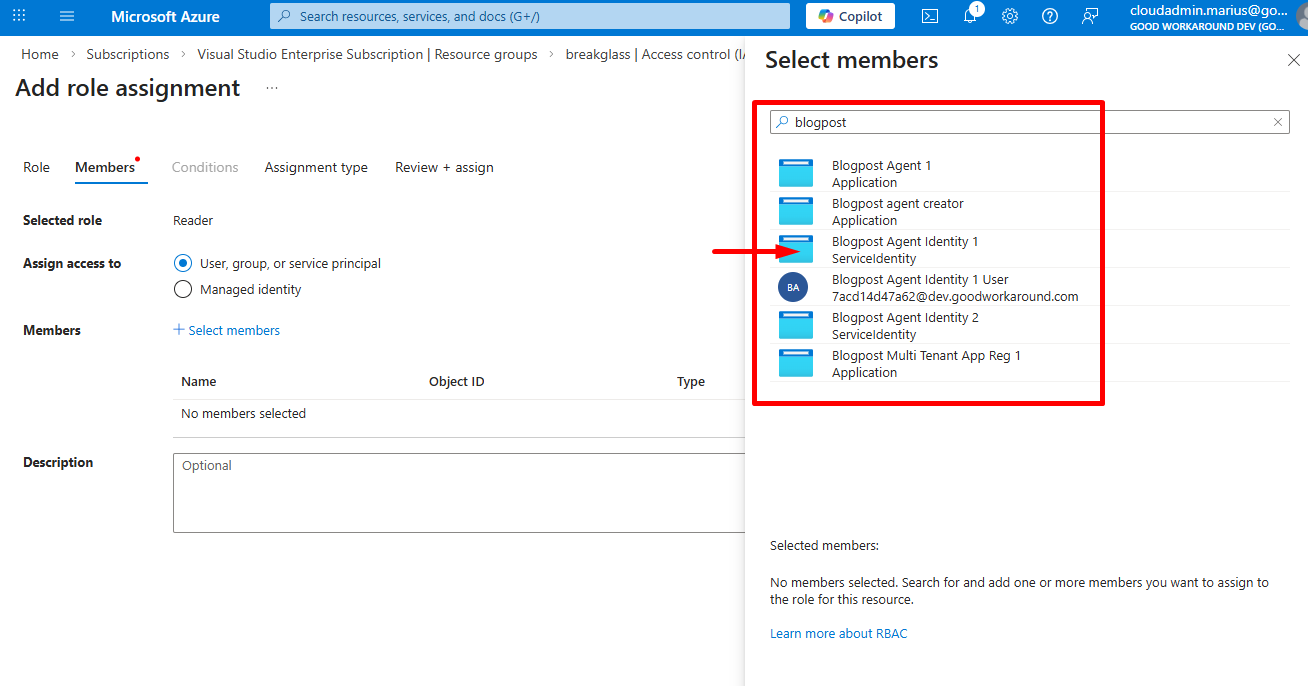
Azure
Accessing Azure is very, very simple. We can simply grant access to the Agent Identity (And as you can see, we can also grant access to the Agent Identity user):
After this, we can get an access token for management.azure.com and access things:
Add-EntraIDClientSecretAccessTokenProfile -TenantId "237098ae-0798-4cf9-a3a5-208374d2dcfd" -ClientId "9471f355-173a-4466-b142-3d4acf848b03" -Scope "api://AzureADTokenExchange/.default" -Name "Blueprint"

Add-EntraIDFederatedCredentialTokenProfile -Name "Agent 1" -TenantId "237098ae-0798-4cf9-a3a5-208374d2dcfd" -ClientId "cd77c677-16ea-4f9d-b5b1-0aab1841694c" -FederatedAccessTokenProfile Blueprint -AgentIdentity -Scope "https://management.azure.com/.default"

Invoke-RestMethod "https://management.azure.com/subscriptions?api-version=2020-01-01" -Headers (GATH -Profile "Agent 1")

Access packages
Have you noticed this? Yes, agents can actually request access packages!
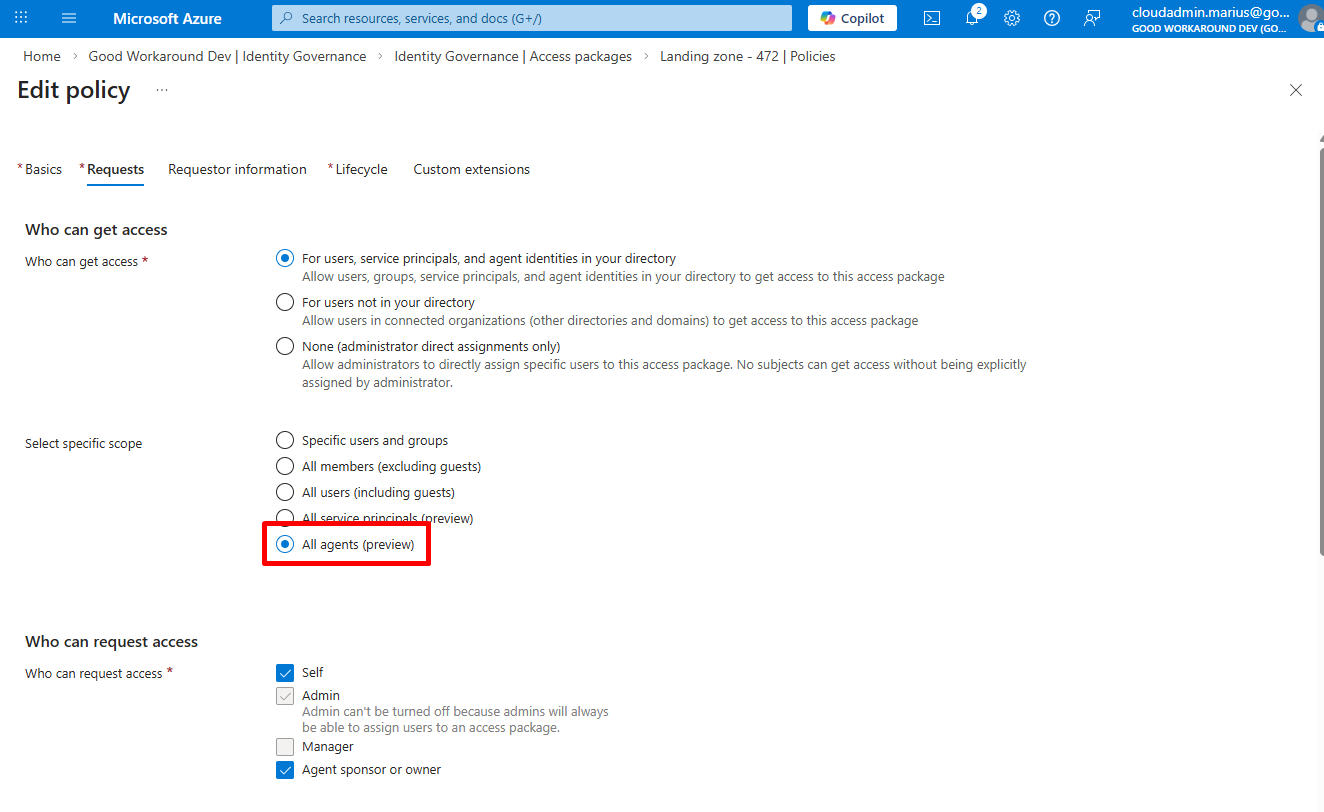
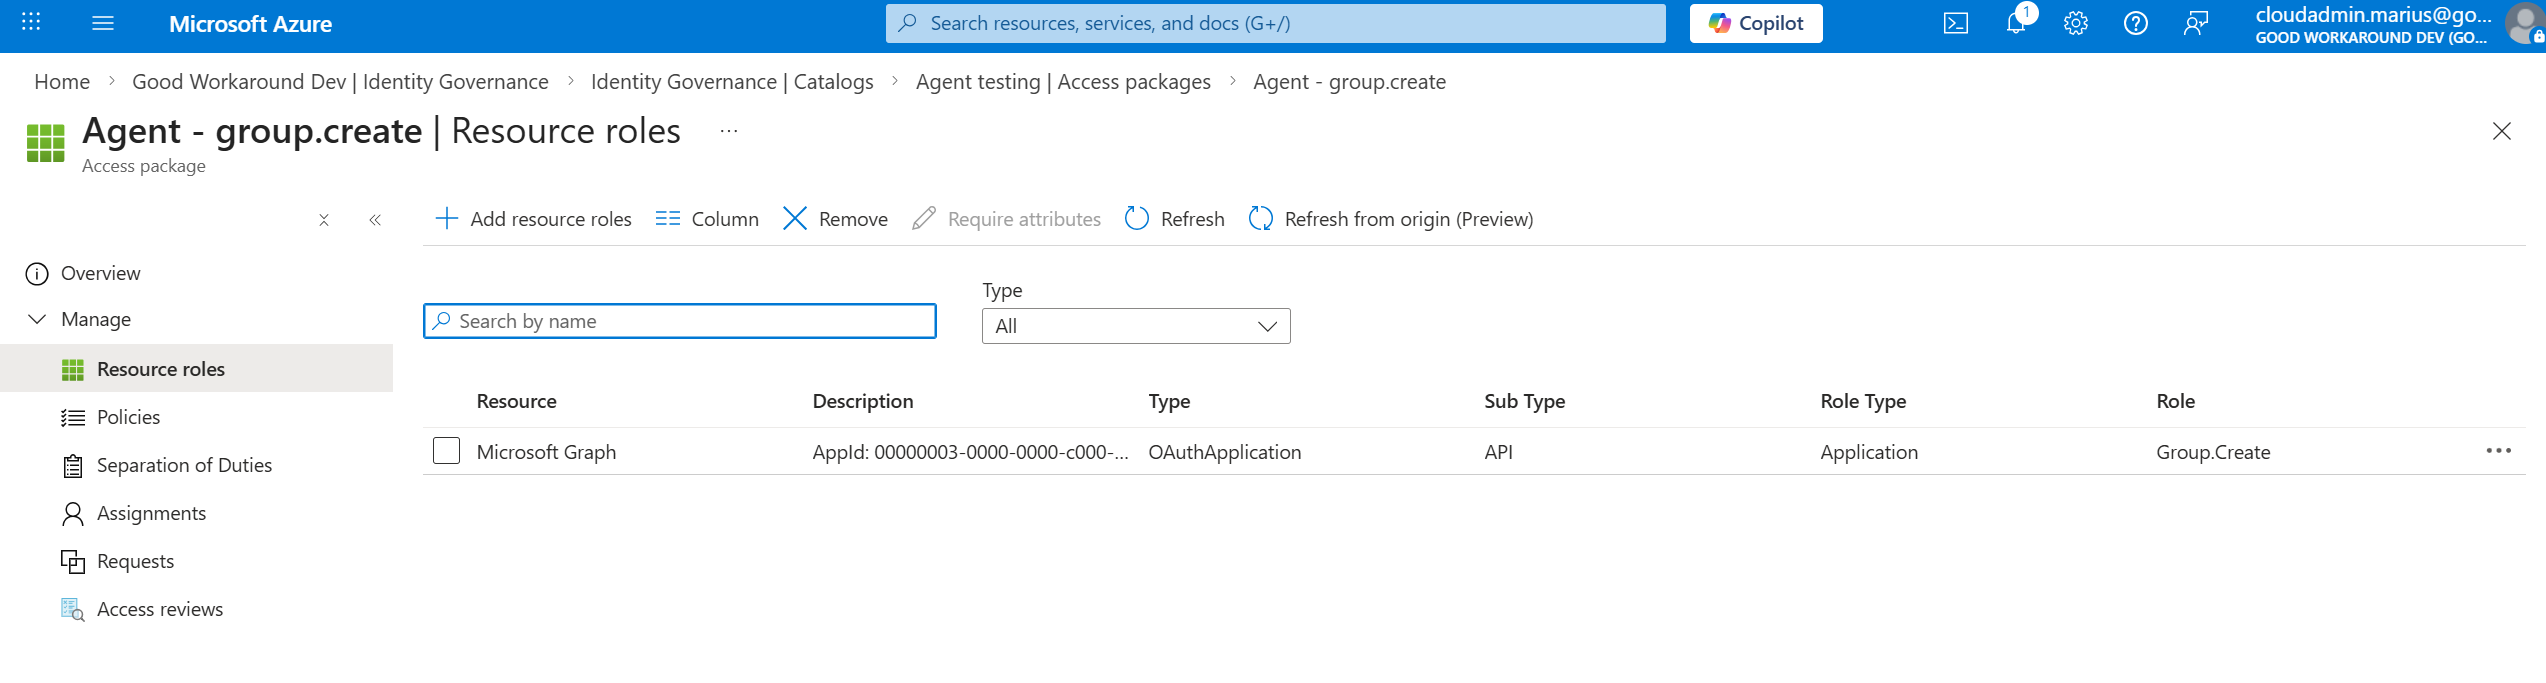
And also, we can now add application permissions to access packages!

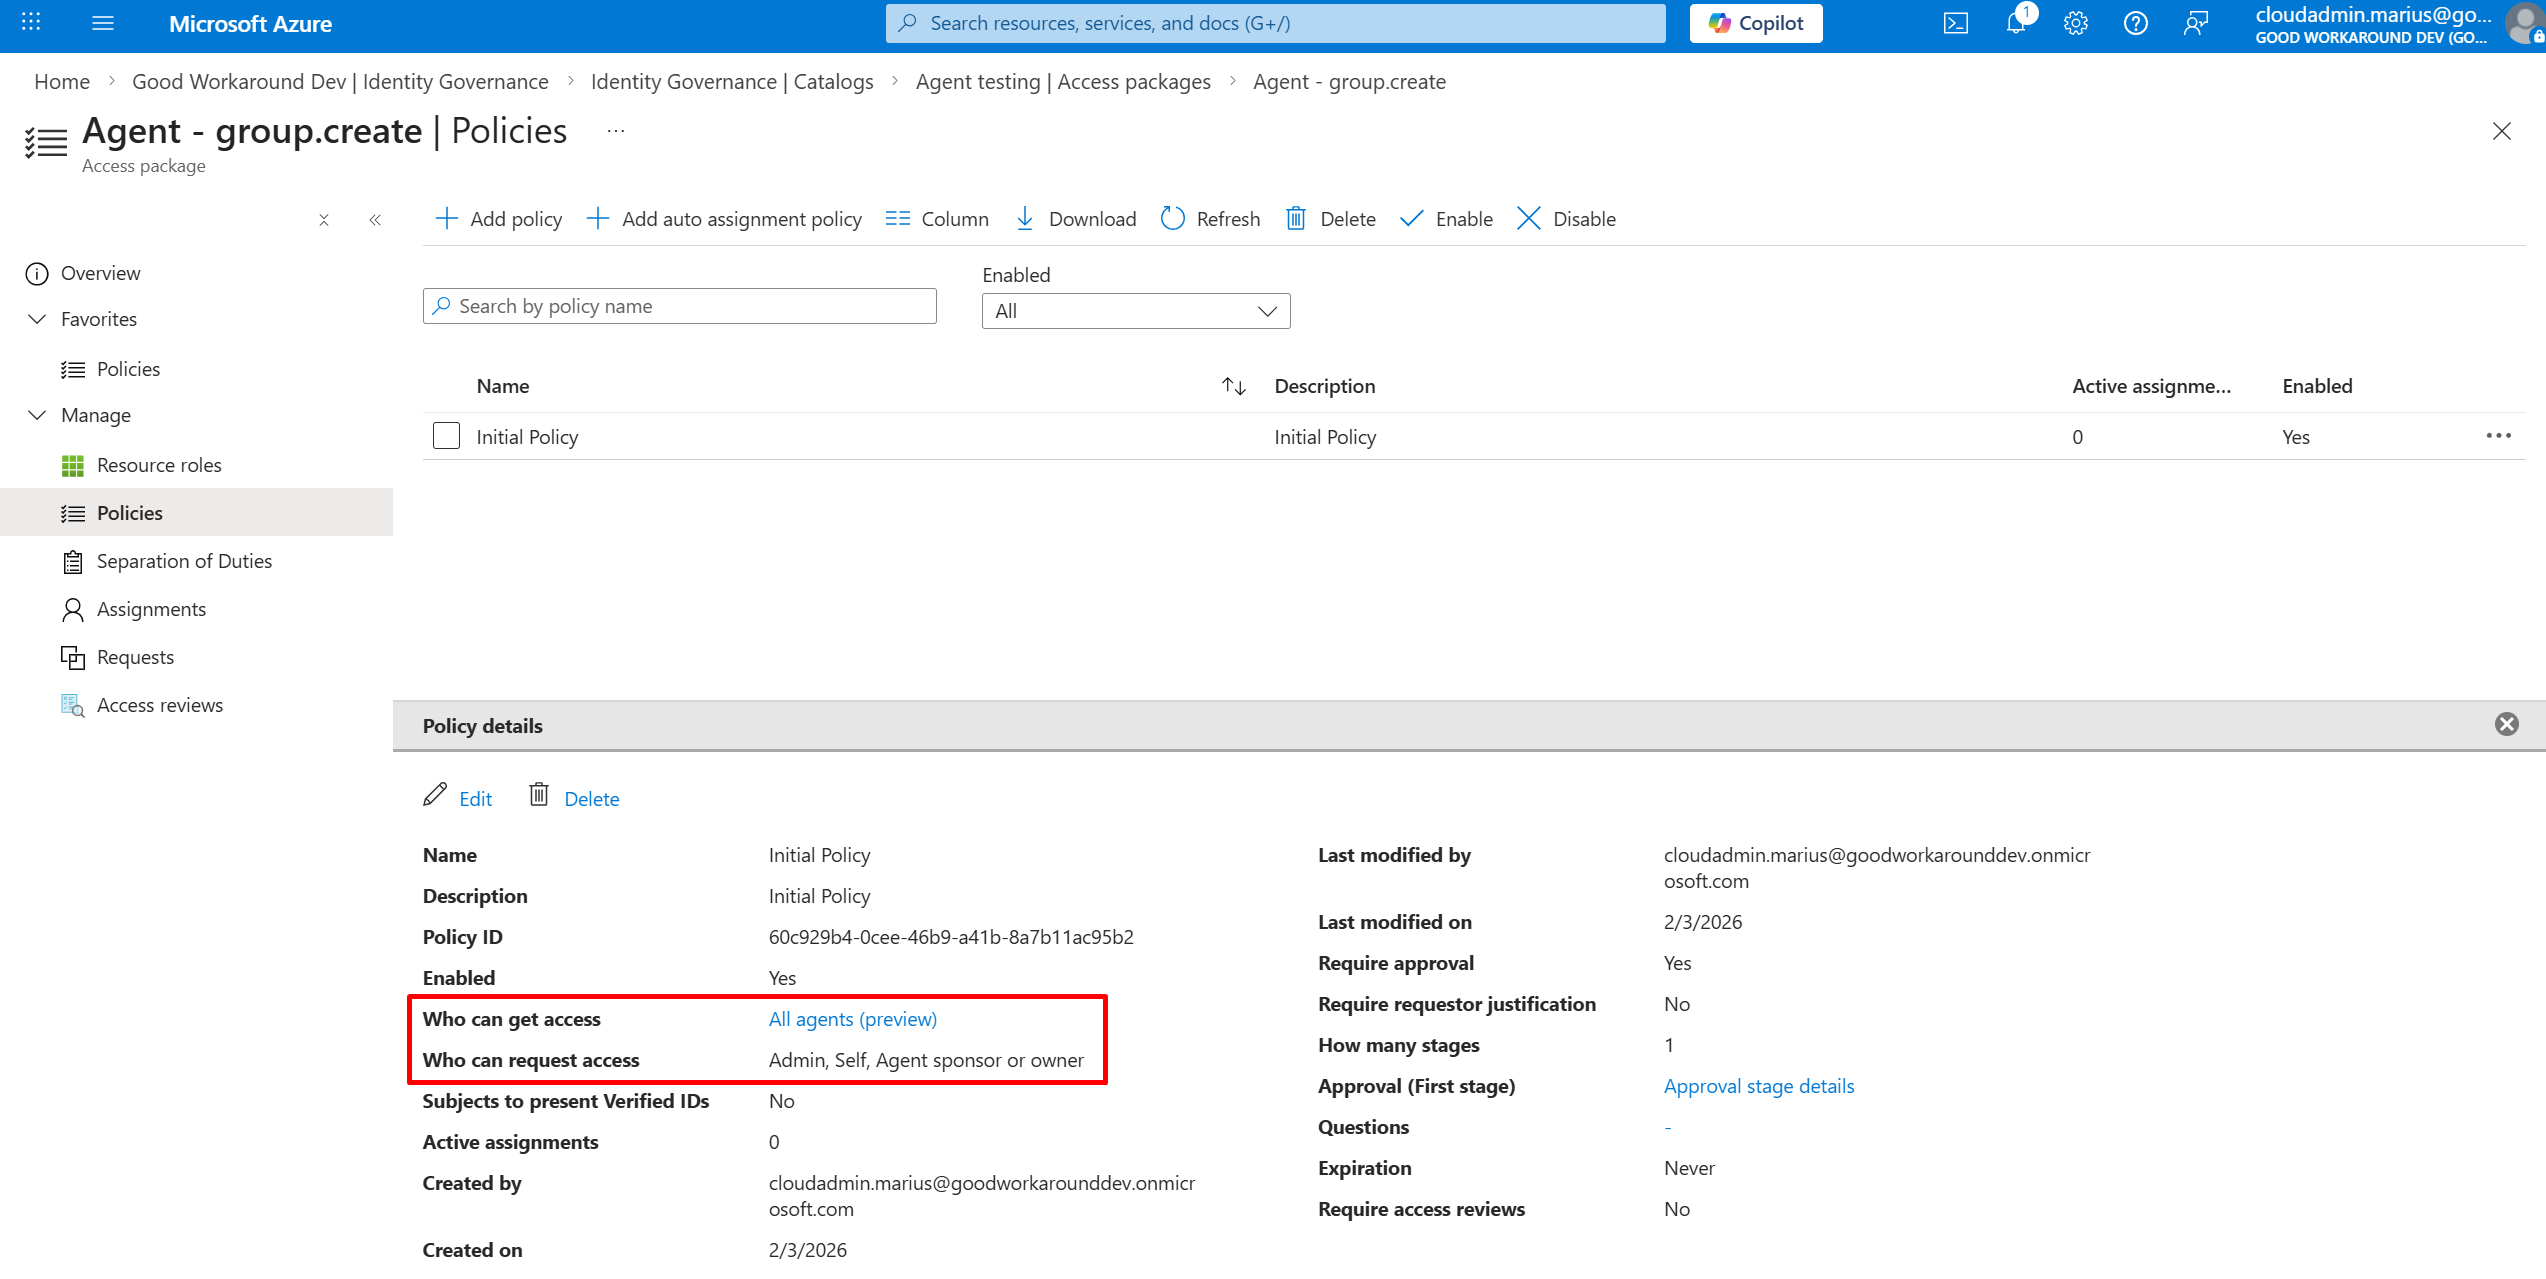
So, I have created an access package that All agents can request, with approval, that grants the Group.Create application permission:
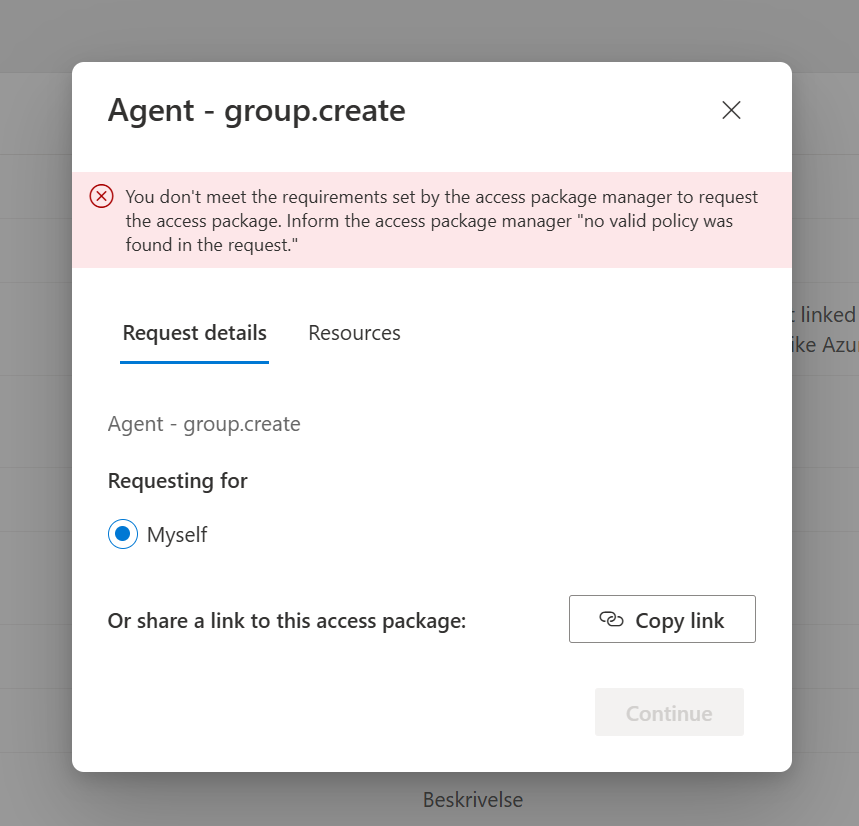
So for now (Until I figure out the agent can request the access by itself), I first tried adding a request through MyAccess, but failed (I believe this SHOULD work, but it doesn’t):
So instead, I tried to add the request like this:
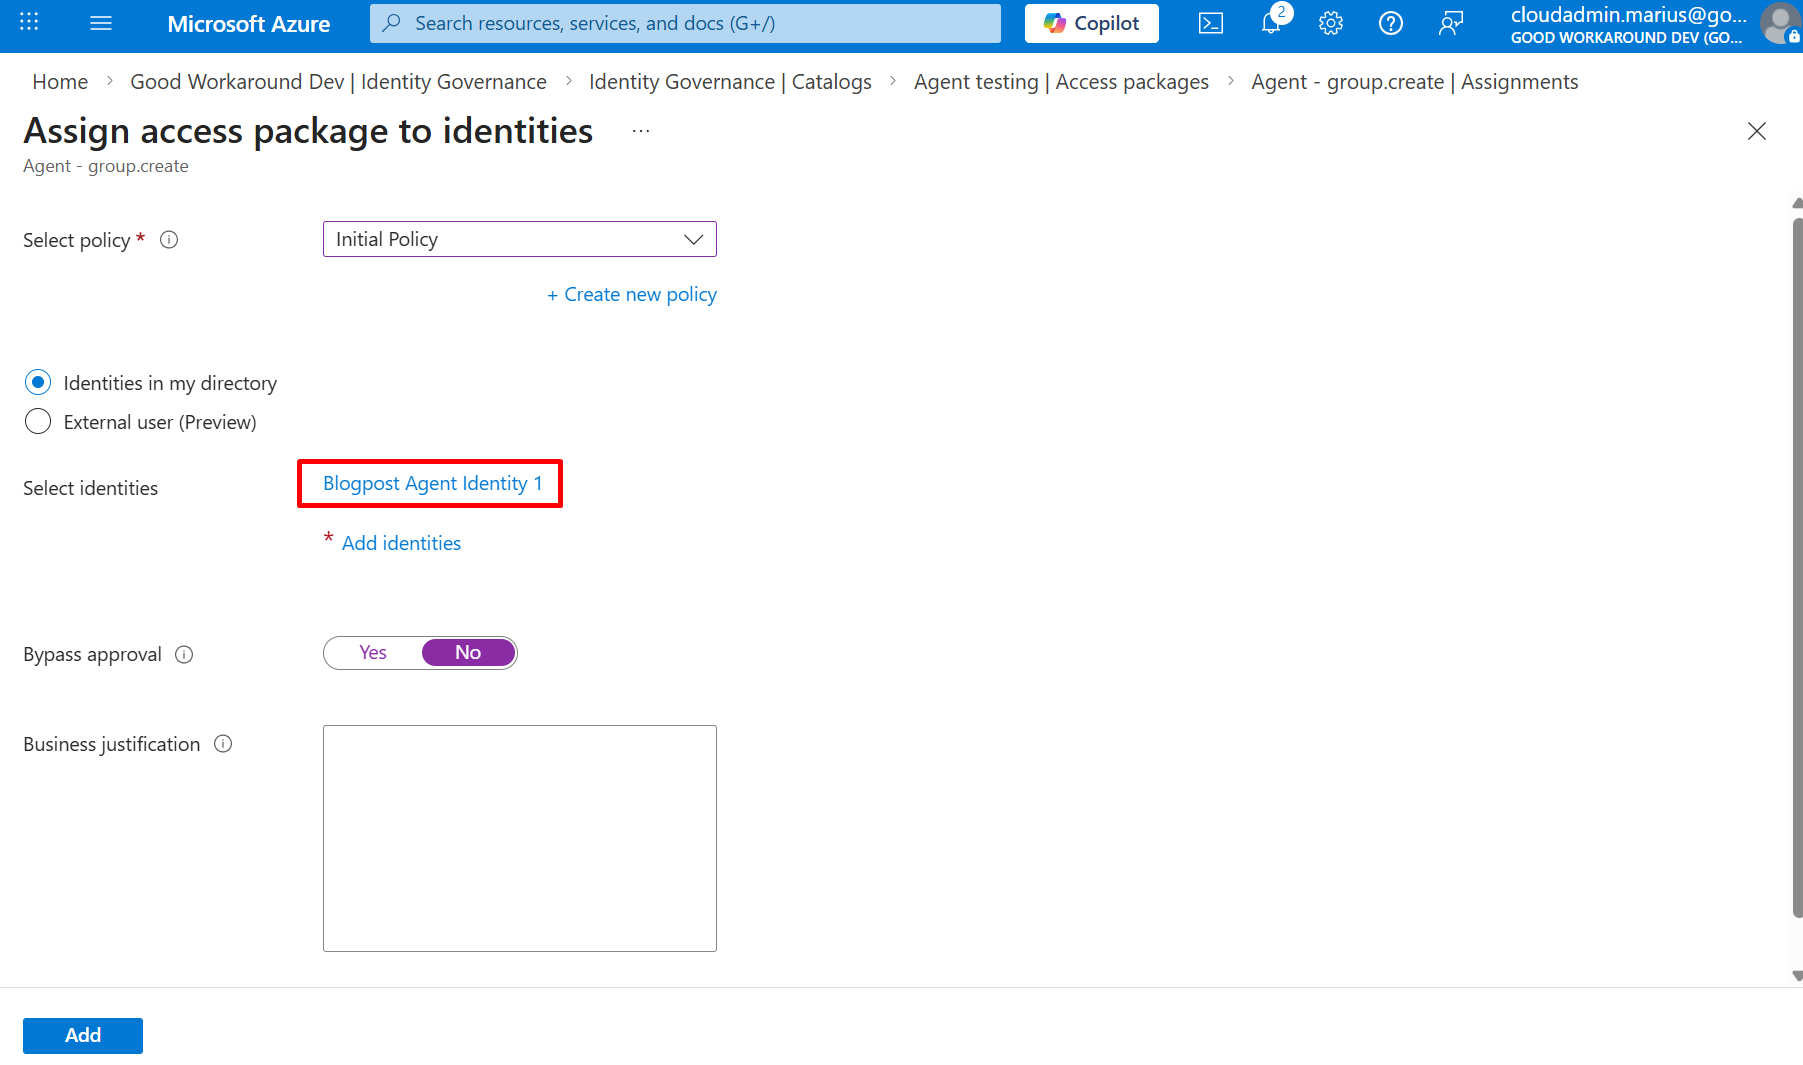
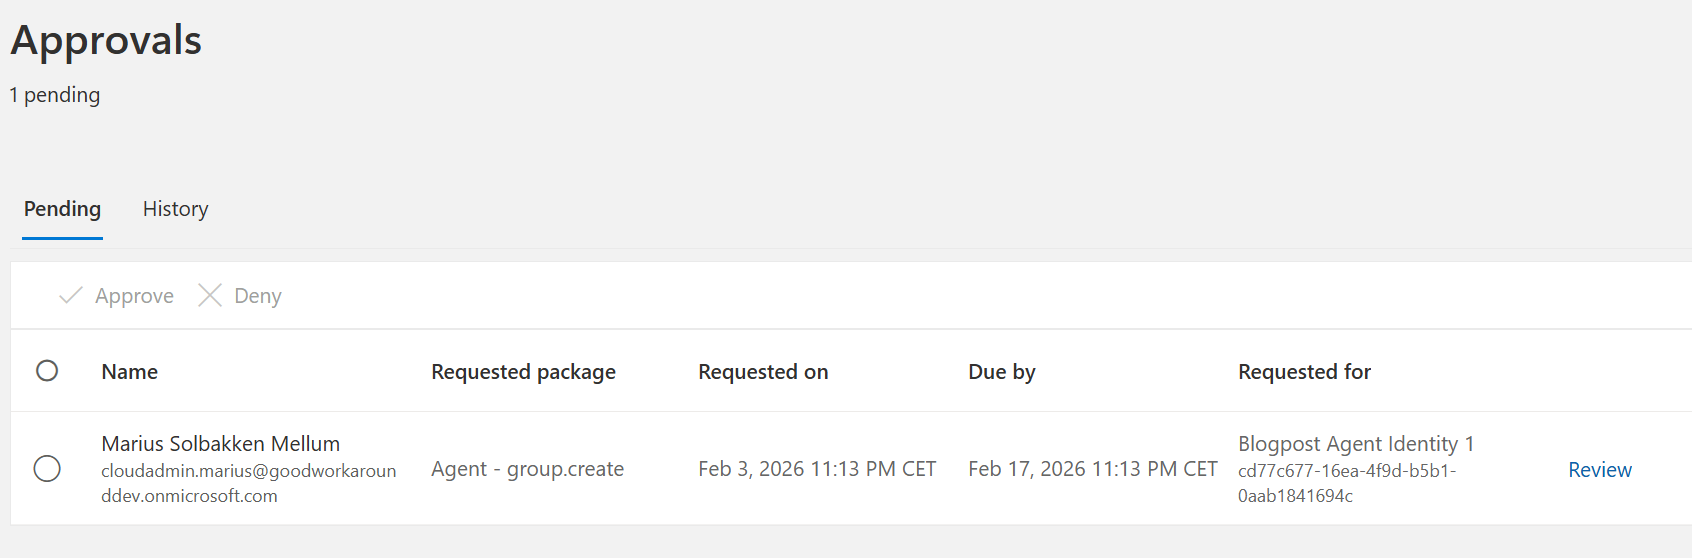
That worked, and I got a pending approval:
And we can see that the access package is being delivered:
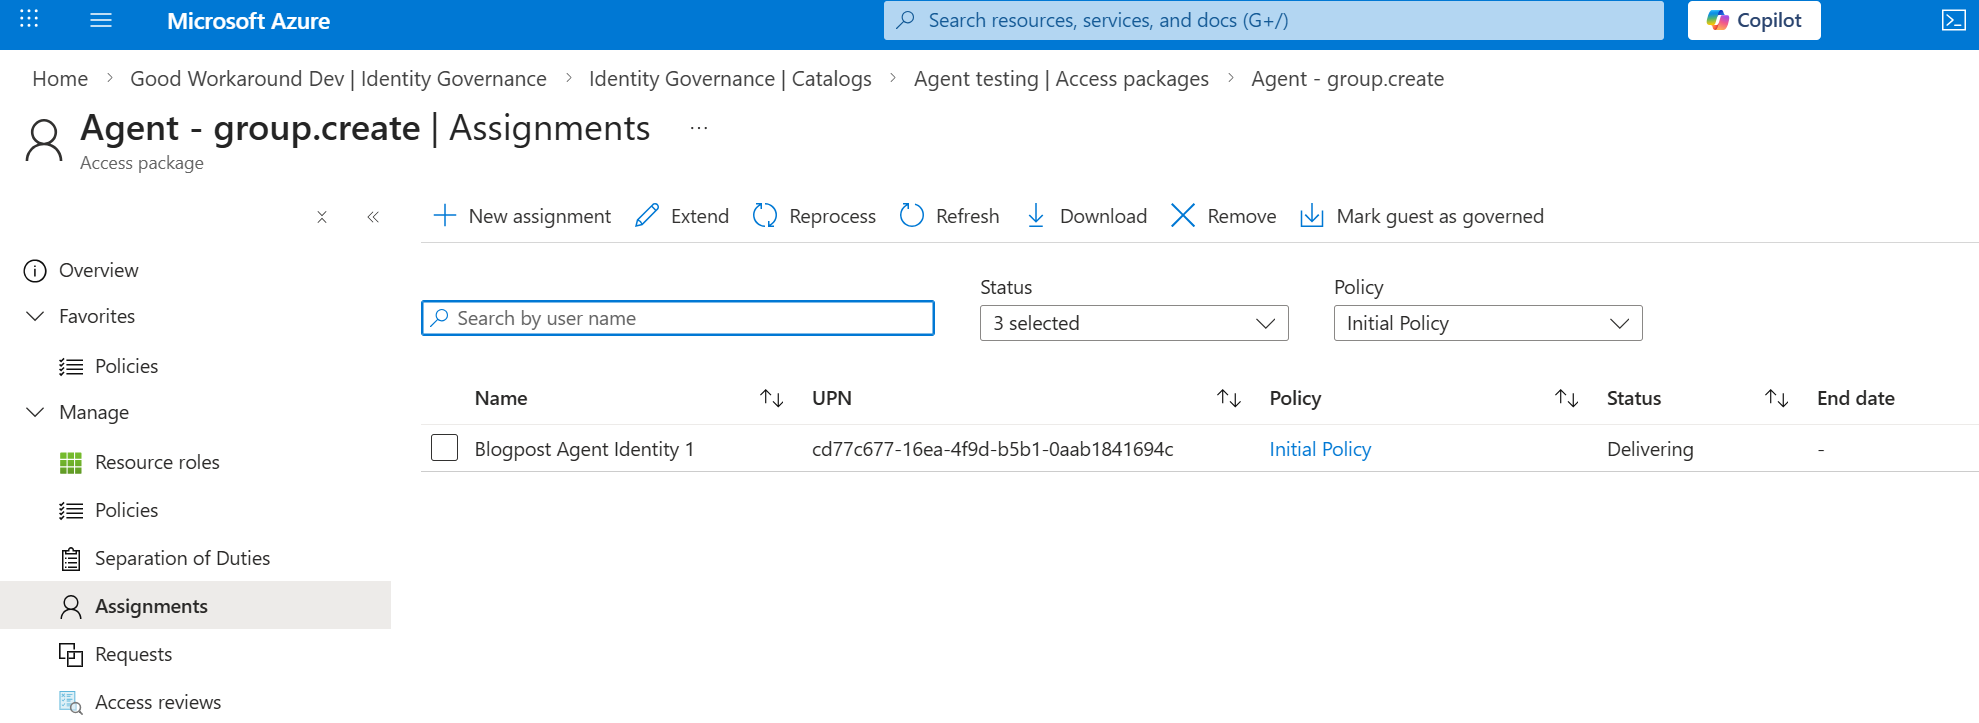
And this was then stuck forever with an error saying Request_BadRequest: One or more properties are invalid
The reason why this happens, is that there are several application permissions that is blocked for being assigned to Agent Identities. I could not find a comprehensive list of these.
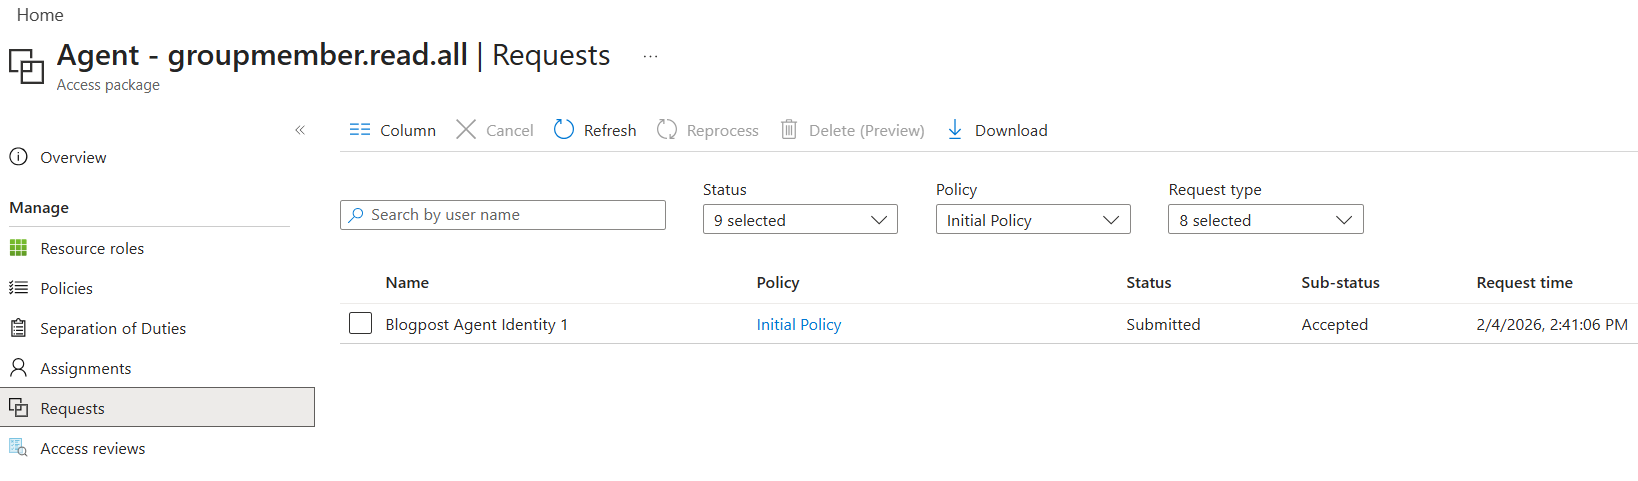
I changed the access package to groupmember.read.all instead, which I know is available to Agent Identities, and it worked:
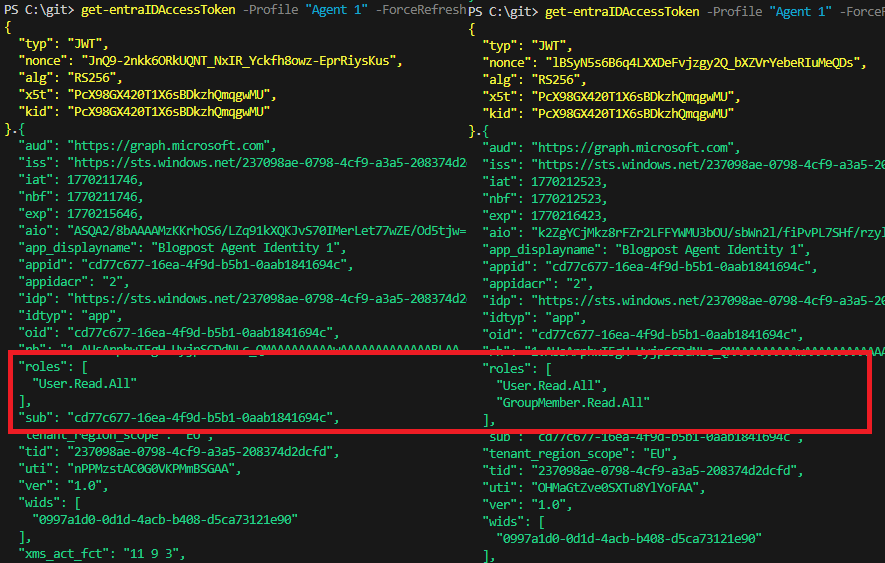
And after this, I can see my access token changing with a new role claim!
So to summarize this, rather than admin consent being the workflow, it should now be access packages. The access packages should be requested either by the agent itself, or by the manager or sponsor (Which currently seem not to work in MyAccess).
Ok, so now we have the autonomous flow in place. In the next blog post we will look at the Agent user flow before we tackle the On behalf of flow.
