Configuring the SharePoint Services Connector for FIM 2010 R2 for ADFS authentication

Here is a quick article on how to configure the SharePoint Services Connector for provisioning user profiles for ADFS authenticated users. I did not find any particularly good articles on the attributes required, so here is a quick reference on what I did no make things work with ADFS authentication.

This is not a guide on how to configure the MA. You should find good information on how to do that here.

There are 5 attributes that are important. Here is a table for you.

Attribute Initial only Description
SPS-ClaimID   This is the value of the identifier claim. This means that if you use userPrincipalname as identifier, this should be marius@goodworkaround.com, or if you use EmployeeID this should be 10032.
SPS-ClaimProviderID   This is the case sensitive name of the Trusted Identity Provider configured in SharePoint. If your Trusted Identity Provider is called “SAML Users”, this value should be “SAML Users”.
SPS-ClaimProviderType   When doing ADFS authentication, this should be the constant “Trusted”. (Btw, if you are doing Windows authentication, this should be “Windows”)
ProfileIdentifier   This value is a bit weird when it comes to ADFS authentication. It is required, and it must be unique, and it mst be on the form “someting:unique” (something colon unique). I usually fill this with “ID:value of SPS-ClaimID”; for example “ID:10032” or “ID:marius@goodworkaround.com“.
Anchor yes Another required value that must be unique. I use the same value as the SPS-ClaimID, so marius@goodworkaround.com or 10032. The reason this attribute must be configure as initial only, is that the Anchor will actually change and overwriting it may cause some strange behavior.

Functions for base 64 in PowerShell

There are no default functions available in PowerShell for encoding and decoding base 64 strings. However, the .NET libraries contain this. Here are two wrapper functions ConvertFrom-Base64 and ConvertTo-Base64 that you can use to make this easier.


function ConvertTo-Base64
{
    [CmdletBinding(DefaultParameterSetName='String')]
    [OutputType([String])]
    Param
    (
        # String to convert to base64
        [Parameter(Mandatory=$true,
                   ValueFromPipeline=$true,
                   ValueFromRemainingArguments=$false,
                   Position=0,
                   ParameterSetName='String')]
        [ValidateNotNull()]
        [ValidateNotNullOrEmpty()]
        [string]
        $String,

        # Param2 help description
        [Parameter(ParameterSetName='ByteArray')]
        [ValidateNotNull()]
        [ValidateNotNullOrEmpty()]
        [byte[]]
        $ByteArray
    )

    if($String) {
        return [System.Convert]::ToBase64String(([System.Text.Encoding]::UTF8.GetBytes($String)));
    } else {
        return [System.Convert]::ToBase64String($ByteArray);
    }
}


function ConvertFrom-Base64 {
    [CmdletBinding()]
    Param(
        [Parameter(Mandatory=$True,
                   Position=0,
                   ValueFromPipeline=$true)]
        [ValidateNotNull()]
        [ValidateNotNullOrEmpty()]
        [string]
        $Base64String
    )

    return [System.Text.Encoding]::UTF8.GetString(([System.Convert]::FromBase64String($Base64String)));
}

These two functions are a part of my PowerShell $profile, which I will create an article about later.

Converting LastLogonTimeStamp from Active Directory to Datetime

I often find myself needing to convert the LastLogonTimeStamp attribute from Active Directory to Datetime with PowerShell. What I have done, is that in my PowerShell profile ($profile) I have added a function ConvertFrom-LastLogonTimeStamp to get the value as a Datetime.

Easier to remember!


function ConvertFrom-LastLogonTimestamp
{
    [CmdletBinding()]
    [OutputType([datetime])]
    Param
    (
        # LastLogonTimestamp from AD
        [Parameter(Mandatory=$true,
                   ValueFromPipeline=$true,
                   Position=0)]
        [String] $LastLogonTimestamp
    )

    return [datetime]::FromFileTime($LastLogonTimestamp)
}

Graphing with PowerShell done easy

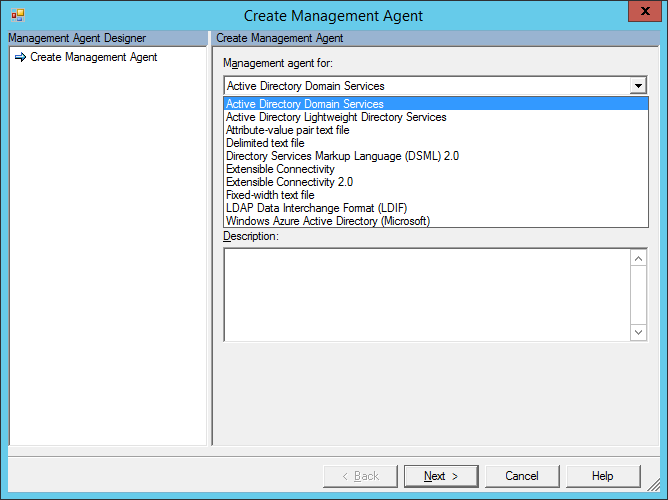
PowerShell is nice for getting textual output, csv output, xml output, etc, but there are no built in charting tools. However, luckily PowerShell is based on .NET, which means all the libraries for .NET is available to us. In this article I will show you how to use the Microsoft Chart Controls together with PowerShell to create charts.

The first thing you need to do is to install the Microsoft Chart Controls from here. After this, you can verify with the following lines of code whether you are able to load the assemblies.


[void][Reflection.Assembly]::LoadWithPartialName("System.Windows.Forms")
[void][Reflection.Assembly]::LoadWithPartialName("System.Windows.Forms.DataVisualization")

This should hopefully just return without output. If so, you are good to go.

To make things a bit easier than working directly with objects, I have made a simple module to create new charts, add datasets to them and display them. The following can either be just pasted into a PowerShell, or better, added to a separate “.psm1” file and loaded with Import-Module.

# Load assembly for Microsoft Chart Controls for Microsoft .NET Framework 3.5
Write-Verbose "Loading assemblies"
[void][Reflection.Assembly]::LoadWithPartialName("System.Windows.Forms")
[void][Reflection.Assembly]::LoadWithPartialName("System.Windows.Forms.DataVisualization")


function New-Chart
{
    [CmdletBinding()]
    [OutputType([System.Windows.Forms.DataVisualization.Charting.ChartArea])]
    Param
    (
        # Dataset
        [Parameter(Mandatory=$false,
                   ValueFromPipelineByPropertyName=$false,
                   Position=0)]
        $Dataset,

        # Width
        [Parameter(Mandatory=$false,
                   ValueFromPipelineByPropertyName=$false)]
        [int]$Width = 500,

        # Height
        [Parameter(Mandatory=$false,
                   ValueFromPipelineByPropertyName=$false)]
        [int]$Height = 500,

        # X Interval
        [Parameter(Mandatory=$false,
                   ValueFromPipelineByPropertyName=$false)]
        [int]$XInterval,

        # Y Interval
        [Parameter(Mandatory=$false,
                   ValueFromPipelineByPropertyName=$false)]
        [int]$YInterval,

        # X Title
        [Parameter(Mandatory=$false,
                   ValueFromPipelineByPropertyName=$false)]
        [string]$XTitle,

        # Y Title
        [Parameter(Mandatory=$false,
                   ValueFromPipelineByPropertyName=$false)]
        [string]$YTitle,

        # Title
        [Parameter(Mandatory=$false,
                   ValueFromPipelineByPropertyName=$false)]
        [string]$Title


    )

    # Create chart
    Write-Verbose "Creating chart $Width x $Height"
    $Chart = New-object System.Windows.Forms.DataVisualization.Charting.Chart
    $Chart.Width = $Width
    $Chart.Height = $Height
    $Chart.Left = 0
    $Chart.Top = 0

    # Add chart area to chart
    $ChartArea = New-Object System.Windows.Forms.DataVisualization.Charting.ChartArea
    $Chart.ChartAreas.Add($ChartArea)

    # Set titles and lables
    if($Title) {
        Write-Verbose "Setting title: $Title"
        [void]$Chart.Titles.Add($Title)
    } else {
        Write-Verbose "No title provided"
    }

    if($YTitle) {
        Write-Verbose "Setting Ytitle: $YTitle"
        $ChartArea.AxisY.Title = $YTitle
    } else {
        Write-Verbose "No Ytitle provided"
    }

    if($XTitle) {
        Write-Verbose "Setting Xtitle: $XTitle"
        $ChartArea.AxisX.Title = $XTitle
    } else {
        Write-Verbose "No Xtitle provided"
    }

    if($YInterval) {
        Write-Verbose "Setting Y Interval to $YInterval"
        $ChartArea.AxisY.Interval = $YInterval
    }

    if($XInterval) {
        Write-Verbose "Setting X Interval to $XInterval"
        $ChartArea.AxisX.Interval = $XInterval
    }

    if($Dataset) {
        Write-Verbose "Dataset provided. Adding this as ""default dataset"" with chart type line."
        [void]$Chart.Series.Add("default dataset")
        $Chart.Series["default dataset"].Points.DataBindXY($Dataset.Keys, $Dataset.Values)
        $Chart.Series["default dataset"].ChartType = [System.Windows.Forms.DataVisualization.Charting.SeriesChartType]::Line
    }

    return $Chart
}


function Add-ChartDataset
{
    [CmdletBinding()]
    [OutputType([System.Windows.Forms.DataVisualization.Charting.ChartArea])]
    Param
    (
        # Chart
        [Parameter(Mandatory=$true,
                   ValueFromPipeline=$true,
                   Position=0)]
        $Chart,

        # Dataset
        [Parameter(Mandatory=$true,
                   ValueFromPipelineByPropertyName=$false,
                   Position=0)]
        $Dataset,

        # DatasetName
        [Parameter(Mandatory=$false,
                   ValueFromPipelineByPropertyName=$false,
                   Position=1)]
        [string]$DatasetName = "Added dataset",

        # SeriesChartType = http://msdn.microsoft.com/en-us/library/system.windows.forms.datavisualization.charting.seriescharttype(v=vs.110).aspx
        [Parameter(Mandatory=$false,
                   ValueFromPipelineByPropertyName=$false,
                   Position=2)]
        [string]$SeriesChartType = "Line"
    )

    Write-Verbose "Adding series $Datasetname"
    [void]$Chart.Series.Add($DatasetName)

    Write-Verbose "Adding data binding"
    $Chart.Series[$DatasetName].Points.DataBindXY($Dataset.Keys, $Dataset.Values)

    Write-Verbose "Setting chart type to $SeriesChartType"
    $Chart.Series[$DatasetName].ChartType = [System.Windows.Forms.DataVisualization.Charting.SeriesChartType]::$SeriesChartType

    return $Chart
}


function Show-Chart
{
    [CmdletBinding()]
    [OutputType([void])]
    Param
    (
        # Chart
        [Parameter(Mandatory=$true,
                   ValueFromPipeline=$true,
                   Position=0)]
        $Chart
    )

    # display the chart on a form
    $Chart.Anchor = [System.Windows.Forms.AnchorStyles]::Bottom -bor [System.Windows.Forms.AnchorStyles]::Right -bor [System.Windows.Forms.AnchorStyles]::Top -bor [System.Windows.Forms.AnchorStyles]::Left
    $Form = New-Object Windows.Forms.Form
    $Form.Text = "PowerShell Chart"
    $Form.Width = $chart.Width
    $Form.Height = $chart.Height + 50
    $Form.controls.add($Chart)
    $Form.Add_Shown({$Form.Activate()})
    $Form.ShowDialog() | Out-Null
}

The functions are documented in the module, and available with Get-Help.

Here is a demo script using the functions:

Import-Module .\GoodWorkaroundCharts-v0.1.psm1 -Force

# Create simple dataset
$simpleDataset = @{
    "Microsoft" = 800
    "Apple" = 250
    "Google" = 400
    "RIM" = 0
}

# Create chart and show it
New-Chart -Dataset $simpleDataset | Show-Chart


# Create ordered hashmap
$osloTemperature = [ordered]@{}

# Request weather data for Oslo, and put into dataset
[xml]$weather = (Invoke-WebRequest -Uri http://www.yr.no/place/Norway/Oslo/Oslo/Oslo/varsel.xml).Content
$weather.weatherdata.forecast.tabular.time | foreach {
    $osloTemperature[$_.from] = $_.temperature.value
}

# Create chart, add dataset and show
New-Chart -Title "Temperature in Oslo" -XInterval 4 -YInterval 2 -Width 1200 |
    Add-ChartDataset -Dataset $osloTemperature -DatasetName "Temperature" -SeriesChartType Spline -OutVariable tempChart |
    Show-Chart

# Save the chart as a PNG to the desktop
$tempChart.SaveImage($Env:USERPROFILE + "\Desktop\Chart.png", "PNG")

Hope that helps someone!

Example for using classes in PowerShell – New-Progressbar

PowerShell is a fairly easy language to learn, but to some extent, creating classes is a bit of a hidden concept. The way to do it is to wrap functions in a module and use Export-ModuleMember to make them externally visible. Here is an easy to understand example of implementing the Write-Progress cmdlet in an even easier way.


function New-Progressbar
{
    [CmdletBinding()]
    Param
    (
        # Total count
        [Parameter(Mandatory=$true,
                   ValueFromPipelineByPropertyName=$false,
                   Position=0)]
        [int]$TotalCount,

        # Activity name
        [Parameter(Mandatory=$false,
                   ValueFromPipelineByPropertyName=$false,
                   Position=1)]
        [string]$ActivityName = "Running",

        # Time estimation
        [Parameter(Mandatory=$false,
                   ValueFromPipelineByPropertyName=$false,
                   Position=2)]
        [boolean]$TimeEstimationEnabled = $true
    )

    # Create new module instance
    $m =  New-Module -ScriptBlock {
        # Internal variables
        $script:total = 1;
        $script:current = 0;
        $script:ActivityName = " ";
        $script:startTime = Get-Date;
        $script:timeEstimation = $false;
        # Functions with obvious method names
        function setActivityName($name) {$script:ActivityName = $name}
        function setTotal($tot) { $script:total = $tot}
        function getTotal($tot) { return $script:total}
        function enableTimeEstimation() {$script:timeEstimation = $true}
        function disableTimeEstimation() {$script:timeEstimation = $false}


        # Progress the progressbar one step. Optional parameter Text for defining the status message
        function Progress {
            Param
            (
                [Parameter(Mandatory=$false,
                    ValueFromPipelineByPropertyName=$false,
                    Position=0)]
                [string]$Text = ("{0}/{1}" -f $script:current, $script:total)
            )

            $params = @{
                Activity = $script:ActivityName
                Status = $Text
                PercentComplete = ($script:current / $script:total * 100)
            }

            if($script:timeEstimation) {
                if($script:current -gt 5) {
                    $params["SecondsRemaining"] = (((Get-Date) - $script:startTime).TotalSeconds / $script:current) * ($script:total - $script:current)
                }
            }

            Write-Progress @params

            if($script:current -lt $script:total) {
                $script:current += 1
            } else {
                Write-Warning "Progressbar incremented too far"
            }
        }
        function Complete() {Write-Progress -Activity $script:ActivityName -Status $script:total -PercentComplete 100 -Completed}
        export-modulemember -function setTotal,getTotal,Progress,Complete,setActivityName,enableTimeEstimation,disableTimeEstimation
    } -AsCustomObject

    # Set initial values
    $m.setTotal($TotalCount)
    $m.setActivityName($ActivityName)

    if($TimeEstimationEnabled) {
        $m.enableTimeEstimation()
    }

    return $m;
}

To use it, simply copy and paste the code into any PowerShell. After doing this, you have a new cmdlet available – New-Progressbar. You can use Get-Help New-ProgressBar -Full to get example usage, but here is a quick example script:

# Get a big list of files of unknown size
$files = @(dir $env:SystemRoot | select -First (Get-Random -Minimum 10 -Maximum 100))

# Create progressbar
$bar = New-Progressbar -TotalCount $files.Count -ActivityName "Processing files"

# Pretend to process files in order to progress the progressbar
$files | foreach {
    $bar.Progress($_.Name)
    sleep -Milliseconds 100
}

# Complete the progressbar
$bar.Complete()

As you can see, $bar is here a custom class with methods presented through the module. You can have internal methods too; only the methods exported by Export-ModuleMember is available externally.

Hope this helps someone as a quick reference to creating a PowerShell module.

Using PowerShell to determine which mailboxes are actually in use

Here is a PowerShell script I’ve created which give you a csv file containing all the information you should need for determining which mailboxes are in use or not. I have primarily used it to determine which shared mailboxes are no longer active and should be deleted. The script supports both Exchange on-premises and Exchange Online.

When connecting to on-premises Exchange, the script requires the Exchange admin tools. This means you can run it from your Exchange server, or any other computer with this installed. If you use Exchange Online, there is no such requirement.

In both cases, the Active Directory PowerShell module is required.


function Create-MailboxReport {
    [CmdletBinding()]
    Param
    (
        [Parameter(Mandatory=$False,Position=0)]
        [string]$CSV = "report.csv",

        [Parameter(Mandatory=$False,Position=1)]
        [int]$MaxResults = 10000,

        [Parameter(Mandatory=$false)]
        $ADFilter = {msExchRecipientTypeDetails -eq 2},

        [Parameter(Mandatory=$false)]
        [bool] $ExchangeOnline = $false,

        [Parameter(Mandatory=$false)]
        [ValidateSet("sAMAccountName", "userPrincipalName", "DistinguishedName", "mailNickname")]
        $ExchangeIdentifierAttribute = "sAMAccountName"
    )

    # Different approach between on-premises Exchange and Exchange Online
    if($ExchangeOnline) {
        # If Connect-ExchangeServer is available, we are in an Exchange PowerShell. That means we cannot load the Exchange Online cmdlets.
        if(Get-Command "Connect-ExchangeServer" -ErrorAction SilentlyContinue -WarningAction SilentlyContinue) {
            Write-Error "Sorry, you are running an Exchange PowerShell and trying to connect to Exchange Online. Please open a regular PowerShell."
            return;
        }

        # If Get-Mailbox already exists, there is not reason to connect again.
        if(!(Get-Command "Get-Mailbox" -ErrorAction SilentlyContinue -WarningAction SilentlyContinue)) {
            Write-Verbose "Connecting to Exchange Online"
            $Session = New-PSSession -ConfigurationName Microsoft.Exchange -ConnectionUri https://ps.outlook.com/powershell -Authentication Basic -AllowRedirection -Credential (Get-Credential)
            Import-PSSession $session -DisableNameChecking
        } else {
            Write-Verbose "Already connected to Exchange Online?"
        }
    } else {
        # Load RemoteExchange if Connect-ExchangeServer is not present
        if(!(Get-Command "Connect-ExchangeServer" -ErrorAction SilentlyContinue -WarningAction SilentlyContinue)) {
            Write-Verbose "Loading RemoteExchange"
            $remoteExchange = 'C:\Program Files\Microsoft\Exchange Server\V14\Bin\RemoteExchange.ps1'
            if(Test-Path $remoteExchange) {
                . $remoteExchange
            } else {
                Write-Error "Could not find $remoteExchange"
                return;
            }
        }

        Write-Verbose "Connecting to Exchange on-premises"
        Connect-ExchangeServer -Auto
    }

    Write-Verbose "Loading AD module"
    Import-Module ActiveDirectory -Verbose:$false

    Write-Verbose ("Getting max {0} users from AD matching filter: {1}" -f $MaxResults, $ADFilter)
    Write-Progress -Activity "Getting user objects from AD" -Status " " -PercentComplete 20
    $adusers = Get-ADUser -filter $ADFilter -Properties lastlogontimestamp,whencreated,DisplayName,altRecipient,msExchHideFromAddressLists,Manager,msExchDelegateListLink,mailNickname -ResultSetSize $MaxResults
    Write-Progress -Activity "Getting user objects from AD" -Status " " -PercentComplete 100 -Completed

    $inc = 1;
    $adusers | foreach{
        $AD = $_ # This makes it a bit more easy to read
        Write-Progress -Activity "Running" -Status ("{0}/{1} - {2}" -f $inc, $adusers.Count, $AD.SamAccountName) -PercentComplete ($inc / $adusers.Count * 100) ; $inc++
        Write-Debug "Getting mailbox statitics"

        # Get mailbox statistics for mailbox. If it fails, give warning but continue with the rest of the mailboxes.
        $MAILBOXSTATISTICS = Get-MailboxStatistics -Identity $AD.$ExchangeIdentifierAttribute -WarningAction SilentlyContinue -ErrorAction SilentlyContinue
        if(!$MAILBOXSTATISTICS) {
            Write-Warning ("Could not find mailbox statics for {0}" -f $AD.$ExchangeIdentifierAttribute )
            return;
        }

        # Get all mailboxe permissions that are not inherited, that is not on the form "NT AUTHORITY\SELF" and the SID is resolvable
        Write-Debug "Getting mailbox permissions"
        $MAILBOXPERMISSION = Get-MailboxPermission -Identity $AD.$ExchangeIdentifierAttribute | where{!$_.IsInherited} | where{([string]$_.User) -notlike "NT AUTH*"} | where{([string]$_.User) -notlike "S-1-5-21-*"}
        Write-Debug ("Found {0} mailbox permissions" -f ($MAILBOXPERMISSION | measure).Count)

        # Extract a few attributes
        $lastlogontimestamp = if($AD.lastlogontimestamp){$AD.lastlogontimestamp}else{0}


        # Create hashmap with all properties
        $properties = @{
            DisplayName = $AD.DisplayName
            sAMAccountName = $AD.SamAccountName
            MailboxItemCount = $MAILBOXSTATISTICS.ItemCount
            MailboxTotalItemSize = $MAILBOXSTATISTICS.TotalItemSize
            MailboxLastAccessedTime = $MAILBOXSTATISTICS.LastLogonTime
            ADObjectWhenCreated = $AD.whencreated
            DistinguishedName = $AD.DistinguishedName
            HiddenFromAddressListsEnabled = $AD.msExchHideFromAddressLists
            ForwardedTo = $AD.altRecipient
            LastLoggedOnUserAccount = $MAILBOXSTATISTICS.LastLoggedOnUserAccount
            Manager = $AD.Manager
            NumberOfAutomappings = ($AD.msExchDelegateListLink | measure).Count
            NumberOfDelegations = ($MAILBOXPERMISSION | measure).Count
            ADObjectLastLogonTimeStamp = [datetime]::FromFileTime($lastlogontimestamp)
        }

        # Create custom object
        return New-Object -TypeName PSObject -Property $properties
    } | Export-Csv -Path $CSV -Encoding UTF8 -NoTypeInformation -Delimiter ";"

    Write-Progress -Activity "Running" -Status "Completed" -PercentComplete 100 -Completed
    Write-Output "$CSV created"
}

To use this script, just take the above script and paste it into PowerShell on the computer you want to run it from. This will define a new cmdlet, Create-MailboxReport, with several options. Here is some ways you can use it.

Create a report for the 10 first AD user objects that have the mail attribute, but not employeeid. The MaxResults paramter can be usefull when testing out a bigger report.
Create-MailboxReport -ADFilter {employeeid -notlike "*" -and mail -like "*"} -MaxResults 10

Create a report for the 10000 first mailboxes that you have in Exchange Online. (Takes many hours)
Create-MailboxReport -ADFilter {targetaddress -like "*.onmicrosoft.com"} -ExchangeOnline:$true -ExchangeIdentifierAttribute userPrincipalName

Create a report for the 10000 first mailboxes in office 365 where the on-premises samaccountname starts with MBX
Create-MailboxReport -ADFilter {targetaddress -like "*.onmicrosoft.com" -and samaccountname -like "MBX*"} -ExchangeOnline:$true -ExchangeIdentifierAttribute userPrincipalName

Create a report for all on-premises mailbox
Create-MailboxReport -ADFilter {homemdb -like "*"} -MaxResults 10000000

Then with the csv report, what i usually do is to open this in Excel and create filters on the columns. Here you can for example do things like the following.

  1. Find all shared mailboxes that have not been accessed the last 2 years (filter on LastAccessTime)
  2. Find all shared mailboxes that no-one has access to (filter on NumberOfDelegations)
  3. Find user accounts that have not been logged into for 6 months (filter on ADLastLogonTimestamp

Hope this saves someone a bit of time!

Playing around with the AADSync beta

The beta for the new AADSync tool has been released, and I have been playing around with it a little to discover whats in store and what we might expect from Microsoft Identity Manager (FIM vNext) when that comes out. This is a screenshot heave “try it for the first time and screenshot everything”-article. What I am trying is to see what the new rule editor can manage, and to see whether I can actually manage to provision users in a separate AD forest directly from AADSync.

I made it through the regular installation, which you can see documented somewhat here. This yielded a quite usual DirSync setup, but in miisclient.exe you cannot see attribute flows and filters. This is instead move to the “Synchronization Rules Editor”.

I started of creating a secondary AD management agent. The first ting i notice here is the amount of management agents available by default. This is in strong contrast to DirSync.


Not much to comment on in these screenshots, except for the fact that you cannot configure filters and attribute flow, everything is still FIM. New MA added:

Having a look at the default configure inbound and outbound rules in the new “Synchronization Rules Editor”.

I clicked “Add new rule”, and started on my inbound join rule for my “external.goodworkaround.com” AD, which is my second forest. I just want to see if I can provision user account into that forest based on the users in my “gwrnd.goodworkaround.com” primary forest.

Some new filtering possibilities available, that needed an extension before. However, there is no way of extending it yourself it seems.

Joining pager in AD with sourceAnchor in FIM.

I’ll just skip adding inbound attribute flow for now.

Added successfully.

The default list of outbound sync rules.

Trying to create a outbound provisioning rule to my “external.goodworkaround.com” forest.

Filtering.

Same join as the inbound rule.

Let’s just try some transformation and see if it works on first try!

It did.

Doing a full synchronization on the primary AD yields 71 adds to my second AD.

Looking good.

Seems right (wonder if I am missing some very important attribute?)

Exported successfully

Some changes not reimported (userAccountControl was wrong value)

I forgot the sAMAccountName too.

Just as before.

Some still giving error, due to sAMAccountName being more than 20 characters.

Let’s see if “Left” still exists.

Yep.

One more thing. The new way of triggering “DirSync” is like below. Also notice that it is automatically triggering my custom added MA!

Looks good (except that it did not Delta sync on my custom MA, only import and export).

That’s it. As I said, just some screenshots to see what’s in store. I am starting to look forward to Microsoft Identity Manager / FIM vNext; hopefully this will be a part of it.