I am implementing a custom synchronization solution between a member register and Office 365, as well as using a custom identity provider. I therefore need to create, update and delete users in Azure AD using the Graph API, here is how I did it.
Start by downloading the NuGet.exe tool to a folder. I will be using C:\GraphAPI in these examples. If you are not familiar with NuGet, this is a tool for downloading libraries and their dependencies, used a lot by Microsoft. Open a PowerShell and run the following.
cd c:\GraphAPI
.\nuget.exe install Microsoft.IdentityModel.Clients.ActiveDirectory
You should see the following:
After running the commands, the folder where you run nuget.exe from should contain some new folders and some files. The following file should now exist (the version number might be different): C:\GraphAPI\Microsoft.IdentityModel.Clients.ActiveDirectory.2.14.201151115\lib\net45\Microsoft.IdentityModel.Clients.ActiveDirectory.dll.
Now, in order to access the Graph API we need to create an application in the Azure AD that you are accessing. Let us start by creating a brand new Azure AD for demo purposes.


You should end up with an Azure AD like this:
Go to Applications and click “Add an Application”: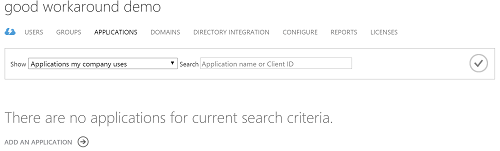
Choose “Add an application my organization is developing”: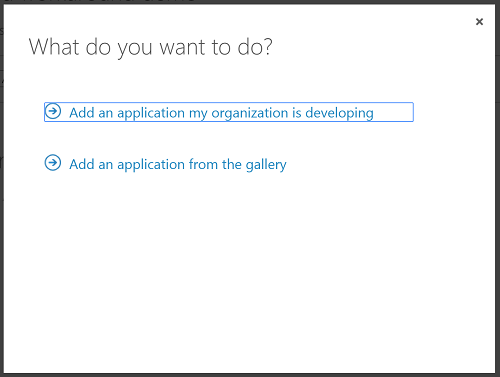
Give the application a name of your choice and choose “WEB APPLICATION AND/OR WEB API”:
Input a url for your application. This url is never used and does not need to be working or anything, it is just an identifier for your application.
Your new application should display. Go to the configuration tab of the new application.
Scroll down until you find the Client ID. Copy this, we will use this later.
In the Keys section, create a new key and save the application.
As soon as you save the application, the key will appear.This is the only time you can see the key so make sure you copy it.
A little note here. As you can see the max lifetime of a key is 2 years, meaning that your application will stop working after two years. What you should do then is to create a new key, input this key into your application and let the old key expire.

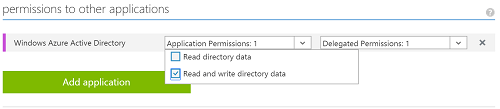
Last thing to configure on the application is permissions. Go down to the “permissions to other applications” section and change the following to “Read and write directory data”. This operation can take a few minutes to complete (even though it already says completed), so you should wait a few minutes before you try the PowerShell examples below.
As a side note, here you can actually also give permissions to other applications such as Exchange Online to query the API there.
You are now finished configuring the application. Now, here is an example PowerShell for you. You need to make sure the path, the client id (which we copied earlier), the key (which we copied earlier) and the tenant name is changed. The rest should be pretty self explanatory.
#
# PowerShell examples created by Marius Solbakken - https://goodworkaround.com/node/73
#

# Change to correct file location
Add-Type -Path "C:\GraphAPI\Microsoft.IdentityModel.Clients.ActiveDirectory.2.14.201151115\lib\net45\Microsoft.IdentityModel.Clients.ActiveDirectory.dll"

# Change these three values to your application and tenant settings
$clientID = "26b2e067-291d-4ad7-9cd2-2e1fae15c905" # CLIENT ID for application
$clientSecret = "qxUG3anGzOi9mfDoV7tHVNWOOM9k2FKo08Xs3bG4APs=" # KEY for application
$tenant = "goodworkarounddemo.onmicrosoft.com" # The tenant domain name

# Static values
$resAzureGraphAPI = "https://graph.windows.net";
$serviceRootURL = "https://graph.windows.net/$tenant"
$authString = "https://login.windows.net/$tenant";

# Creates a context for login.windows.net (Azure AD common authentication)
[Microsoft.IdentityModel.Clients.ActiveDirectory.AuthenticationContext]$AuthContext = [Microsoft.IdentityModel.Clients.ActiveDirectory.AuthenticationContext]$authString

# Creates a credential from the client id and key
[Microsoft.IdentityModel.Clients.ActiveDirectory.ClientCredential]$clientCredential = New-Object -TypeName "Microsoft.IdentityModel.Clients.ActiveDirectory.ClientCredential"($clientID, $clientSecret)

# Requests a bearer token
$authenticationResult = $AuthContext.AcquireToken($resAzureGraphAPI, $clientCredential);

# Output the token object
Write-Host -ForegroundColor Yellow "Token object:"
$authenticationResult | Format-List


# Example to get all users
Write-Host -ForegroundColor Yellow "Getting all users"
$users = Invoke-RestMethod -Method GET -Uri "$serviceRootURL/users?api-version=1.5" -Headers @{Authorization=$authenticationResult.CreateAuthorizationHeader()} -ContentType "application/json"
$users.value | Format-Table UserPrincipalName,DisplayName


# Example to create a user
Write-Host -ForegroundColor Yellow "Creating user"

$newUserJSONObject = @{
    "accountEnabled" = $true
    "displayName" = "Donald Duck"
    "mailNickname" = "donald.duck"
    "passwordProfile" = @{
        "password" = "Test1234"
        "forceChangePasswordNextLogin" = $false
    }
    "userPrincipalName" = "donald.duck@$tenant"
} | ConvertTo-Json

Invoke-RestMethod -Method POST -Uri "$serviceRootURL/users?api-version=1.5" -Headers @{Authorization=$authenticationResult.CreateAuthorizationHeader()} -ContentType "application/json" -Body $newUserJSONObject


# Example to update a user
Write-Host -ForegroundColor Yellow "Updating user"
$updateUserJSONObject = @{
    "givenName" = "Donald"
    "surname" = "Duck"
} | ConvertTo-Json
Invoke-RestMethod -Method PATCH -Uri "$serviceRootURL/users/donald.duck@${tenant}?api-version=1.5" -Headers @{Authorization=$authenticationResult.CreateAuthorizationHeader()} -ContentType "application/json" -Body $updateUserJSONObject


# Example to get a single user
Write-Host -ForegroundColor Yellow "Getting user"
$user = Invoke-RestMethod -Method GET -Uri "$serviceRootURL/users/donald.duck@${tenant}?api-version=1.5" -Headers @{Authorization=$authenticationResult.CreateAuthorizationHeader()} -ContentType "application/json"
$user


# Example to delete a user - please note that this requires a special permissions set with the MsOnline PowerShell module
Write-Host -ForegroundColor Yellow "Deleting user"
Invoke-RestMethod -Method DELETE -Uri "$serviceRootURL/users/donald.duck@${tenant}?api-version=1.5" -Headers @{Authorization=$authenticationResult.CreateAuthorizationHeader()} -ContentType "application/json"

Great article! Of all the “Getting started” Graph API examples I could find, this was the easiest to understand and implement. Thanks Marius!
I can’t make it to run the nuget.exe command (Ran as an admin, still the same):
Am I missing anything?
.\nuget.exe : ‘NETStandard.Library’ already has a dependency defined for ‘Microsoft.NETCore.Platforms’.
At line:1 char:1
+ .\nuget.exe install Microsoft.IdentityModel.Clients.ActiveDirectory
+ ~~~~~~~~~~~~~~~~~~~~~~~~~~~~~~~~~~~~~~~~~~~~~~~~~~~~~~~~~~~~~~~~~~~
+ CategoryInfo : NotSpecified: (‘NETStandard.Li…ore.Platforms’.:String) [], RemoteException
+ FullyQualifiedErrorId : NativeCommandError