Azure AD Certificate-Based Authentication is now in public preview, with a surprisingly good documentation. Usually I have to guess how 50% of a feature actually works, but this time they have gone all-in with technical details of just about everything. What is a blogger to do? Well, let’s configure it and see if we can sneak a peek behind the scenes 🙂

So, to start, let’s configure a certificate authority using plain OpenSSL. Essentially I will then have a certificate with a private key in a file locally on my computer, upload the public version of the certificate to Azure AD as a trusted root certificate authority and issue user certificates with the private key.
Please note: This is not a recommended configuration at all, as it does not have things like Certificate Revocation List, but it works great for testing.
We start by installing OpenSSL and follow this 11 year old guide, apparently still relevant.
We can then use the following PowerShell script to create a CA:
$openssl = 'C:\Program Files\OpenSSL-Win64\bin\openssl.exe'

Set-Content -Path ca.conf -Value '[ ca ]
default_ca = ca_default
[ ca_default ]
dir = ./ca
certs = $dir
new_certs_dir = $dir/ca.db.certs
database = $dir/ca.db.index
serial = $dir/ca.db.serial
RANDFILE = $dir/ca.db.rand
certificate = $dir/ca.crt
private_key = $dir/ca.key
default_days = 365
default_crl_days = 30
default_md = md5
preserve = no
policy = generic_policy
[ generic_policy ]
countryName = optional
stateOrProvinceName = optional
localityName = optional
organizationName = optional
organizationalUnitName = optional
commonName = optional
emailAddress = optional'

# Create folders
!(Test-path "ca") ? (mkdir "ca" | Out-Null) : $null
!(Test-path "ca/ca.db.certs") ? (mkdir "ca/ca.db.certs" | Out-Null) : $null

# Fill initial files
Set-Content -Path "ca/ca.db.index" -Value ""
Set-Content -Path "ca/ca.db.serial" -Value "1234"

# Generate a 1024-bit RSA private key for the CA
. $openssl genrsa -des3 -out ca/ca.key 4096

# Create a self-signed X509 certificate for the CA (the CSR will be signed with it)
. $openssl req -new -x509 -days 10000 -key ca/ca.key -out ca/ca.crt
We will then have a folder structure that looks something like this:
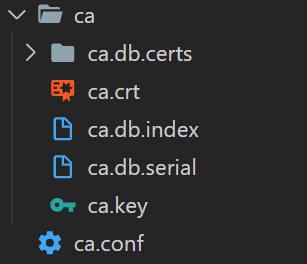
The ca.crt file is our public key that we should upload to Azure AD. Let’s to that using Microsoft Graph endpoint:
$accessToken = "eyJ0eXAiOiJKV1QiLCJub........vtPWqjhA"
$tenantid = "95877aab-f66b-4cd0-98a0-1218634664fa"
$file = "ca/ca.crt"

$body = @{
    certificateAuthorities = @(
        @{
            isRootAuthority = $true
            certificate = [Convert]::ToBase64String([System.IO.File]::ReadAllBytes($file))
        }
    )
} | ConvertTo-Json -Depth 10

Invoke-RestMethod -Uri "https://graph.microsoft.com/v1.0/organization/$tenantid/certificateBasedAuthConfiguration" -Method Post -Body $body -Headers @{Authorization = "Bearer $accessToken"} -ContentType "application/json"
We can now see that a certificate authority has been added:

Quick question – If I were to add an additional trusted CA to your tenant, would you notice?
We can now configure the CBA feature:

Since this is a test tenant, I simply enable for all users:

And, now we are ready to create a user certificate:
$userPrincipalName = "AllanD@M365x912454.OnMicrosoft.com"

$openssl = 'C:\Program Files\OpenSSL-Win64\bin\openssl.exe'

# Create CSR
#. $openssl req -new -sha256 -newkey rsa:4096 -nodes -keyout "$userPrincipalName-key.pem" -out "$userPrincipalName-req.pem" -subj "/C=NO/ST=Oslo/L=Oslo/O=Good Workaround/OU=IT/CN=$userPrincipalName" -addext "subjectAltName=otherName:msUPN;UTF8:$userPrincipalName"
. $openssl req -new -sha256 -newkey rsa:4096 -nodes -keyout "$userPrincipalName-key.pem" -out "$userPrincipalName-req.pem" -subj "/C=NO/ST=Oslo/L=Oslo/O=Good Workaround/OU=IT/CN=$userPrincipalName" -addext "subjectAltName=otherName:1.3.6.1.4.1.311.20.2.3;UTF8:$userPrincipalName"

# Sign CSR
. $openssl ca -md sha256 -config ca.conf -out "$userPrincipalName-certificate.pem.crt" -infiles "$userPrincipalName-req.pem"

# Create PFX
. $openssl pkcs12 -inkey "$userPrincipalName-key.pem" -in "$userPrincipalName-certificate.pem.crt" -export -out "$userPrincipalName.pfx"
After running this, we now how a pfx file that we can import locally:

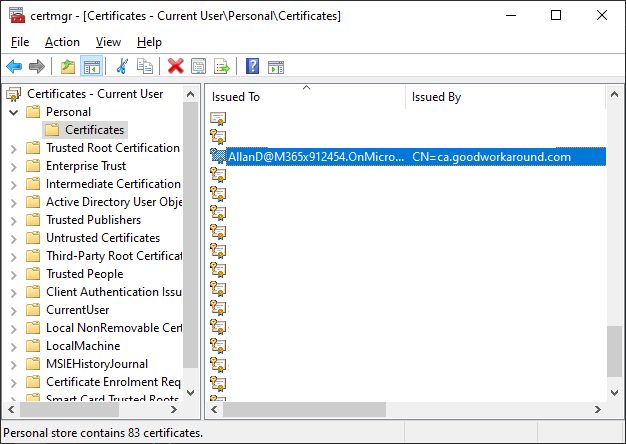
We should see that the SAN field contains “Principal Name”:

This should match our CBA configuration:

Let’s test!
After we type our username, we get Sign in with a certificate as an option.

After clicking, we are told to choose which certificate to use when authenticating towards certauth.login.microsoftonline.com:

And for some reason it fails the first time:

Before it works after clicking Sign in with a certificate the second time…

And now it works:

That might be a public preview issue, or something to do with my certificate configuration – I don’t know, but we got it working!
Let us now have a look at what happens behind the scenes. When clicking the Sign in with a certificate link, the following happens:
First, the url https://login.microsoftonline.com/common/GetCredentialType?mkt=en-US is invoked:
There are a lot of parameters sent out to this endpoint, already discovered apparently:

And we get information about the certificate authentication, and a lot of other things:
{
    "Username": "alland@m365x912454.onmicrosoft.com",
    "Display": "alland@m365x912454.onmicrosoft.com",
    "IfExistsResult": 0,
    "IsUnmanaged": false,
    "ThrottleStatus": 0,
    "Credentials": {
        "PrefCredential": 1,
        "HasPassword": true,
        "HasCertAuth": true,
        "RemoteNgcParams": null,
        "FidoParams": null,
        "SasParams": null,
        "CertAuthParams": {
            "CertAuthUrl": "https://certauth.login.microsoftonline.com/95877aab-f66b-4cd0-98a0-1218634664fa/certauth"
        },
        "GoogleParams": null,
        "FacebookParams": null
    },
    "EstsProperties": {
        "UserTenantBranding": [
            {
                "Locale": 0,
                "BannerLogo": "https://aadcdn.msauthimages.net/c1c6b6c8-73gilawzs7vcccewdzlmur04azyq-nqt3452mhve0/logintenantbranding/0/bannerlogo?ts=637704913794688624",
                "TileLogo": "https://aadcdn.msauthimages.net/c1c6b6c8-73gilawzs7vcccewdzlmur04azyq-nqt3452mhve0/logintenantbranding/0/tilelogo?ts=637704913799628057",
                "TileDarkLogo": "https://aadcdn.msauthimages.net/c1c6b6c8-73gilawzs7vcccewdzlmur04azyq-nqt3452mhve0/logintenantbranding/0/squarelogodark?ts=637704913804851508",
                "Illustration": "https://aadcdn.msauthimages.net/c1c6b6c8-73gilawzs7vcccewdzlmur04azyq-nqt3452mhve0/logintenantbranding/0/illustration?ts=637704913789375818",
                "BoilerPlateText": "<p>Contoso</p>\n",
                "KeepMeSignedInDisabled": false,
                "UseTransparentLightBox": false,
                "LayoutTemplateConfig": {
                    "showHeader": false,
                    "headerLogo": "",
                    "layoutType": 0,
                    "hideCantAccessYourAccount": false,
                    "hideForgotMyPassword": false,
                    "hideResetItNow": false,
                    "showFooter": true,
                    "hideTOU": false,
                    "hidePrivacy": false
                },
                "CustomizationFiles": {
                    "strings": {
                        "adminConsent": "",
                        "attributeCollection": "",
                        "authenticatorNudgeScreen": "",
                        "conditionalAccess": ""
                    },
                    "customCssUrl": ""
                }
            }
        ],
        "DomainType": 3
    },
    "FlowToken": "AQABAAEAAAD--DLA3VO7Q.....D8VmBUct-YdmhU7iLRpSAA",
    "IsSignupDisallowed": true,
    "apiCanary": "AQABAAAAAAD--DLA3VO7Q....36IjDyl96Z4yTQi3IiAA"
}
The FlowToken is then sent to the url found in CertAuthUrl, as well as a ctx token (for tracking purposes, I believe):

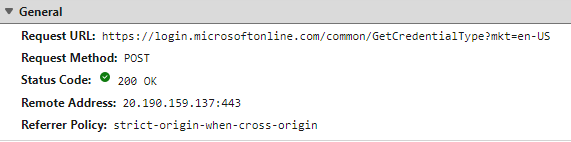
A POST to https://certauth.login.microsoftonline.com/TENANTID/certauth happens, with two parameters:

There is no response at all, other than 200 OK, so I am guessing there is some kind of backend call happening that informs Azure AD about the successful authentication, and the flowToken is what identifies our browser session.
Using PowerShell we can test the https://login.microsoftonline.com/common/GetCredentialType?mkt=en-US endpoint:
$url = "https://login.microsoftonline.com/common/GetCredentialType?mkt=en-US"
$body = @{
    username = "alland@m365x912454.onmicrosoft.com"
    flowtoken = "marius"
} | ConvertTo-Json

$result = Invoke-RestMethod -Method Post -Uri $url -Body $body -ContentType "application/json"
"FlowToken: $($result.FlowToken)"
"CertAuthUrl: $($result.Credentials.CertAuthParams.CertAuthUrl)"
Using this test I can find that the flowtoken returned is simply whatever it sent to the endpoint:

But where does the FlowToken stem from? Well, I found that it comes from a subset of the buid cookie returned from the authorize endpoint:
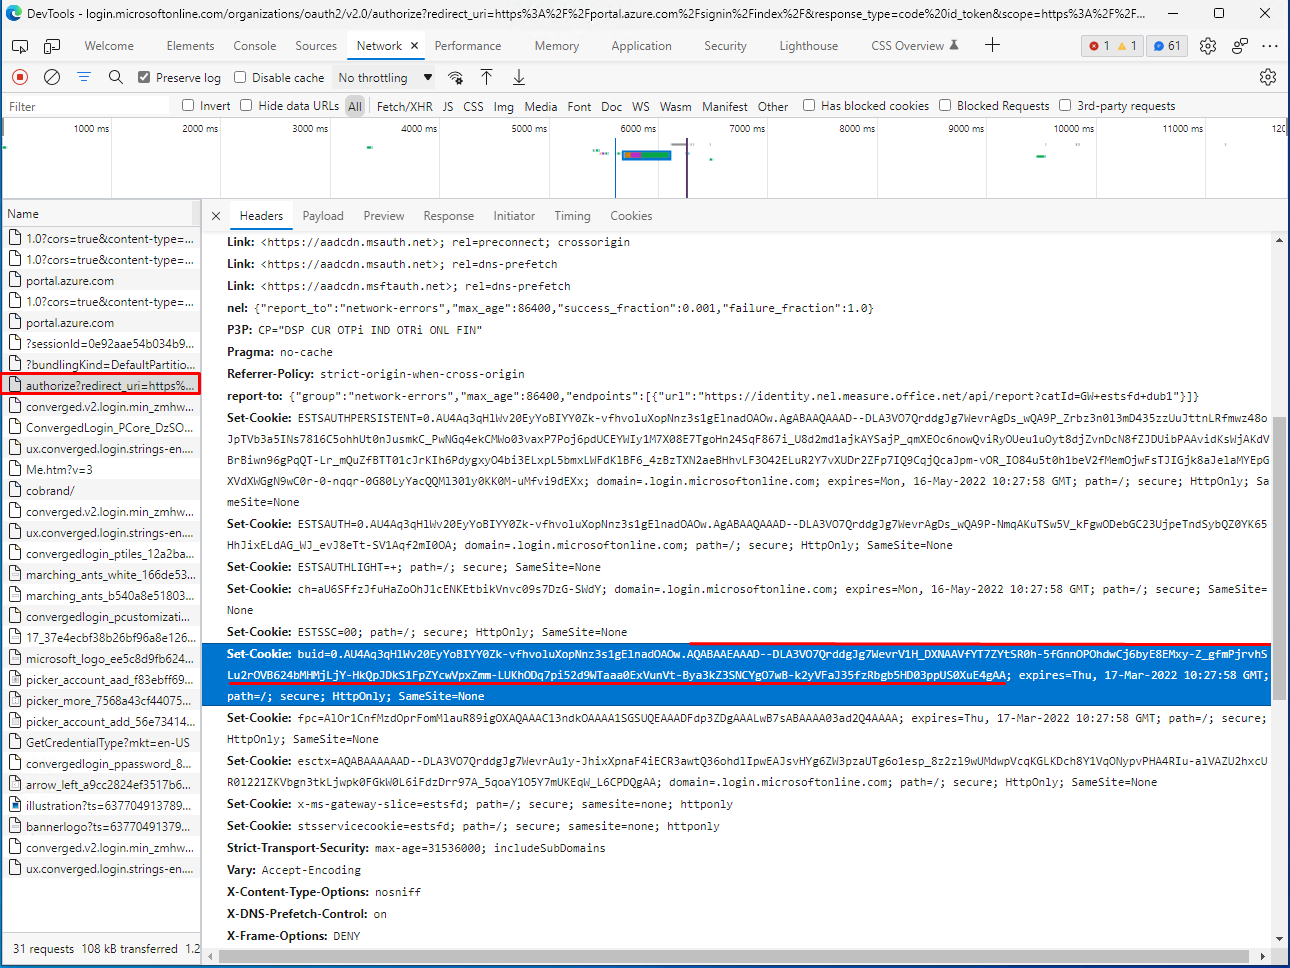
So I guess it would be techincally possible to trigger the authorize endpoint from PowerShell, reading the buid cookie, like this:
$userPrincipalName = "AllanD@M365x912454.OnMicrosoft.com"
$CertificateThumbprint = "456b0789b3b4f0f9980ea10c3472a6c3e97419d0"

# Extract flowtoken
$r = Invoke-WebRequest -Uri "https://login.microsoftonline.com/organizations/oauth2/v2.0/authorize?redirect_uri=https%3A%2F%2Fportal.azure.com%2Fsignin%2Findex%2F&response_type=code%20id_token&scope=https%3A%2F%2Fmanagement.core.windows.net%2F%2Fuser_impersonation%20openid%20email%20profile&response_mode=form_post&nonce=6378&client_id=c44b4083-3bb0-49c1-b47d-974e53cbdf3c" -SessionVariable session
$cookie = $r.RawContent -split "`n" | Where-Object {$_ -like "set-Cookie: buid=*"}
$flowtoken = ($cookie -replace "set-Cookie: " -split ";" | Where-object {$_ -like "buid=*"}) -Split "\." | Select-Object -Last 1

# Get credential type
$url = "https://login.microsoftonline.com/common/GetCredentialType?mkt=en-US"
$body = @{
    username = $userPrincipalName
    flowtoken = $flowtoken
} | ConvertTo-Json

$result = Invoke-RestMethod -Method Post -Uri $url -Body $body -ContentType "application/json" -WebSession $session
"FlowToken: $($result.FlowToken)"
"CertAuthUrl: $($result.Credentials.CertAuthParams.CertAuthUrl)"

# Auth using cert
$body = "flowToken=$($result.FlowToken)"
$certauth = Invoke-RestMethod $result.Credentials.CertAuthParams.CertAuthUrl -CertificateThumbprint $CertificateThumbprint -Method Post -Body $body -ContentType "application/x-www-form-urlencoded" -WebSession $session
But for some reason I just cannot get this to work, as it errors out with AADSTS9002313: Invalid request. Request is malformed or invalid. But anyway, this feature is not really targeted towards script scenarios.
That’s it, the feature is really well documented and works great, and it seems really simple from the customer side. One thing to really note here, is that one should definitely monitor the trusted root authorities of Azure AD, as they can be used to add backdoors to your system.
Have a good one!

Your explanation is much more clear than Azure official doc! I followed your step and successfully setup a local signed cert to login.
There are two minor changes during my setup are:
1. When creating CSR by command `openssl req -new -sha256 -newkey rsa:4096 -nodes -keyout “$userPrincipalName-key.pem” -out “$userPrincipalName-req.pem” -subj “/C=NO/ST=Oslo/L=Oslo/O=Good Workaround/OU=IT/CN=$userPrincipalName” -addext “subjectAltName=otherName:1.3.6.1.4.1.311.20.2.3;UTF8:$userPrincipalName”`, the CN= in -sub should be same as name of root CA.
2. When I using the command `. $openssl ca -md sha256 -config ca.conf -out “$userPrincipalName-certificate.pem.crt” -infiles “$userPrincipalName-req.pem”` to sign the cert, the SAN field disappeared. So I used a workaround with an extension files which explicitly defines a SAN.
– command: openssl x509 -req -days 365 -in “$userPrincipalName.csr” -CA ./ca/ca.crt -CAkey ./ca/ca.key -CAcreateserial -out “$userPrincipalName.crt” -extfile ‘$userPrincipalName.conf’ -extensions v3_req
– Part of $userPrincipalName.conf file:
“`
…
[v3_req]
keyUsage = keyEncipherment, dataEncipherment, digitalSignature
extendedKeyUsage = serverAuth, clientAuth
subjectAltName = otherName:msUPN;UTF8:firsthonoreduser@xiaoyueduangmail.onmicrosoft.com
“`
Besides, it should be carefully that the cert `keyUsage` must contain `digitalSignature`. Otherwise when logging in, web browser will not show up the option of the cert.