With the public preview of the new API-driven inbound provisioning for Entra ID (Previously known as Azure Active Directory), Microsoft is enabling new methods for integrating HR systems or other sources of record for employees or users. These APIs can be used by HR vendors to directly integrate their HR systems to Entra ID, or by system integrators reading data from services like ERP and writing it to Entra ID. There has of course always been the option of creating users through Microsoft Graph, but this does not support on-premises Active Directory.
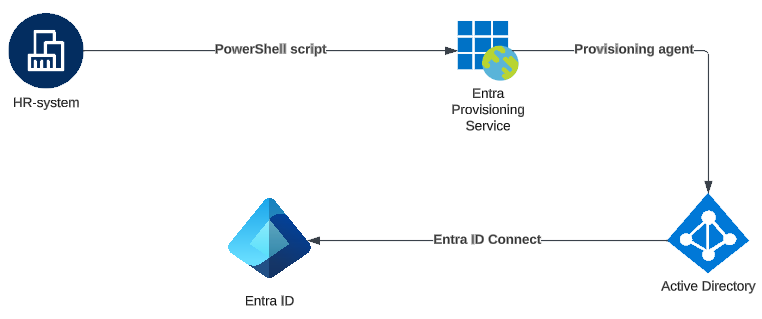
Just as with how the Workday and SuccessFactors integrations have been working up until now, hybrid configurations with plain old Active Directory is also supported through a provisioning agent, which we will configure in this blog post.

Ok, so what is our goal that we will try to achieve with this blog post?
Well, essentially we will have a fancy Excel based HR-system, that will utilize PowerShell for talking to the Entra ID Inbound Provisioning API, which then will write users to an on-premises Active Directory, which is synchronized to an Entra tenant.
Step 1 – Configuring an application for the provisioning API
The Microsoft documentation is awesome here, so I will not dive to deeply into what I’m doing:
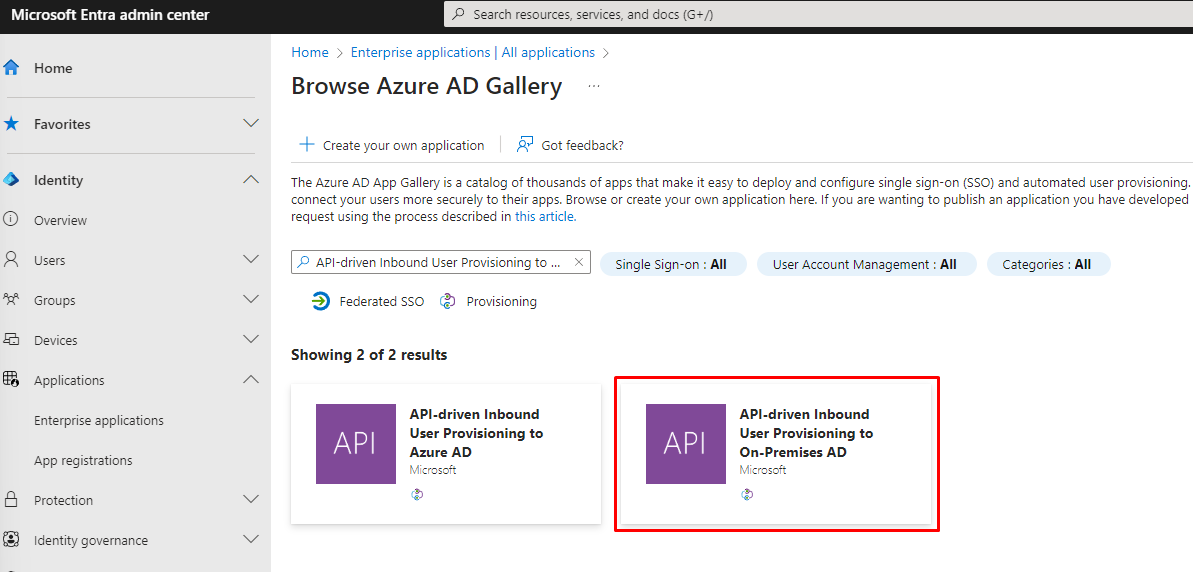
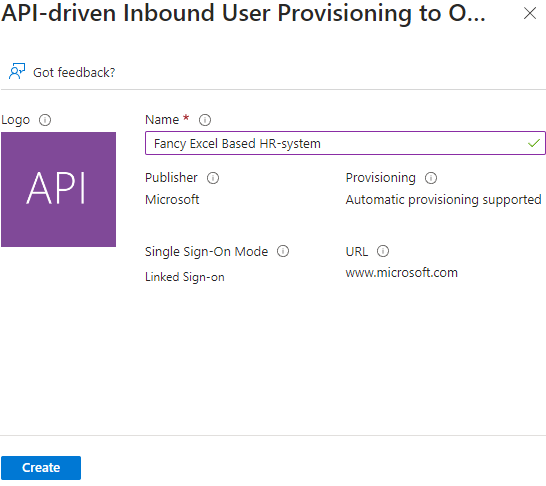
First we create an instance of the API-driven Inbound User Provisioning to On-Premises AD application template:
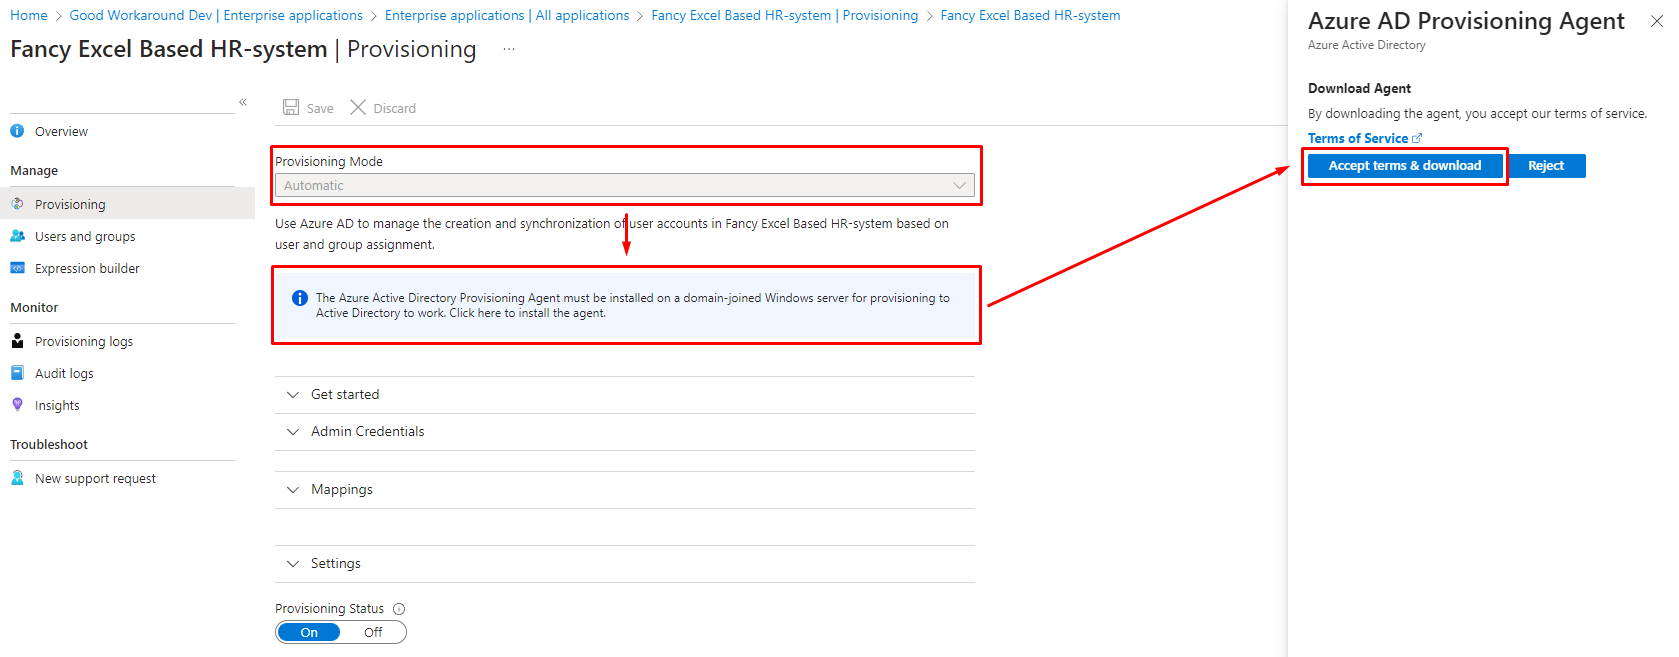
After creating the application, we enable automatic provisioning and download the Azure AD Provisioning Agent:
Now we are ready to install the provisioning agent. I am doing this on my Entra ID Connect server (or is it now called Entra Connect?)

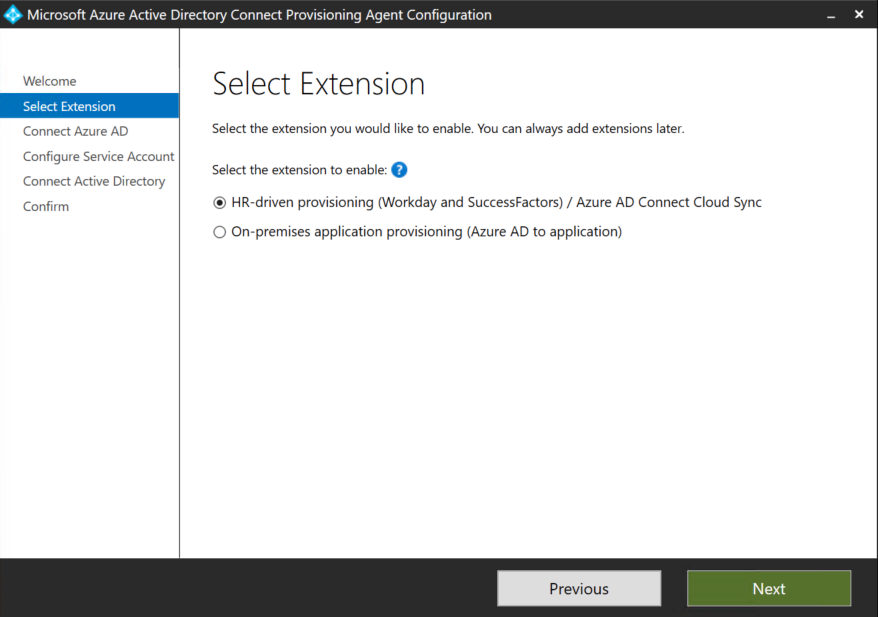
I’ll skip most of the screens and simply say “Voila”:

After configuring the provisioning agent, we can now configure our Active Directory Domain and Default OU for New Users:

After configuring the target, we can now have a look at our attribute mapping:

It is worth noticing how userPrincipalName is configured by default, but we’ll leave it in the default setting per now:

Back to the initial drawing of our goal, we actually only have the PowerShell script missing!
Step 2 – Playing with the inbound provisioning API
The inbound provisioning API is a part of the Microsoft Graph API, which means all authentication and stuff is super straight forward. First of all, on the provisioning overview page, we can find the provisioning API endpoint:
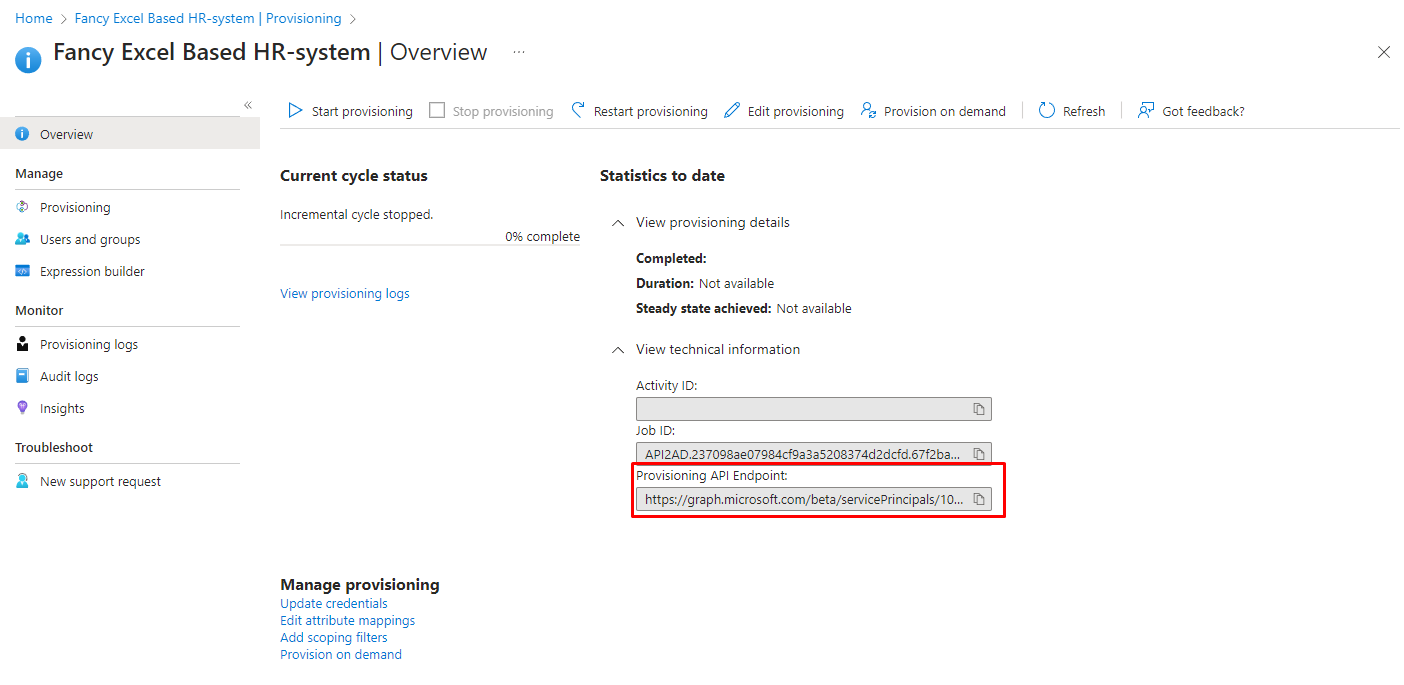
For my application, this value is as follows:
https://graph.microsoft.com/beta/servicePrincipals/1047d54f-0ef1-404f-8bcf-6ff9ea9ad0e0/synchronization/jobs/API2AD.237098ae07984cf9a3a5208374d2dcfd.67f2bab8-9b20-4eff-89ad-3bf91b33e8af/bulkUploadYou’ll notice that everything is scoped under the enterprise app I have created (which got objectid 1047d54f-0ef1-404f-8bcf-6ff9ea9ad0e0).
Now, in order to work with the provisioning API, we have several options. In this example we will use the Microsoft Graph Explorer, and eventually a PowerShell script that uses an app with the permissions AuditLog.Read.All and SynchronizationData-User.Upload. This can be the same app as we have configured the provisioning on, or a different one, as long as the permission is granted.
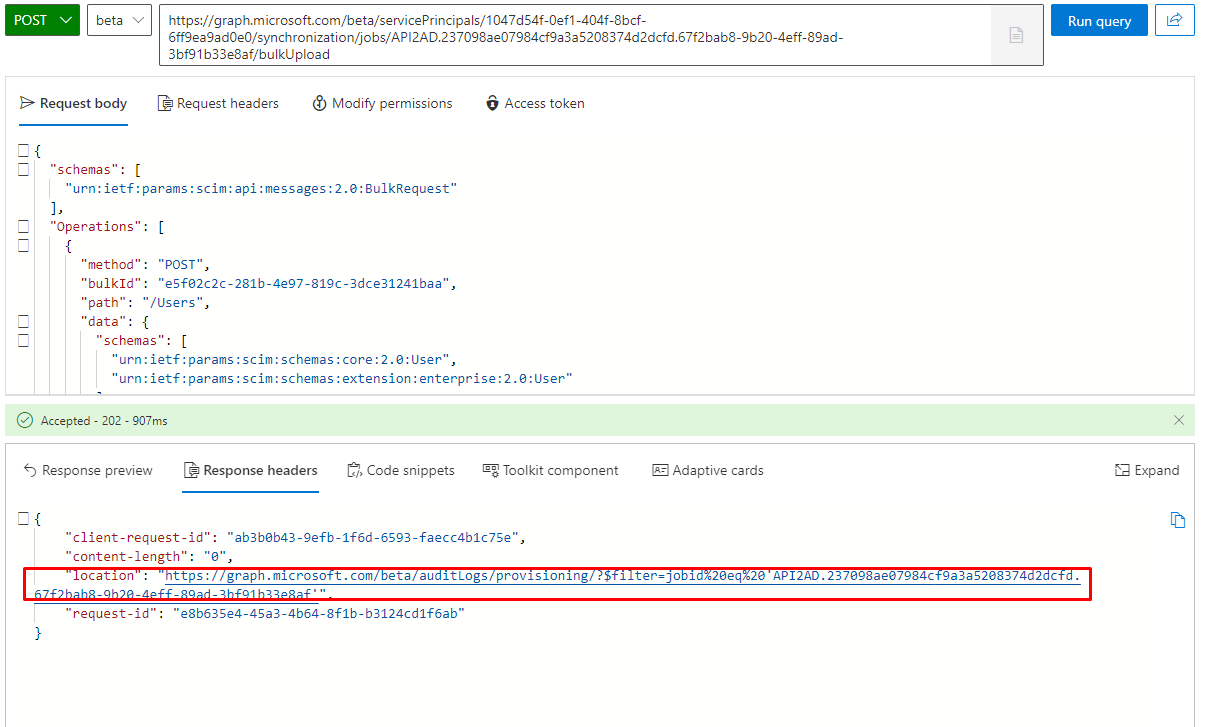
Microsoft actually already have a guide on this, but let’s try it out. Here I have built a single user payload, and sending it:
POST https://graph.microsoft.com/beta/servicePrincipals/1047d54f-0ef1-404f-8bcf-6ff9ea9ad0e0/synchronization/jobs/API2AD.237098ae07984cf9a3a5208374d2dcfd.67f2bab8-9b20-4eff-89ad-3bf91b33e8af/bulkUpload
{
  "schemas": [
    "urn:ietf:params:scim:api:messages:2.0:BulkRequest"
  ],
  "Operations": [
    {
      "method": "POST",
      "bulkId": "e5f02c2c-281b-4e97-819c-3dce31241baa",
      "path": "/Users",
      "data": {
        "schemas": [
          "urn:ietf:params:scim:schemas:core:2.0:User",
          "urn:ietf:params:scim:schemas:extension:enterprise:2.0:User"
        ],
        "externalId": "54321",
        "name": {
          "formatted": "Firstname Lastname",
          "familyName": "Lastname",
          "givenName": "Firstname"
        },
        "displayName": "Firstname Lastname",
        "phoneNumbers": [
          {
            "value": "+4799999999",
            "type": "mobile"
          }
        ],
        "userType": "Employee",
        "title": "IT-guy",
        "active": true
      }
    }
  ],
  "failOnErrors": null
}
The response will contain a location header, where we can track progress:
This requires the AuditLog.Read.All permission. We can check the provisioning log in the UI, where we now find an error:
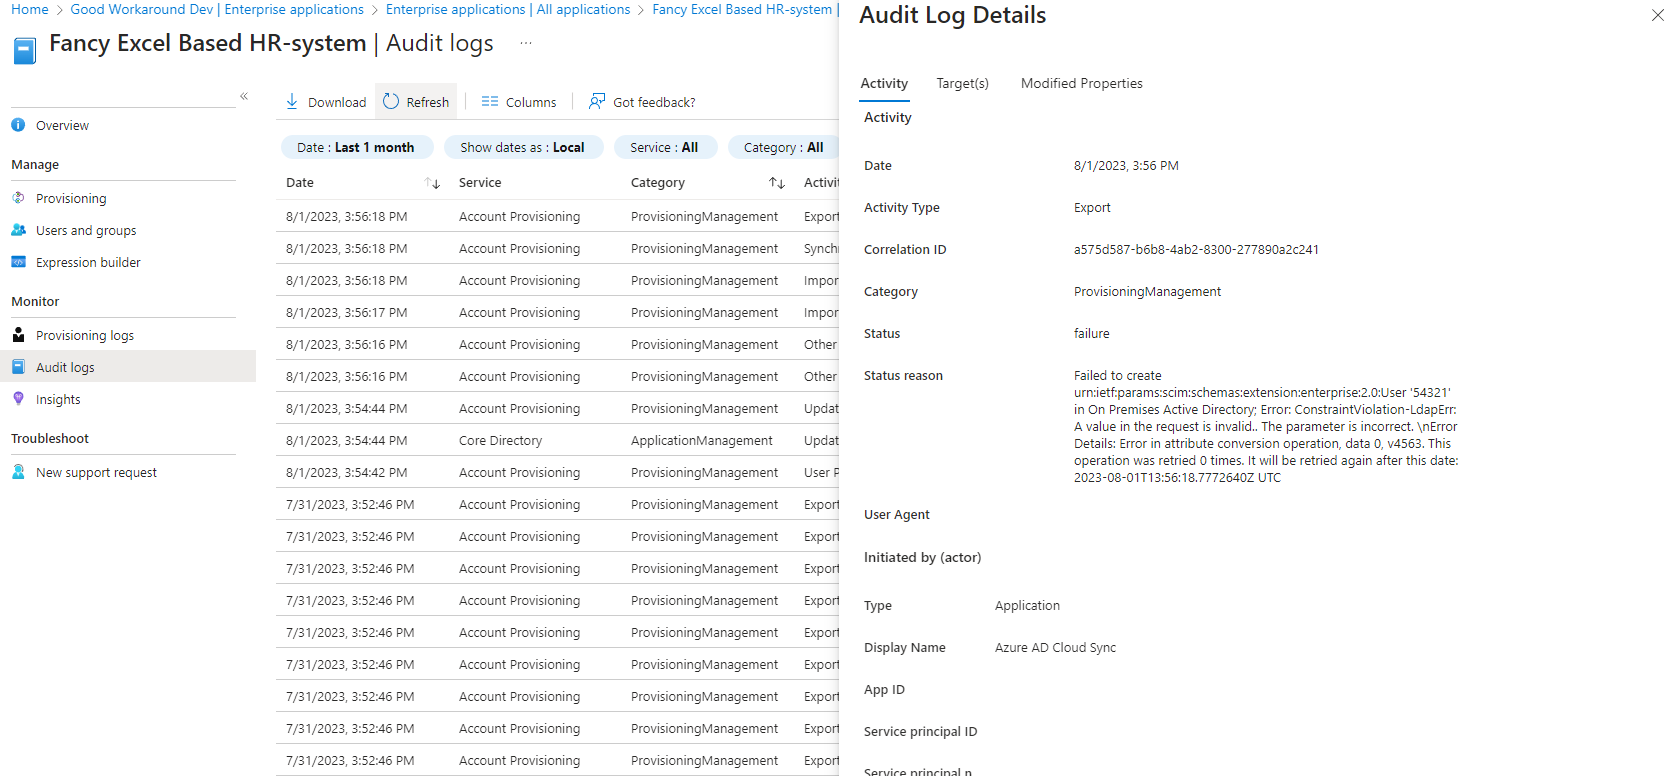
If you had a keen eye, you’d have already noticed that the attribute map has the attributes sAMAccountName, userPrincipalName and mail all depending on a SCIM attribute “username” that we did not send in our payload. Let’s fix this by generating based on the givenName and familyName!
Here are two examples of generator code that also checks for uniqueness!
sAMAccountName generator
SelectUniqueValue(NormalizeDiacritics(StripSpaces(Join("", Left([name.givenName], 1), Left([name.familyName], 14)))), NormalizeDiacritics(StripSpaces(Join("", Left([name.givenName], 2), Left([name.familyName], 13)))), NormalizeDiacritics(StripSpaces(Join("", Left([name.givenName], 1), Left([name.familyName], 12), RandomString(2, 2, 0, 0, 0, "")))))userPrincipalName and mail generator
SelectUniqueValue(Join("@", NormalizeDiacritics(StripSpaces(Join(".", [name.givenName], [name.familyName]))), "dev.goodworkaround.com"), Join("@", NormalizeDiacritics(StripSpaces(Join(".", [name.givenName], [name.familyName], RandomString(2, 2, 0, 0, 0, "")))), "dev.goodworkaround.com"))
And now the logs tells me everything is ok:
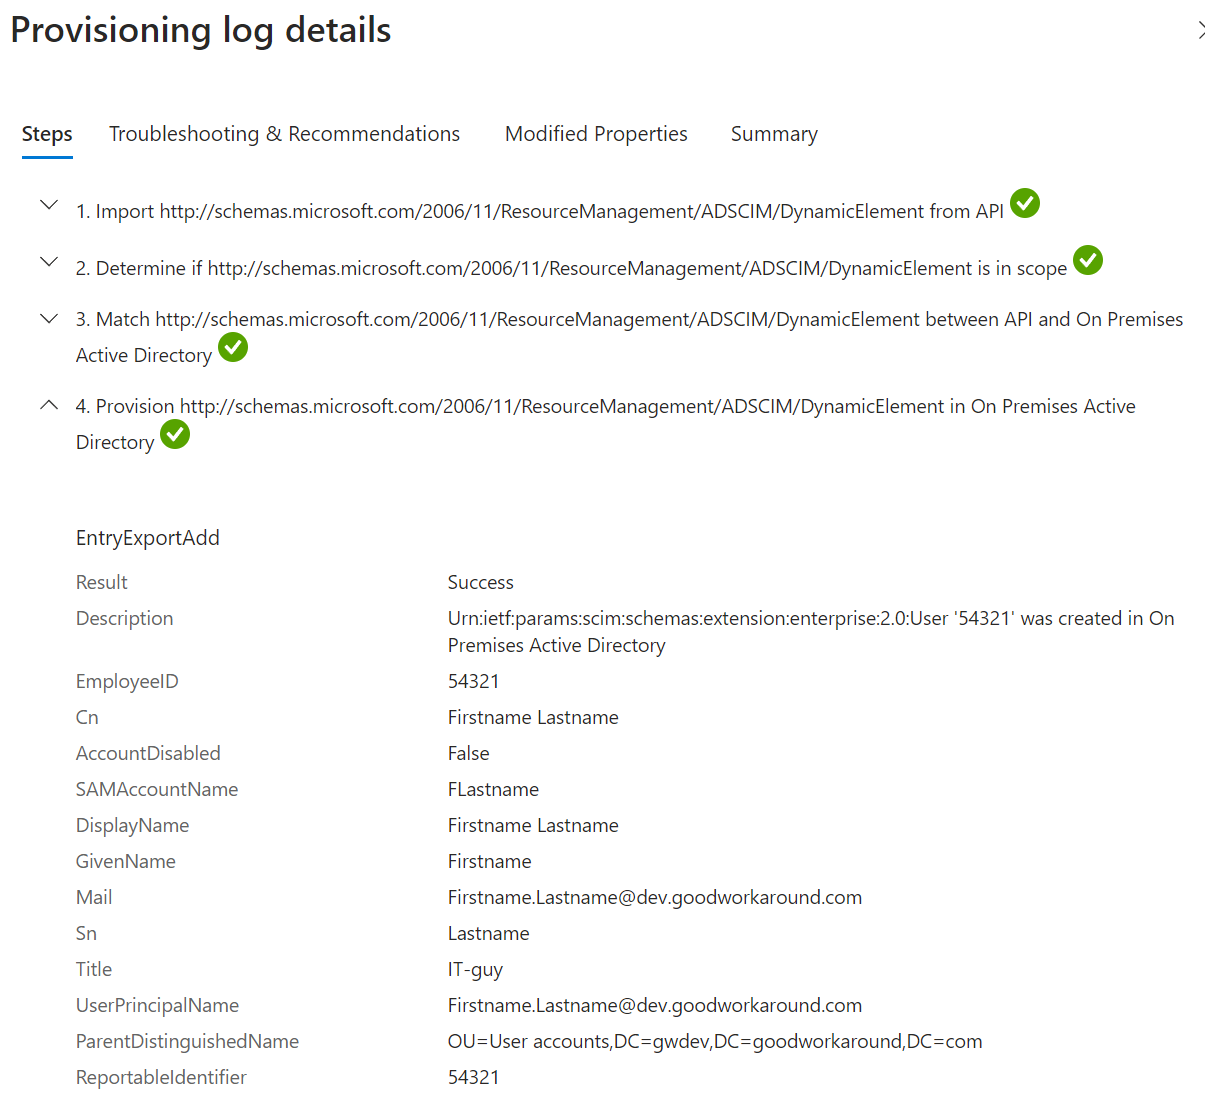
And the user has also been created in Active Directory with the expected values:

We have now successfully provisioned a user in Active Directory, without ever talking LDAP, ADWS or anything! Let’s automate this using PowerShell.
Step 3 – Configuring a PowerShell client
We’ll start by adding a new app registration, secret and granting the required permissions:

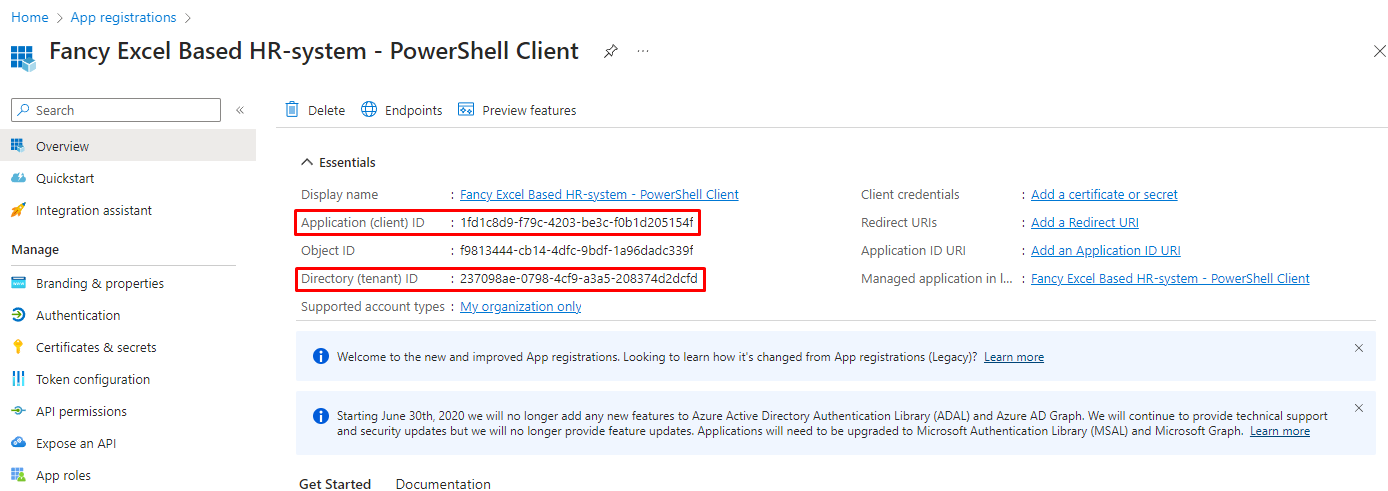

We now have the below configuration, which is all we need to provision users
$tenantid = "237098ae-0798-4cf9-a3a5-208374d2dcfd"
$clientid = "1fd1c8d9-f79c-4203-be3c-f0b1d205154f"
$clientsecret = "......"
$provisioningapiendpoint = "https://graph.microsoft.com/beta/servicePrincipals/1047d54f-0ef1-404f-8bcf-6ff9ea9ad0e0/synchronization/jobs/API2AD.237098ae07984cf9a3a5208374d2dcfd.67f2bab8-9b20-4eff-89ad-3bf91b33e8af/bulkUpload"
Now, using this, we can now authenticate like this:
$body = @{
    "client_id"     = $clientid
    "scope"         = "https://graph.microsoft.com/.default"
    "grant_type"    = "client_credentials"
    "client_secret" = $clientsecret
}
$accesstoken = Invoke-RestMethod "https://login.microsoftonline.com/$($tenantid)/oauth2/v2.0/token"  -Body $body -Method POST | Select-Object -ExpandProperty access_token
Now that we have an access token, let’s create our data source:
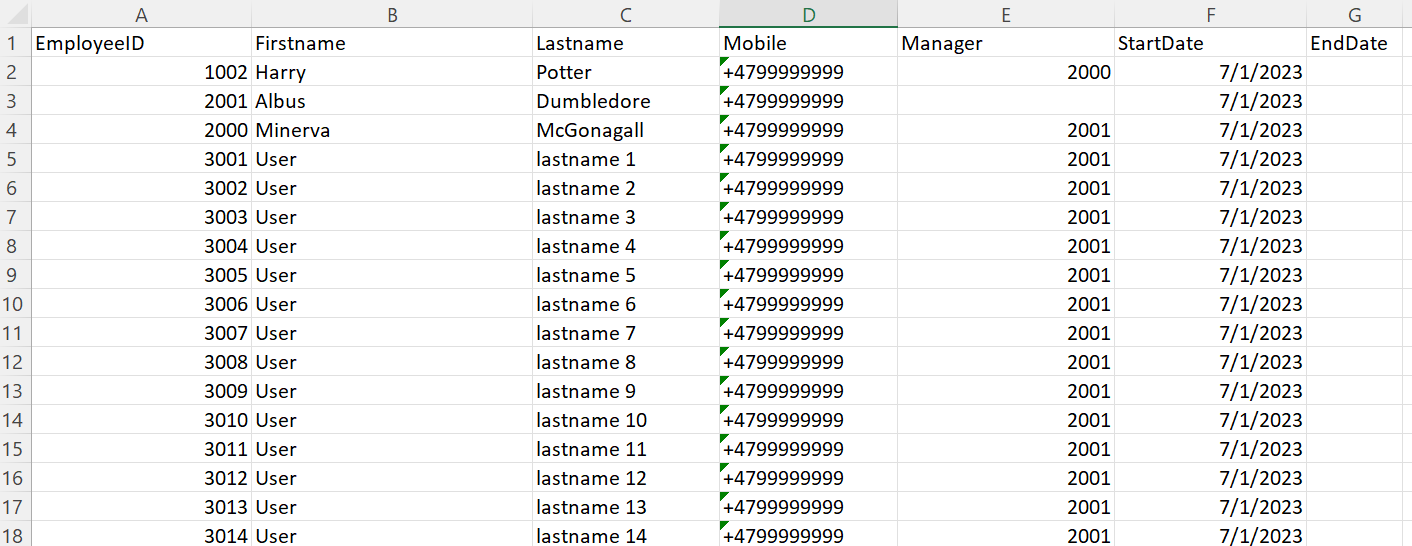
Step 5 – Creating our Excel based HR-system
HR systems vary a lot, so I started on a little Hogwarts teamed HR-system in Excel, just to model a few employees, then gave up and just called users incremental numbers…:
Step 6 – Sending data to the inbound provisioning API using PowerShell
Simply putting together the connection part for getting access token, and reading out Excel data, we can do the same thing with PowerShell as we did with Graph Explorer. Notice that I split users into batches of 20 users.
# Config
$tenantid = "237098ae-0798-4cf9-a3a5-208374d2dcfd"
$clientid = "1fd1c8d9-f79c-4203-be3c-f0b1d205154f"
$clientsecret = "......."
$provisioningapiendpoint = "https://graph.microsoft.com/beta/servicePrincipals/1047d54f-0ef1-404f-8bcf-6ff9ea9ad0e0/synchronization/jobs/API2AD.237098ae07984cf9a3a5208374d2dcfd.67f2bab8-9b20-4eff-89ad-3bf91b33e8af/bulkUpload"

# Get access token
$body = @{
    "client_id"     = $clientid
    "scope"         = "https://graph.microsoft.com/.default"
    "grant_type"    = "client_credentials"
    "client_secret" = $clientsecret
}
$accesstoken = Invoke-RestMethod "https://login.microsoftonline.com/$($tenantid)/oauth2/v2.0/token"  -Body $body -Method POST | Select-Object -ExpandProperty access_token

# Read excel
$users = Import-excel .\HR.xlsx

# Bucket function
function ConvertTo-Buckets
{
    [CmdletBinding()]
    [Alias()]
    [OutputType([int])]
    Param
    (
        # Total number of buckets, bucket size will vary
        [Parameter(Mandatory=$true,
                    Position=0,
                    ParameterSetName="NumberOfBuckets")]
        [ValidateRange(2, 9999)]
        [int] $NumberOfBuckets,

        # Size of each bucket, last bucket will have different size of the rest
        [Parameter(Mandatory=$true,
                    Position=1,
                    ParameterSetName="BucketSize")]
        [ValidateRange(2, 99999)]
        [int]  $BucketSize,

        # Input object to put into bucket
        [Parameter(Mandatory=$true,
                    Position=2, ValueFromPipeline=$true)]
        $InputObject
    )

    Begin
    {
        $Buckets = New-Object System.Collections.ArrayList<Object>
        if($NumberOfBuckets -gt 0) {
            # Add numberofbuckets number of array lists to create a multi dimensional array list
            1..$NumberOfBuckets | Foreach {
                $Buckets.Add((New-Object System.Collections.ArrayList<Object>)) | Out-Null
            }
        } else {
            # Add a single bucket as our first bucket
            $Buckets.Add((New-Object System.Collections.ArrayList<Object>)) | Out-Null
        }
        $index = 0
    }
    Process
    {
        if($NumberOfBuckets -gt 0) {
            $index = ($index + 1) % $NumberOfBuckets
            $Buckets[$index].Add($InputObject) | Out-Null
        } else {
            $Buckets[$index].Add($InputObject) | Out-Null
            if($Buckets[$index].Count -ge $BucketSize) {
                $Buckets.Add((New-Object System.Collections.ArrayList<Object>)) | Out-Null
                $index += 1
            }
        }

    }
    End
    {
        $Buckets
    }
}

# Split users into buckets
$buckets = $users | ConvertTo-Buckets -BucketSize 20
$inc = 1

$buckets | ForEach-Object {
    # Build SCIM payload
    $payload = @{
        schemas = @("urn:ietf:params:scim:api:messages:2.0:BulkRequest")
        Operations = New-Object System.Collections.ArrayList
        failOnErrors = $null
    }
    $_ | ForEach-Object {
        $enddate = $_.EndDate ? [DateTime]::Parse($_.EndDate) : (Get-Date).AddYears(100)
        $payload.Operations.Add(@{
            method = "POST"
            bulkId = (New-Guid).ToString()
            path = "/Users"
            data = @{
            schemas = @(
                "urn:ietf:params:scim:schemas:core:2.0:User"
                "urn:ietf:params:scim:schemas:extension:enterprise:2.0:User"
            )
            externalId = "{0}" -f ([int] $_.EmployeeID)
            name = @{
                formatted = ("{0} {1}" -f $_.FirstName, $_.LastName)
                familyName = $_.LastName
                givenName = $_.FirstName
            }
            displayName = ("{0} {1}" -f $_.FirstName, $_.LastName)
            phoneNumbers = @(
                @{
                value = $_.Mobile
                type = "mobile"
                }
            )
            userType = "Employee"
            active = (Get-Date) -gt [DateTime]::Parse($_.StartDate).AddDays(14) -and (Get-Date) -lt $enddate
            }
        }) | Out-Null
    }

    # Send SCIM payload
    Write-Host "Sending bucket $inc"
    $inc += 1
    Invoke-RestMethod $provisioningapiendpoint -Method POST -Body ($payload | convertto-json -depth 100) -ContentType "application/scim+json" -Headers @{Authorization = "Bearer $accesstoken"}
}
And we can now see this working just as expected:

Please note that Microsoft has lots of pre-made “send CSV file as SCIM payloads”-type scripts on the documentation.
In summary
In this blogpost I’ve shown how the inbound provisioning API let you provision users from any HR system into Active Directory, through Entra ID, without the need of actually reaching any domain controller. Of course it also works without onpremises Active Directory.
Overall, the service seems surprisingly mature and stable, I am looking forward to working with customers on this, as well as HR vendors.
There are two things that I would really like to see added:
- The ability to GET users from SCIM. Currently the external system must keep track of which users have been sent to the SCIM endpoint, which is a bit anoying, and you run into the risk of “forgetting” a user, if they are deleted from HR without a delete being sent to the SCIM endpoint.
- A staging feature, where you can post users to the SCIM endpoint and get a full report over what Entra ID plans to do with users (deletions, updates, etc.). Right now this is straight into production, which is not suitable for brownfield deployments.
That’s it for now. Chao!

I am really needing to change my Power Automate flow that creates a cloud user to use this, so that it creates an on-prem account. But I cant find any examples as I am not an expert… Could you do an example where a Power Automate or Logic App pulls data from a sharepoint list?
Great article,
Did you manage to set a password for the user created?
documentation states that password creation isn’t supported.
I am also interested to understand if you have managed to rename the account? As in Rename AD Object name attribute.
Thank you for the indepth article!
I got a quick question. I am trying to set the accountExpire attribute based on the FinishDate of the user, however, I am not able to parse that information to AD. I am using the TIMEFORMAT (integer) value but still. I saw you did the “active: {paramenter}” approach.
In this case, shall you have the script runing on a schedule bases and update the active value accordingly? Did you try setting up the accountExpire attribute, if so, did you get it working?
Hi!
Yes, I am running on a schedule, so I am writing and changing the active attribute every X hours based on a source value from HR. 🙂
Thanks!
Also, quick question. How did you manage passwords for those new users? I can’t seem to figure out as I believe there is not Attribute to send a temp password using the API-Provisioning.
Depends a bit on your license. If you have Entra ID Governance, you have Life Cycle Workflows that can generate temporary access pass, or trigger logic apps that can do the same.
If you do not have Entra ID Governance, you will need to implement “something”, like a logic app, to do that operation. There is no flow to an attribute like “unicodePwd” as we had back in the Microsoft Identity Manager days.
Can you move the attribute mapping schema between different provisioning apps? I know you can download the schema.json from the schema editor but i am sure it’s specific to that provisioning app. I am interested in how the route to live is achieved (Dev-Test-Int-Live).
Yes you can. Have a look at my PowerShell module: https://www.powershellgallery.com/packages/EntraIDInboundProvisioningHelper/1.2.2
It contains cmdlets Backup-InboundProvisioningMapping and Restore-InboundProvisioningMapping, which allows you to backup from one app and restore to another. 🙂
We have configured API-driven inbound provisioning to the on-premises Active Directory (AD), and it is functioning as expected. However, we have identified an issue: whenever a new user is created using the provisioning API, attempting to assign a manager who is an existing user in AD located in a different organizational unit (OU) results in the following error.
However, this issue does not occur when assigning a manager who was created through the provisioning service, even if they exist in a different BU .
Error Message from provisioning Log
We were unable to assign xxx@xxx.com as the manager of xxxx*@xxx.com . In order to ensure that the references are updated properly, you have two options. First, ensure that xxxx@xxxxx is in scope for provisioning. Provision xxxx@xxx.com on-demand and then provision xxxx@xxxxx on-demand. Alternatively, you can restart provisioning after ensuring that xxx@xxx.com is in scope for provisioning.*
PropertyName
manager
SkipReason
UnableToResolveReferenceAttributeValue
manager Add
The error is asking to do scoping on-demand however on-demand scoping feature is not available in API-driven inbound provisioning .
In order to populare the manager field the following is required:
Are these true? 🙂
Is it possible to set the password for the new user created from the PowerShell after setting the attribute mapping passwordProfile.passowrd ?