AAD Identity Protection – End-user behavior

Microsoft is moving from a “force Multi-Factor Authentication for all users” model to a risk based model where users are requested to do Multi-Factor Authentication when their sign-in has a risk assigned to it. This could happen for example by an impossible travel, the user logging in from an IP address which has been in contact with a botnet or other “signals” as Microsoft calls them.

First of all, with AAD Identity Protection, instead of doing manual or scripted assigning of MFA, this is now done with an MFA registration policy. Here is an example on what this can look like:

snip_20160321095252

This will let organizations start with a group of users and expand to more and more users. What will happen is that the user will be prompted to register for MFA when they log on with a browser (or Office with ADAL etc.), but their next logon will not require MFA.

snip_20160321095400

When we look at StrongAuthenticationRequirements of the user, it will be empty, meaning that MFA is not enforced, but the user is still ready to use MFA whenever Azure AD requires it.

Now let us look at the Sign-in risk policy:

snip_20160321100036

Here I have configured the policy to be invoked when the machine learning system in Azure AD find my sign-in a low or medium risk. If a high risk is detected, it is blocked completely.

When I sign in from my regular computer, nothing happens. No MFA; everything is like it has always been. This is perfect, and exactly how this should work. Azure AD detects that everything is safe, no risk at all, so I am not prompted for MFA.

Now, let us try signing in through a RDP session from a computer about 2 hours away by air.

snip_20160321095306


snip_2016032110100

Suddenly my sign-in requires Multi-Factor Authentication, because I made an impossible travel.


How Active Directory vNext and the PAM feature works under the hood

So, i decided to figure out how the new PAM feature in MIM worked as a POC for a customer. I configured two forests (red.goodworkaround.com and blue.goodworkaround.com), where RED was the Privileged Access Management forest.

I got MIM PAM up and running in a matter of minutes using the TechNet Configuring the MIM Environment for Privileged Access Managment. As PAM is still very new, I figure it would be a good idea to follow a guide for once.

I imported some groups using the code below, so far so good. The groups was created in the RED forest with sidHistory from the BLUE forest.

$cred = get-credential -UserName RED\marius -Message "RED forest domain admin credentials"
New-PAMGroup -SourceGroupName "Service Admin - Service G" -SourceDomain blue.goodworkaround.com -Credentials $cred  -SourceDC blue-pc.blue.goodworkaround.com

I tested with the Domain Admins group, and it failed with the error message about limitations in sidHistory not allowing this type of group. I already knew this going in, but I figured I wanted to try.

My customer really want to control their Domain Admins group, so we digged further into the new functionality in Windows Server vNext / Threshold. Here there is a new feature which they sometimes call “Foreign Principal Groups” and sometimes “Shadow Groups”. Searching around the web gave very, very few answers, but I found a few interesting sites:

What’s New and Changed (Windows Server vNext)
A pdf with some details
3.1.1.13.5 ExpandShadowPrincipal
2.453 Attribute msDS-ShadowPrincipalSid

From these sites I was able to deduce that what the MIM PAM feature is actually doing is creating msDS-ShadowPrincipal objects, which are basically groups with an additional attribute msDS-ShadowPrincipalSID. These are created in the “Shadow Principal Configuration” container (which is actually a msDs-ShadowPrincipalContainer) under the Services node in AD Sites and Services.

The following PowerShell however, yielded an error “New-ADObject : The specified method is not supported”:

$g = Get-ADGroup -Identity "Domain Admins" -Server blue.goodworkaround.com
New-ADObject -Type msDS-ShadowPrincipal -OtherAttributes @{
    "msDS-ShadowPrincipalSid" = $g.SID
} -Path "CN=Shadow Principal Configuration,CN=Services,CN=Configuration,DC=red,DC=goodworkaround,DC=com" -Name "BLUE.Domain Admins"
$g = Get-ADGroup -Identity "My Global Group" -Server blue.goodworkaround.com
New-ADObject -Type msDS-ShadowPrincipal -OtherAttributes @{
    "msDS-ShadowPrincipalSid" = $g.SID
} -Path "CN=Shadow Principal Configuration,CN=Services,CN=Configuration,DC=red,DC=goodworkaround,DC=com" -Name "BLUE.My Global Group"

Digging a bit more around I found that this PAM feature is an optional feature that has to be enabled, just as the AD Recycle Bin. Enabling the feature was easy:


Get-ADOptionalFeature -Filter {Name -eq "Privileged Access Management Feature"} | Enable-ADOptionalFeature -Scope ForestOrConfigurationSet -Target red.goodworkaround.com

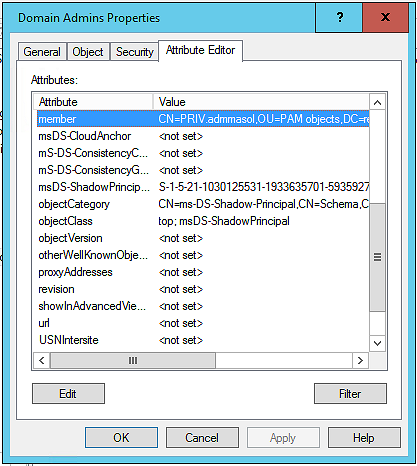
Now, the PowerShell above worked and the shadow principals was created:

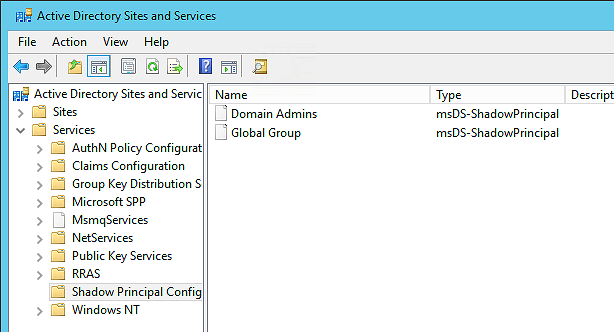
I have not added any members though. So I did that through the GUI:

So what I have now is the following code


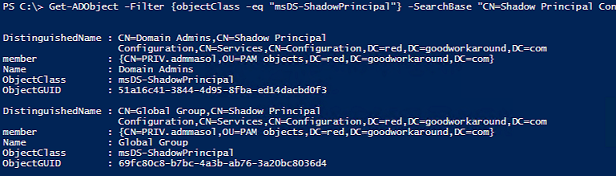
Get-ADObject -Filter {objectClass -eq "msDS-ShadowPrincipal"} -SearchBase "CN=Shadow Principal Configuration,CN=Services,CN=Configuration,DC=red,DC=goodworkaround,DC=com" -Properties member

That returns the following shadow principals (with member as you can see):

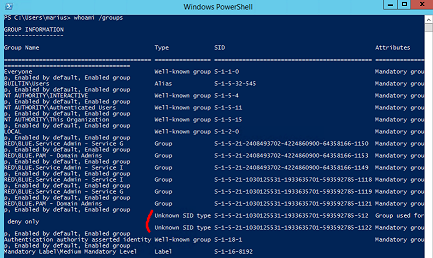
And when logging on as this user and running whoami /groups, you will see these as added groups:

As you can imagine, this will also completely remove the requirement to use ADMT (or the library of ADMT) to migrate SIDs for groups

Now, one heads up that I have asked Microsoft is about: Domain Admins does not work over the trust with this method (the SID is probably filtered away on the other side). I will update the article when I have more info.

Update: So, I talked to Mark Wahl about this and it turns out that it is planned a QFE for older Windows Server versions to allow for built-in groups over trusts, but this will probably not happen until Windows Server vNext is released. This means that the PAM feature will not work for built-in groups until this QFE is released.

Using the Azure AD Graph Reporting API from PowerShell

In an earlier article (source) i demonstrated how to use the Azure AD Graph REST API to do things in Azure AD such as creating users, getting users and license users. This time, we will use the new Repoting API.

What you must first do, is to follow the first steps in this article to create your application. Follow the same steps all the way to “permissions to other applications”. The Reporting API only requires “read directory data”, not “read and write directory data”. As of writing, it actually seems it does not work with “read and write directory data” at all, only if you check “read directory data” does things start to work (you will see an error message like “Unable to check Directory Read access for appId”).

Here is an example of application that gets an oauth token using ADAL and requests a list of all reports:

Add-type -Path C:\GraphAPI\Microsoft.IdentityModel.Clients.ActiveDirectory.2.18.206251556\lib\net45\Microsoft.IdentityModel.Clients.ActiveDirectory.dll

$clientID = "26b2e067-291d-4ad7-9cd2-2e1fae15c905"
$clientSecret = "7dAkpp6sCfc3n6bfsBRoBYORnMFYeA7LsLVkQX+rAn0="
$resAzureGraphAPI = "https://graph.windows.net";

$serviceRootURL = "https://graph.windows.net/goodworkarounddemo.onmicrosoft.com"
$authString = "https://login.windows.net/goodworkarounddemo.onmicrosoft.com";

[Microsoft.IdentityModel.Clients.ActiveDirectory.AuthenticationContext]$AuthContext = [Microsoft.IdentityModel.Clients.ActiveDirectory.AuthenticationContext]$authString
[Microsoft.IdentityModel.Clients.ActiveDirectory.ClientCredential]$clientCredential = New-Object -TypeName "Microsoft.IdentityModel.Clients.ActiveDirectory.ClientCredential"($clientID, $clientSecret)

$authenticationResult = $AuthContext.AcquireToken($resAzureGraphAPI, $clientCredential);


Invoke-RestMethod -Uri "$serviceRootURl/reports?api-version=beta" -Headers @{Authorization=$authenticationResult.CreateAuthorizationHeader()} -ContentType "application/json" | select -ExpandProperty value

This will return something like:

Here are some further examples on what you can do. Please note that if the reports are empty, you seem to be getting the error “An error occurred while processing this request” for some of the reports.

# Gets the Multi-Geo signin report and outputs to screen, grouped by username.
Invoke-RestMethod -Uri "$serviceRootURl/reports/signInsFromMultipleGeographiesEvents?api-version=beta" -Headers @{Authorization=$authenticationResult.CreateAuthorizationHeader()} -ContentType "application/json" |
    Select -ExpandProperty Value |
    Group UserName |
    Foreach {
        Write-Host -ForegroundColor Yellow "----- $($_.Group[0].DisplayName) ($($_.Name)) -----"
        $_.Group | Foreach {
            Write-Host "First signin from:   $($_.firstSignInFrom)"
            Write-Host "Second signin from:  $($_.secondSignInFrom)"
            Write-Host "Time:                $($_.timeOfSecondSignIn)"
            Write-Host "Time between:        $($_.timeBetweenSignIns)"
            Write-Host "Estimated travel:    $($_.estimatedTravelHours) hours"
            Write-Host ""
        }
    }


# Gets the report for users with many failed logon attemps, before suddenly being able to sign in
Invoke-RestMethod -Uri "$serviceRootURl/reports/signInsAfterMultipleFailuresEvents?api-version=beta" -Headers @{Authorization=$authenticationResult.CreateAuthorizationHeader()} -ContentType "application/json" | Select -ExpandProperty Value


# Sends an email to each user informing them of the irregular sign ons the last 24 hours
$uri = '{0}/reports/signInsFromMultipleGeographiesEvents?api-version=beta&$filter=timeOfSecondSignIn gt {1}' -f $serviceRootURl, ((Get-Date (Get-Date).AddDays(-1) -Format "u") -replace " ", "T")
Invoke-RestMethod -Uri $uri -Headers @{Authorization=$authenticationResult.CreateAuthorizationHeader()} -ContentType "application/json" |
    Select -ExpandProperty Value |
    Foreach {
        #Send-MailMessage -From '"IT Department" ' -To
        $params = @{
            Body = "Hi,<br /><br />According to our reports your account was first signed in from '$($_.firstSignInFrom)', and then $($_.timeBetweenSignIns) later, you were signed in from '$($_.secondSignInFrom)'. The estimated travel time is $($_.estimatedTravelHours) hour(s). <br /><br />Please review, and if this looks suspicious to you, change your password.<br /><br />- IT"
            To = ('"{0}" ' -f $_.displayName, $_.username)
            From = '"IT Department" '
            Subject = "Suspicious logon activity for your account"
            BodyAsHtml = $true
            SmtpServer = "smtp.office365.com"
            UseSSL = $true
            Credential = (Get-Credential -Message "Input office 365 credentials for sending mail")
        }

        Send-MailMessage @params
    }

Hope it helps!

Office 2013 with ADAL not working with Single Sign-On

I am currently testing out Office 2013 with ADAL which is currently in preview. With ADAL, the Office applications support “Modern Authentication” which means web redirects instead of using the old basic authentication and “proxying credentials” through Office 365. I followed the guidance and enabled ADAL. However, despite of using ADFS and having the adfs website added as an “intranett site” in security settings in IE, all I got was forms based authentication and not single sign-on as I expected. I contacted the Microsoft product group and verified that this was indeed supposed to work and was one of the primary use cases.

If you enable the TCOTrace registry key, the %temp%\outlook.exe.txt logfile is created and here I found the following entry:

ADAL: message=’Could not discover endpoint for Integrate Windows Authentication. Check your ADFS settings. It should support Integrate Widows Authentication for WS-Trust 1.3.’, additionalInformation=’Authority: https://login.windows.net/common

To fix this, you need to enable an ADFS endpoint that is disabled by default. To do this you need to run the following PowerShell cmdlet and restart the ADFS service on all servers in the farm.


Enable-AdfsEndpoint -TargetAddressPath "/adfs/services/trust/13/windowstransport"

Now it should work, with ADAL giving you perfect SSO from your Office applications.

Another bug

I also encountered a bug that Microsoft is fixing (also verified after contacting the product group) in the April update. If you find a log line saying CheckADUser: Not AD user found in the log file, even though you are a domain user, you have encountered this bug. To fix, close all Office apps and delete the following registry key below and try again: HKCU\Software\Microsoft\Office\15.0\Common\Identity\SignedOutADUser

After deleting the registry key, ADAL should not try Integrated Windows Authentication instead of Forms Based Authentication.

Using the Azure AD Graph API with PowerShell

I am implementing a custom synchronization solution between a member register and Office 365, as well as using a custom identity provider. I therefore need to create, update and delete users in Azure AD using the Graph API, here is how I did it.

Start by downloading the NuGet.exe tool to a folder. I will be using C:\GraphAPI in these examples. If you are not familiar with NuGet, this is a tool for downloading libraries and their dependencies, used a lot by Microsoft. Open a PowerShell and run the following.


cd c:\GraphAPI
.\nuget.exe install Microsoft.IdentityModel.Clients.ActiveDirectory

You should see the following:
PowerShell Result

After running the commands, the folder where you run nuget.exe from should contain some new folders and some files. The following file should now exist (the version number might be different): C:\GraphAPI\Microsoft.IdentityModel.Clients.ActiveDirectory.2.14.201151115\lib\net45\Microsoft.IdentityModel.Clients.ActiveDirectory.dll.

Now, in order to access the Graph API we need to create an application in the Azure AD that you are accessing. Let us start by creating a brand new Azure AD for demo purposes.

Menu to create Azure AD

You should end up with an Azure AD like this:
Menu to create Azure AD

Go to Applications and click “Add an Application”:
Menu to create Azure AD

Choose “Add an application my organization is developing”:
Menu to create Azure AD

Give the application a name of your choice and choose “WEB APPLICATION AND/OR WEB API”:
Menu to create Azure AD

Input a url for your application. This url is never used and does not need to be working or anything, it is just an identifier for your application.
Menu to create Azure AD

Your new application should display. Go to the configuration tab of the new application.
Menu to create Azure AD

Scroll down until you find the Client ID. Copy this, we will use this later.
Menu to create Azure AD

In the Keys section, create a new key and save the application.
Menu to create Azure AD

As soon as you save the application, the key will appear.This is the only time you can see the key so make sure you copy it.

A little note here. As you can see the max lifetime of a key is 2 years, meaning that your application will stop working after two years. What you should do then is to create a new key, input this key into your application and let the old key expire.

Menu to create Azure AD

Last thing to configure on the application is permissions. Go down to the “permissions to other applications” section and change the following to “Read and write directory data”. This operation can take a few minutes to complete (even though it already says completed), so you should wait a few minutes before you try the PowerShell examples below.

As a side note, here you can actually also give permissions to other applications such as Exchange Online to query the API there.

Menu to create Azure AD

You are now finished configuring the application. Now, here is an example PowerShell for you. You need to make sure the path, the client id (which we copied earlier), the key (which we copied earlier) and the tenant name is changed. The rest should be pretty self explanatory.

#
# PowerShell examples created by Marius Solbakken - https://goodworkaround.com/node/73
#

# Change to correct file location
Add-Type -Path "C:\GraphAPI\Microsoft.IdentityModel.Clients.ActiveDirectory.2.14.201151115\lib\net45\Microsoft.IdentityModel.Clients.ActiveDirectory.dll"

# Change these three values to your application and tenant settings
$clientID = "26b2e067-291d-4ad7-9cd2-2e1fae15c905" # CLIENT ID for application
$clientSecret = "qxUG3anGzOi9mfDoV7tHVNWOOM9k2FKo08Xs3bG4APs=" # KEY for application
$tenant = "goodworkarounddemo.onmicrosoft.com" # The tenant domain name

# Static values
$resAzureGraphAPI = "https://graph.windows.net";
$serviceRootURL = "https://graph.windows.net/$tenant"
$authString = "https://login.windows.net/$tenant";

# Creates a context for login.windows.net (Azure AD common authentication)
[Microsoft.IdentityModel.Clients.ActiveDirectory.AuthenticationContext]$AuthContext = [Microsoft.IdentityModel.Clients.ActiveDirectory.AuthenticationContext]$authString

# Creates a credential from the client id and key
[Microsoft.IdentityModel.Clients.ActiveDirectory.ClientCredential]$clientCredential = New-Object -TypeName "Microsoft.IdentityModel.Clients.ActiveDirectory.ClientCredential"($clientID, $clientSecret)

# Requests a bearer token
$authenticationResult = $AuthContext.AcquireToken($resAzureGraphAPI, $clientCredential);

# Output the token object
Write-Host -ForegroundColor Yellow "Token object:"
$authenticationResult | Format-List


# Example to get all users
Write-Host -ForegroundColor Yellow "Getting all users"
$users = Invoke-RestMethod -Method GET -Uri "$serviceRootURL/users?api-version=1.5" -Headers @{Authorization=$authenticationResult.CreateAuthorizationHeader()} -ContentType "application/json"
$users.value | Format-Table UserPrincipalName,DisplayName


# Example to create a user
Write-Host -ForegroundColor Yellow "Creating user"

$newUserJSONObject = @{
    "accountEnabled" = $true
    "displayName" = "Donald Duck"
    "mailNickname" = "donald.duck"
    "passwordProfile" = @{
        "password" = "Test1234"
        "forceChangePasswordNextLogin" = $false
    }
    "userPrincipalName" = "donald.duck@$tenant"
} | ConvertTo-Json

Invoke-RestMethod -Method POST -Uri "$serviceRootURL/users?api-version=1.5" -Headers @{Authorization=$authenticationResult.CreateAuthorizationHeader()} -ContentType "application/json" -Body $newUserJSONObject


# Example to update a user
Write-Host -ForegroundColor Yellow "Updating user"
$updateUserJSONObject = @{
    "givenName" = "Donald"
    "surname" = "Duck"
} | ConvertTo-Json
Invoke-RestMethod -Method PATCH -Uri "$serviceRootURL/users/donald.duck@${tenant}?api-version=1.5" -Headers @{Authorization=$authenticationResult.CreateAuthorizationHeader()} -ContentType "application/json" -Body $updateUserJSONObject


# Example to get a single user
Write-Host -ForegroundColor Yellow "Getting user"
$user = Invoke-RestMethod -Method GET -Uri "$serviceRootURL/users/donald.duck@${tenant}?api-version=1.5" -Headers @{Authorization=$authenticationResult.CreateAuthorizationHeader()} -ContentType "application/json"
$user


# Example to delete a user - please note that this requires a special permissions set with the MsOnline PowerShell module
Write-Host -ForegroundColor Yellow "Deleting user"
Invoke-RestMethod -Method DELETE -Uri "$serviceRootURL/users/donald.duck@${tenant}?api-version=1.5" -Headers @{Authorization=$authenticationResult.CreateAuthorizationHeader()} -ContentType "application/json"

Custom ADFS cmdlets I use all the time

I don’t know about your habits, but one of mine is filling my PowerShell profile with all kinds of good stuff. Here are a few of my favorites for ADFS.


function Copy-ADFSClaimRules
{
    [CmdletBinding()]
    Param
    (
        # Param1 help description
        [Parameter(Mandatory=$true,
                   ValueFromPipeline=$false,
                   Position=0)]
        [string] $SourceRelyingPartyTrustName,

        [Parameter(Mandatory=$true,
                   ValueFromPipeline=$false,
                   Position=1)]
        [string] $DestinationRelyingPartyTrustName
    )

    Begin
    {
    }
    Process
    {
        $SourceRPT = Get-AdfsRelyingPartyTrust -Name $SourceRelyingPartyTrustName
        $DestinationRPT = Get-AdfsRelyingPartyTrust -Name $DestinationRelyingPartyTrustName

        if(!$SourceRPT) {
            Write-Error "Could not find $SourceRelyingPartyTrustName"
        } elseif(!$DestinationRPT) {
            Write-Error "Could not find $DestinationRelyingPartyTrustName"
        }

        Set-AdfsRelyingPartyTrust -TargetRelyingParty $DestinationRPT -IssuanceTransformRules $SourceRPT.IssuanceTransformRules -IssuanceAuthorizationRules $SourceRPT.IssuanceAuthorizationRules -DelegationAuthorizationRules $SourceRpT.DelegationAuthorizationRules
    }
    End
    {
    }
}


function Get-AdfsTokenSigningThumbprint
{
    [CmdletBinding()]
    Param
    (
        # Param1 help description
        [Parameter(Mandatory=$true,
                   ValueFromPipelineByPropertyName=$false,
                   Position=0)]
        $ADFS
    )

    Begin
    {
    }
    Process
    {
        $metadata = Invoke-RestMethod -Uri ("https://{0}/FederationMetadata/2007-06/FederationMetadata.xml" -f $ADFS)
        $tempfile = "{0}\adfsTempCert.cer" -f $env:temp
        $metadata.EntityDescriptor.Signature.KeyInfo.X509Data.X509Certificate | Set-Content -Path $tempfile
        $cert = (New-Object System.Security.Cryptography.X509Certificates.X509Certificate2)
        $cert.Import($tempfile)

        return $cert.Thumbprint
    }
    End
    {
    }
}


function Copy-AdfsRelyingPartyTrust
{
    [CmdletBinding()]
    [OutputType([int])]
    Param
    (
        [Parameter(Mandatory=$true,
                   ValueFromPipeline=$false,
                   Position=0)]
        $SourceRelyingPartyTrustName,

        [Parameter(Mandatory=$true,
                   ValueFromPipeline=$false,
                   Position=1)]
        $NewRelyingPartyTrustName,

        [Parameter(Mandatory=$true,
                   ValueFromPipeline=$false,
                   Position=2)]
        $NewRelyingPartyTrustIdentifier
    )

    Begin
    {
    }
    Process
    {
        $SourceRelyingPartyTrust  = Get-AdfsRelyingPartyTrust -Name $SourceRelyingPartyTrustName

        $exceptedAttributes = @("ConflictWithPublishedPolicy","OrganizationInfo","ProxyEndpointMappings","LastUpdateTime","PublishedThroughProxy","LastMonitoredTime")
        $parameters = @{}
        $SourceRelyingPartyTrust | Get-Member -MemberType Property | where{$_.name -notin $exceptedAttributes} | foreach {
            if($SourceRelyingPartyTrust.($_.Name) -ne $null) {
                $parameters[$_.Name] = $SourceRelyingPartyTrust.($_.Name)
            }
        }
        $parameters.Name = $NewRelyingPartyTrustName
        $parameters.Identifier = $NewRelyingPartyTrustIdentifier

        Add-AdfsRelyingPartyTrust @parameters
    }
    End
    {
    }
}

PowerShell and EWS Managed API

Here is a script that lets you download mail objects with attachments from an Exchange mailbox (works with Office 365). First, install Exchange Web Services Managed API 2.2.

# Destination folder
$destinationFolder = "C:\Users\marius\Downloads\Attachment Downloader"

# replace with your email address
$email    = "username@mytenant.onmicrosoft.com"
$username = "username@mytenant.onmicrosoft.com"
$password = "Password123!"

# File extensions to download
$extensions = "pdf","pdfa","doc","docx","dot","dotx","xls","xlsx","ppt","pptx"

# load the assembly
Add-Type -Path "C:\Program Files\Microsoft\Exchange\Web Services\2.2\Microsoft.Exchange.WebServices.dll"

# Create Exchange Service object
$s = New-Object Microsoft.Exchange.WebServices.Data.ExchangeService([Microsoft.Exchange.WebServices.Data.ExchangeVersion]::Exchange2013_SP1)
$s.Credentials = New-Object Net.NetworkCredential($username, $password)
# $s.TraceEnabled = $true
Write-Host "Trying AutoDiscover... "
$s.AutodiscoverUrl($email, {$true})

if(!$s.Url) {
    Write-Error "AutoDiscover failed"
    return;
} else {
    Write-Host -ForegroundColor Green "AutoDiscover succeeded - $($s.Url)"
}

# Create destination folder
$destinationFolder = "{0}\{1}" -f $destinationFolder, (Get-Date -Format "yyyyMMdd HHmmss")
mkdir $destinationFolder | Out-Null

# get a handle to the inbox
$inbox = [Microsoft.Exchange.WebServices.Data.Folder]::Bind($s,[Microsoft.Exchange.WebServices.Data.WellKnownFolderName]::Inbox)

#create a property set (to let us access the body & other details not available from the FindItems call)
$psPropertySet = new-object Microsoft.Exchange.WebServices.Data.PropertySet([Microsoft.Exchange.WebServices.Data.BasePropertySet]::FirstClassProperties)
$psPropertySet.RequestedBodyType = [Microsoft.Exchange.WebServices.Data.BodyType]::Text;

# Find the items
$inc = 0;
$maxRepeat = 50;
do {
    $maxRepeat -= 1;

    Write-Host "Searching for items in mailbox... " -NoNewline
    $items = $inbox.FindItems(100)
    Write-Host -ForegroundColor Green "found $($items.items.Count)"

    foreach ($item in $items.Items)
    {
        # Create mail folder
        $inc += 1
        $mailFolder = "{0}\{1}" -f $destinationFolder, $inc;
        mkdir $mailFolder | Out-Null

        # load the property set to allow us to get to the body
        try {
            $item.load($psPropertySet)
            Write-Host ("$inc - $($item.Subject)") -ForegroundColor Yellow

            # save the metadata to a file
            $item | Export-Clixml ("{0}\metadata.xml" -f $mailFolder)

            # save all attachments
            foreach($attachment in $item.Attachments) {
                if(($attachment.Name -split "\." | select -last 1) -in $extensions) {
                    Write-Host " - $($attachment.Name) - $([Math]::Round($attachment.Size / 1024))KB"
                    $fileName = ("{0}\{1}" -f $mailFolder, $attachment.Name) -replace "/",""
                    $attachment.Load($fileName)
                }
            }

            # delete the mail item
            $item.Delete([Microsoft.Exchange.WebServices.Data.DeleteMode]::HardDelete, $true)
        } catch [Exception] {
            Write-Error "Unable to load item: $($_)"
        }
    }
} while($items.MoreAvailable -and $maxRepeat -ge 0)

Lessons learned while configuring the SharePoint Services Connector for FIM 2010 R2

I have now configured many SharePoint Management Agents, and initially I had severe problems finding out which attributes to populate with what. Here is the lessons I learned during this investigation.

Application ID

During configuration of the Management Agent, you are requested to input Application ID. I have never used it, and i guess it is used when you have multiple User Profile Service Applications.

Anchor

Do not bother with anchors. Instead just provision a connector space object and let it get the default anchor. You will never see the anchor anywhere except in FIM and internally in the SharePoint databases.

Manager attribute populating bug

There is a bug in SharePoint, where the manager attribute won’t be populated in the User Profile Service, even though you are flowing it with FIM. The reason is that the timer job “User Profile Service Application – User Profile ActiveDirectory Import Job” is not created if you configure “Enable External Identity Manager” directly. Instead, you have to first choose “Use SharePoint Active Directory Import” on the “Configure Synchronization Settings”, and let this job be created (takes 15 minutes), then switch to “Enable External Identity Manager”.

Parallellism

It is not supported to run multiple SharePoint MAs simultaneously. Not sure why, but a little bit of code snooping shows this is true.

Pictures

Pictures can be a bit difficult, especially when trying with limited permissions. First of all, if you use fiddler the attribute is actually called “PictureURL”. Also, technically it seems as though what actually happens when you use this connector and export a picture, you transfer the binary data (as base64 ofc) out in “PictureURL / Picture” and the API you talk to uploads these data as an original to your mysite, at the location “http://mysitehost.goodworkaround.com/User photos”. And then it stores the url of the picture in the User Profile Service.

First of all, the MySite host MUST BE IN THE SAME FARM. It is not possible to have pictures uploaded to a separate SharePoint farm. Second, there is a requirement for permissions on the mysitehost. You can grant these permissions with the following cmdlet:


$w = Get-SPWebApplication -Identity http://mysitehost.goodworkaround.com
$w.GrantAccessToProcessIdentity("gwrnd\managementAgentAccount")

If you do not give this permissions, FIM will not get any error message from SharePoint saying “sorry, we could not store this picture”. It will simply be “ok” even though the picture was not saved.

Also, as you can see in this TechNet article you need to run a cmdlet to actually generate the thumbnail photos.

ADFS authentication

To configure ADFS authentication the following attributes needs to be flowed from FIM to SharePoint:

SharePoint attribute Value
SPS-ClaimProviderID Name of the trusted identity provider in SP (case sensitive): “SAML Users”
SPS-ClaimProviderType Constant: “Trusted”
SPS-ClaimID Unique identifier – mail, userPrincipalname, employeeID etc. Must be what comes in the nameidentifier claim from ADFS
SID Do not flow anything
ProfileIdentifier someprefix:unique – where “unique” is the same as SPS-ClaimID (not required, but make it unique)
UserName Do not flow anything
AccountName Do not flow anything

Example user

SharePoint attribute Value
SPS-ClaimProviderID SAML Users
SPS-ClaimProviderType Trusted
SPS-ClaimID marius@goodworkaround.com
SID no flow
ProfileIdentifier gwrnd:marius@goodworkaround.com
UserName no flow
AccountName no flow – SharePoint will automatically populate this with something like “i:0\.t|SAML Users|marius@goodworkaround.com

Windows authentication

To configure Windows authentication the following attributes needs to be flowed from FIM to SharePoint:

SharePoint attribute Value
SPS-ClaimProviderID Constant: “Windows”
SPS-ClaimProviderType Constant: “Windows”
SID ObjectSID from Active Directory
ProfileIdentifier DOMAIN\sAMAccountName from Active Directory
UserName sAMAccountName from Active Directory
AccountName Do not flow anything

Example user

SharePoint attribute Value
SPS-ClaimProviderID Windows
SPS-ClaimProviderType Windows
SID – binary data –
ProfileIdentifier GWRND\marius
UserName marius
AccountName no flow

That’s, hope it saves you some time.

Using your PowerShell profile for something very useful

Have you ever found yourself writing the same PowerShell code over and over, thinking “there should be a built-in function for this”. Here is my trick for an even better PowerShell day! First I’ll show you how to create a PowerShell profile where you can define all of our favorite methods, and then I’ll show you how to use it on many computers, as you will probably want this on your servers as well as your desktop.

Start by opening a PowerShell and type $profile. This default variable contains a path to your PowerShell profile, usually located in the Documents\WindowsPowerShell, which does not exist by default. Run the following two lines to create the folder, and create an empty file.

mkdir (Split-Path $profile) -ErrorAction SilentlyContinue;
if(!(Test-Path $profile))
{
	Set-Content -Path $profile -Value ""
}

After running these you have an empty profile. Use your favorite editor to edit the file.

# PS> ise $profile

The code inside this file will run each time your start a new PowerShell. Here you can define your own methods. What makes this very usefull is the possibility to create a method to download your PowerShell profile from the internet. Here is an example of such a function:

# Function to update the powershellprofile from the internet
function Update-PowerShellProfile() {
    [CmdletBinding()]
    Param()
    Write-Verbose "Updating PowerShell profile"

    if(!(Test-Path (Split-Path $profile))) {
        Write-Verbose ("Profile path did not exist, creating {0}" -f (Split-Path $profile))
        mkdir (Split-Path $profile)
    }

    Write-Debug "Creating System.Net.WebClient"
    $wc = New-Object System.Net.WebClient
    Write-Debug "Downloading file http://pastebin.com/raw.php?i=tdySrDgz"
    $wc.DownloadFile("http://pastebin.com/raw.php?i=tdySrDgz", $profile)

    Write-Output "Reload profile with the cmdlet:  . `$profile"
}

Basically it downloads a some stuff from pastebin and puts into the PowerShell profile. After this, you can either open a new PowerShell to run the profile again, or you can type “. $profile” to re-load the profile.

Here is an example of a full profile (a subset of methods I have in mine). I have my own PowerShell profile hosted in my Dropbox folder, but you choose wherever you want, just change the Update-PowerShellProfile method.


function Connect-ExchangeOnline{
    [CmdletBinding()]
    Param(
        [Parameter(Mandatory=$True,Position=0)]
        [System.Management.Automation.PSCredential]$Credentials
    )
    $Session = New-PSSession -ConfigurationName Microsoft.Exchange -ConnectionUri https://ps.outlook.com/powershell -Authentication Basic -AllowRedirection -Credential $Credentials
    Import-PSSession $session -DisableNameChecking
}

function Disconnect-ExchangeOnline {
    [CmdletBinding()]
    Param()
    Get-PSSession | ?{$_.ComputerName -like "*outlook.com"} | Remove-PSSession
}

# Function to update the powershellprofile from the internet
function Update-PowerShellProfile() {
    [CmdletBinding()]
    Param()
    Write-Verbose "Updating PowerShell profile"

    if(!(Test-Path (Split-Path $profile))) {
        Write-Verbose ("Profile path did not exist, creating {0}" -f (Split-Path $profile))
        mkdir (Split-Path $profile)
    }

    Write-Debug "Creating System.Net.WebClient"
    $wc = New-Object System.Net.WebClient
    Write-Debug "Downloading file http://pastebin.com/raw.php?i=tdySrDgz"
    $wc.DownloadFile("http://pastebin.com/raw.php?i=tdySrDgz", $profile)

    Write-Output "Reload profile with the cmdlet:  . `$profile"
}

# Set the PowerShell prompt to PS>
function prompt{
    Write-Host -ForegroundColor Red "PS" -NoNewline
    Write-Host -ForegroundColor White -NoNewline ">"
    return " "
}


function ConvertTo-Base64
{
    [CmdletBinding(DefaultParameterSetName='String')]
    [OutputType([String])]
    Param
    (
        # String to convert to base64
        [Parameter(Mandatory=$true,
                   ValueFromPipeline=$true,
                   ValueFromRemainingArguments=$false,
                   Position=0,
                   ParameterSetName='String')]
        [ValidateNotNull()]
        [ValidateNotNullOrEmpty()]
        [string]
        $String,

        # Param2 help description
        [Parameter(ParameterSetName='ByteArray')]
        [ValidateNotNull()]
        [ValidateNotNullOrEmpty()]
        [byte[]]
        $ByteArray
    )

    if($String) {
        return [System.Convert]::ToBase64String(([System.Text.Encoding]::UTF8.GetBytes($String)));
    } else {
        return [System.Convert]::ToBase64String($ByteArray);
    }
}


function ConvertFrom-Base64 {
    [CmdletBinding()]
    Param(
        [Parameter(Mandatory=$True,
                   Position=0,
                   ValueFromPipeline=$true)]
        [ValidateNotNull()]
        [ValidateNotNullOrEmpty()]
        [string]
        $Base64String
    )

    return [System.Text.Encoding]::UTF8.GetString(([System.Convert]::FromBase64String($Base64String)));
}


function Split-String
{
    [CmdletBinding()]
    [OutputType([string[]])]
    Param
    (
        # The input string object
        [Parameter(Mandatory=$true,
                   ValueFromPipeline=$true,
                   Position=0)]
        [String] $InputObject,

        # Split delimiter
        [Parameter(Mandatory=$false,
                   ValueFromPipeline=$false,
                   Position=1)]
        [String] $Delimiter = "`n",

        # Do trimming or not
        [Parameter(Mandatory=$false,
                   ValueFromPipeline=$false,
                   Position=2)]
        [Boolean] $Trim = $true

    )

    if($Trim) {
        return $InputObject -split $Delimiter | foreach{$_.Trim()}
    } else {
        return $InputObject -split $Delimiter
    }
}


function ConvertFrom-ImmutableID
{
    [CmdletBinding()]
    [OutputType([GUID])]
    Param
    (
        # Param1 help description
        [Parameter(Mandatory=$true,
                   ValueFromPipelineByPropertyName=$false,
                   ValueFromPipeline=$true,
                   Position=0)]
        $ImmutableID
    )

    return [guid]([system.convert]::frombase64string($ImmutableID) )
}


function New-ObjectFromHashmap
{
    [CmdletBinding()]
    Param
    (
        # Param1 help description
        [Parameter(Mandatory=$true,
                   ValueFromPipeline=$true,
                   Position=0)]
        $Hashmap
    )

    Begin
    {
    }
    Process
    {
        New-Object -TypeName PSCustomObject -Property $Hashmap
    }
    End
    {
    }
}

Then for each new server you are working on, just find a way to bring the Update-PowerShellProfile method, run it and you have the same profile everywhere, such as my Connect-ExchangeOnline method or the Split-String method.

Have fun!

Creating a simple ADFS authenticated .NET site

Authenticating .NET sites with ADFS is pretty easy, especially when you create a new Visual Studio project and just point to the ADFS farm’s federation metadata. However, some times you might want an as simple ADFS authenticated site as possible, without MVC patterns or anything. In this article I will provide you with the simplest .NET site possible for authenticating with ADFS. Also, I will demonstrate how to host this site in Azure Websites.

Creating an Azure website

This site will also work on regular IIS or IISExpress servers, but here is how to configure an Azure website to host it.

Start by logging into the Azure mangement portal and creating a new website.

Choose a URL, choose a web hosting plan (or create one if you have not already done that). Click the OK-button.

After you have created the site, you should see it provisioning and then running. This can take a few momemts.

Click the site and go to the Dashboard of the site. On the Dashboard, click “Download the publish profile”.

Store the file and open it in your favorite text editor. Here you will find the Web Deploy and the FTP publishing method. Get the userName, userPWD and publishUrl for the FTP method. The publish url shoul be something like ftp://waws-prod-db3-013.ftp.azurewebsites.windows.net/site/wwwroot, the password about 50 characters and the username on the form website\$website, in my case extmin\$extmin.

Open an Explorer window, or any other FTP client, and go to the ftp url. Enter the username and password and you should see this.

You can safely delete the hostingstart.html file. You know have access to the storage area for your website, and can publish anything you’d like here. For the sake of this guide, you will want to get this file and extract the contents to this area. Also, your site will be available at https://sitename.azurewebsites.net.

Configuring ADFS

What we need to do is to add a new Relying Part Trust. Start by opening the ADFS management console, and clicking “Add Relying Party Trust” in the right column.

Choose to enter data manually.

Select any display name you’d like.

Choose AD FS Profile.

Enble support for WS Federation, and input the url of the website we created in Azure (or if you have the site on-premise, the url you have for it there).

Leave the default configuration for identifier. This is the “realm” from web.config if you choose to use something not default.

Click next on the rest of the pages, and finish. This should now open the following window with editing claim rules.

Click “Add…” and select “Send LDAP Attributes as claims”, and click next.

Here you can choose whatever attributes you want to send. Here is just an example. You can also choose to not send any attributes. The simple site will still authenticate you, but it will not know anything about the user (other than that the user was authenticated).

Click Finish and OK. You have now configured ADFS.

Explanation of each file in the website

Click here to download all files in the example. The following is an explanation of each file.

Default.aspx
Simple default page with codebehind. Shouldn’t really need any explanation.

Default.aspx.cs
A simple codebehind with a simple Page_Load that prints each claim provided. The important bit here is the following line. The ClaimsIdentity class provides a lot of methods necessary to actually get access to the different claims.


System.Security.Claims.ClaimsIdentity Identity = new System.Security.Claims.ClaimsIdentity(Thread.CurrentPrincipal.Identity);

bin/System.IdentityModel.Tokens.ValidatingIssuerNameRegistry
Important library used to validate the token signing. This is actually from NuGet – https://www.nuget.org/packages/System.IdentityModel.Tokens.ValidatingIssuerNameRegistry/.

Web.config
Each section is commented, and this is the only file that you need to edit.

Get ADFS token signing thumbprint.ps1
Run from any computer with PowerShell 4.0 (for example 2012 R2 server). Just right click and “Run with PowerShell”. Input the hostname of your ADFS farm, such as adfs.goodworkaround.com, and this script will get the federation metadata and extract the thumbprint. This is what you need in web.config, in the issuerNameRegistry.

Setting up the website

The only file you need to edit is the web.config file. Open web.config in your favorite editor and just replace the following:

Replace With
adfs.goodworkaround.com The FQDN of your ADFS
min.azurewebsites.net The FQDN of your website
7B0EBA22C68FD2375F95692EF9C1B90B563D8064 The thumbprint you get from Get ADFS token signing thumbprint.ps1

Drag all the files over in the deployment FTP, or whatever deployment method you choose, and you are good to go.

Testing

Open a browser and navigate to your site. You should see that you are immediately redirected to your ADFS.

Log in, and you should be redirected back to your site, which will show you your claims.

Let me know if you have any trouble!