Continuing my series on how to achieve a full “Identity Governance and Administration” (IGA) solution using Azure AD, the topic this time and for the next few posts will be provisioning, with focus on actually transferring the app roles from my previous post into the application itself.
There are three general ways of transferring the app roles assigned in Azure AD into an application:
- Outbound provisioning using SCIM
- Claims
- Requesting the data from the Microsoft Graph
Today we’ll focus on SCIM.
SCIM, or System for Cross-domain Identity Management, sexy as it sounds, is simply a protocol definition for a JSON based REST API. Azure AD supports sending user data out to these types of APIs for custom applications, the same way it supports sending user data to applications such as Box, Dropbox, G-suite and many, many others.
You might have noticed that enterprise applications in Azure AD has “Provisioning” available, and wondered what that is all about?

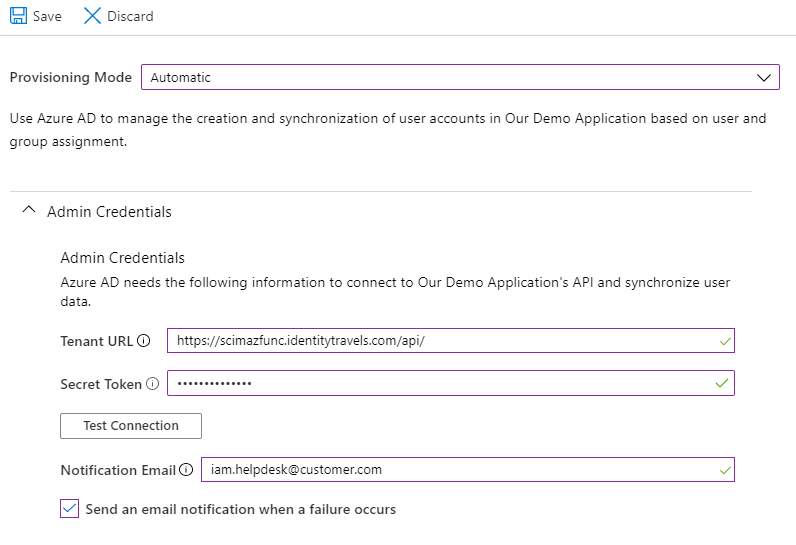
Changing provisioning mode to “Automatic” opens a whole can of works that we will break down now.
Tenant URL is simply the url to the base of the application’s API, where today the Azure AD SCIM implementation is quite simple and will simply append “Users” to the url in order to find the Users endpoint.
The secret token is optional, and the input value will arrive in the authorization header when Azure AD contacts your API. If no secret token is provided, Azure AD will send a signed bearer token with the application as the audience in the bearer token.
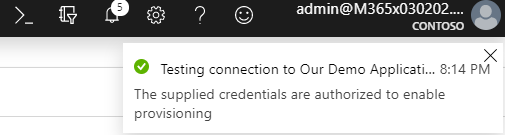
With the configuration above done, clicking test connection fails of course, because we need someone to actually receive the data.
If you are reading this as a developer, this is a very simplified example Azure Function as SCIM interface (There are plenty of missing classes, the point is simply to show the required endpoints). You should have a look at the documentation in order to implement your actual API.
using System;
using System.IO;
using System.Threading.Tasks;
using Microsoft.AspNetCore.Mvc;
using Microsoft.Azure.WebJobs;
using Microsoft.Azure.WebJobs.Extensions.Http;
using Microsoft.AspNetCore.Http;
using Microsoft.Extensions.Logging;
using Newtonsoft.Json;
using ScimFunctionApp1.Models.SCIM;
using System.Collections.Generic;
using ScimFunctionApp1.Connector;

namespace ScimFunctionApp1
{
    public static class SCIM
    {
        [FunctionName("Users")]
        public static async Task<IActionResult> Users(
            [HttpTrigger(AuthorizationLevel.Anonymous, "get", "patch", "post", "delete", Route = "Users/{id?}")] HttpRequest req,
            string id,
            ILogger log)
        {
            log.LogInformation($"C# HTTP trigger function processed a request. {req.Method} Users/{id}");

            // Check authorization header
            if (req.Headers.ContainsKey("Authorization"))
            {
                string authorization = req.Headers["Authorization"].ToString();
                log.LogDebug($"Authorization header provided: {authorization}");

                //TODO verify header
            }
            else
            {
                return (ActionResult)new NotFoundObjectResult("Authorization failed");
            }

            // Log filter
            if(req.GetQueryParameterDictionary().ContainsKey("filter"))
            {
                log.LogDebug($"Filter provided: {req.GetQueryParameterDictionary()["filter"]}");
            }

            // GET Users/123
            if (req.Method == "GET" && id != null)
            {
                log.LogInformation($"Handling get of user {id}");
                User user = InMemory.singleton().GetUser(id);

                return (ActionResult)new OkObjectResult(user);
            }

            // GET Users?filter=test
            else if (req.Method == "GET" && req.GetQueryParameterDictionary().ContainsKey("filter"))
            {
                // Always return empty list when filter is provided
                var response = new ListResponse()
                {
                    schemas = new List<string>() { "urn:ietf:params:scim:api:messages:2.0:ListResponse" },
                    totalResults = 0,
                    startIndex = 1,
                    itemsPerPage = 1000,
                    Resources = new List<Resource>()
                };

                return (ActionResult)new OkObjectResult(response)
                {
                    ContentTypes = new Microsoft.AspNetCore.Mvc.Formatters.MediaTypeCollection() { @"application/scim+json" }
                };

            }

            // GET Users
            else if (req.Method == "GET")
            {
                log.LogInformation($"Handling get of all users");

                var response = new ListResponse()
                {
                    schemas = new List<string>() { "urn:ietf:params:scim:api:messages:2.0:ListResponse" },
                    totalResults = 1,
                    startIndex = 1,
                    itemsPerPage = 1000,
                    Resources = new List<Resource>()
                };

                response.Resources.AddRange(InMemory.singleton().GetUsers());
                response.totalResults = response.Resources.Count;

                return (ActionResult)new OkObjectResult(response)
                {
                    ContentTypes = new Microsoft.AspNetCore.Mvc.Formatters.MediaTypeCollection() { @"application/scim+json" }
                };
            }

            // POST /Users
            else if (req.Method == "POST" && id == null)
            {
                log.LogInformation($"Handling post of user");

                string requestBody = await new StreamReader(req.Body).ReadToEndAsync();

                User user = JsonConvert.DeserializeObject<User>(requestBody);
                User response = InMemory.singleton().PostUser(user);

                return (ActionResult)new OkObjectResult(response);
            }

            // PATCH /Users/123
            else if (req.Method == "PATCH" && id != null)
            {
                log.LogInformation($"Handling patch of user {id}");

                string requestBody = await new StreamReader(req.Body).ReadToEndAsync();

                User user = JsonConvert.DeserializeObject<User>(requestBody);
                User response = InMemory.singleton().PatchUser(id, user);

                return (ActionResult)new OkObjectResult(response);
            }

            // DELETE /Users/123
            else if (req.Method == "DELETE" && id != null)
            {
                log.LogInformation($"Handling delete of user {id}");

                InMemory.singleton().DeleteUser(id);
                return (ActionResult)new OkObjectResult($"Deleted");
            } else
            {
                return new NotFoundObjectResult("Endpoint not valid"); // ("Endpoint not valid");
            }
        }
    }
}
After the API is ready, and you are at this point here where the “Test connection” button actually succeeds, we are ready to go on:
When we are able to save the configuration, Azure AD will set up two default mappings for us, one for groups and one for users, and disable provisioning until we have configured our mapping.

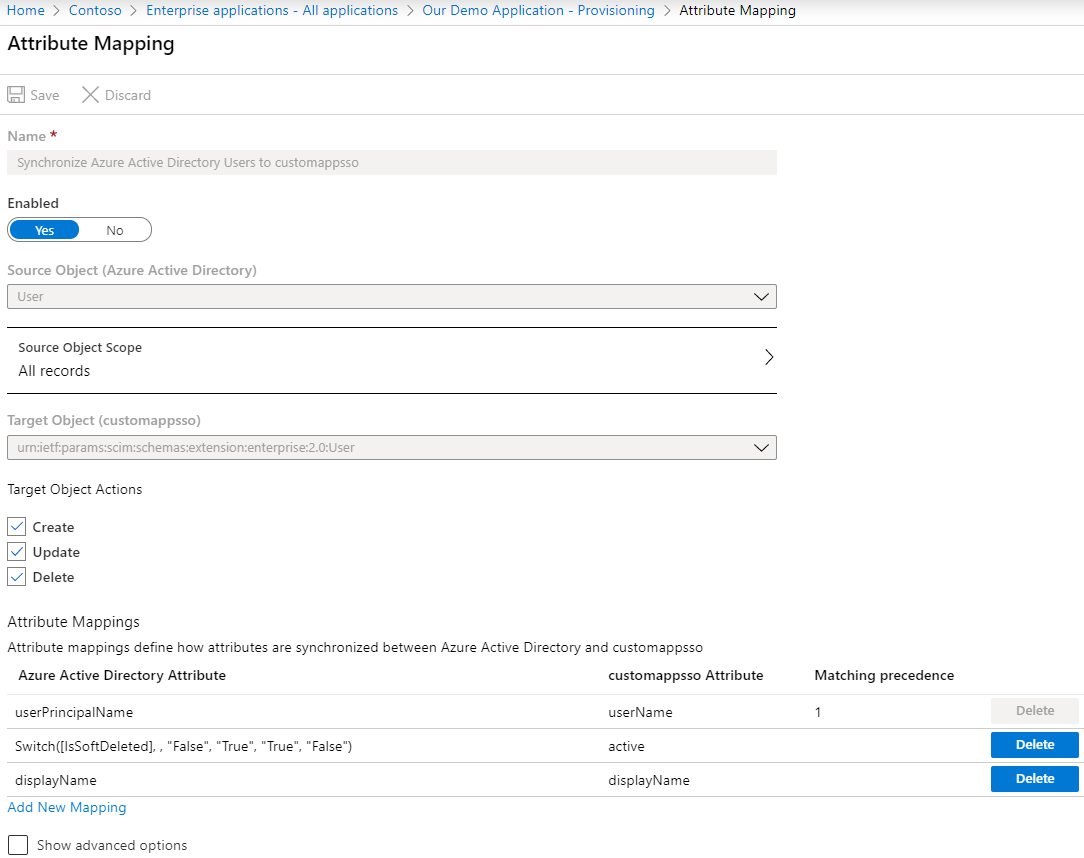
For this demo we will just provision users, and no groups. Clicking on the “Synchronize Azure Active Directory Users to customappsso” attribute mapping, opens the following screen(s):

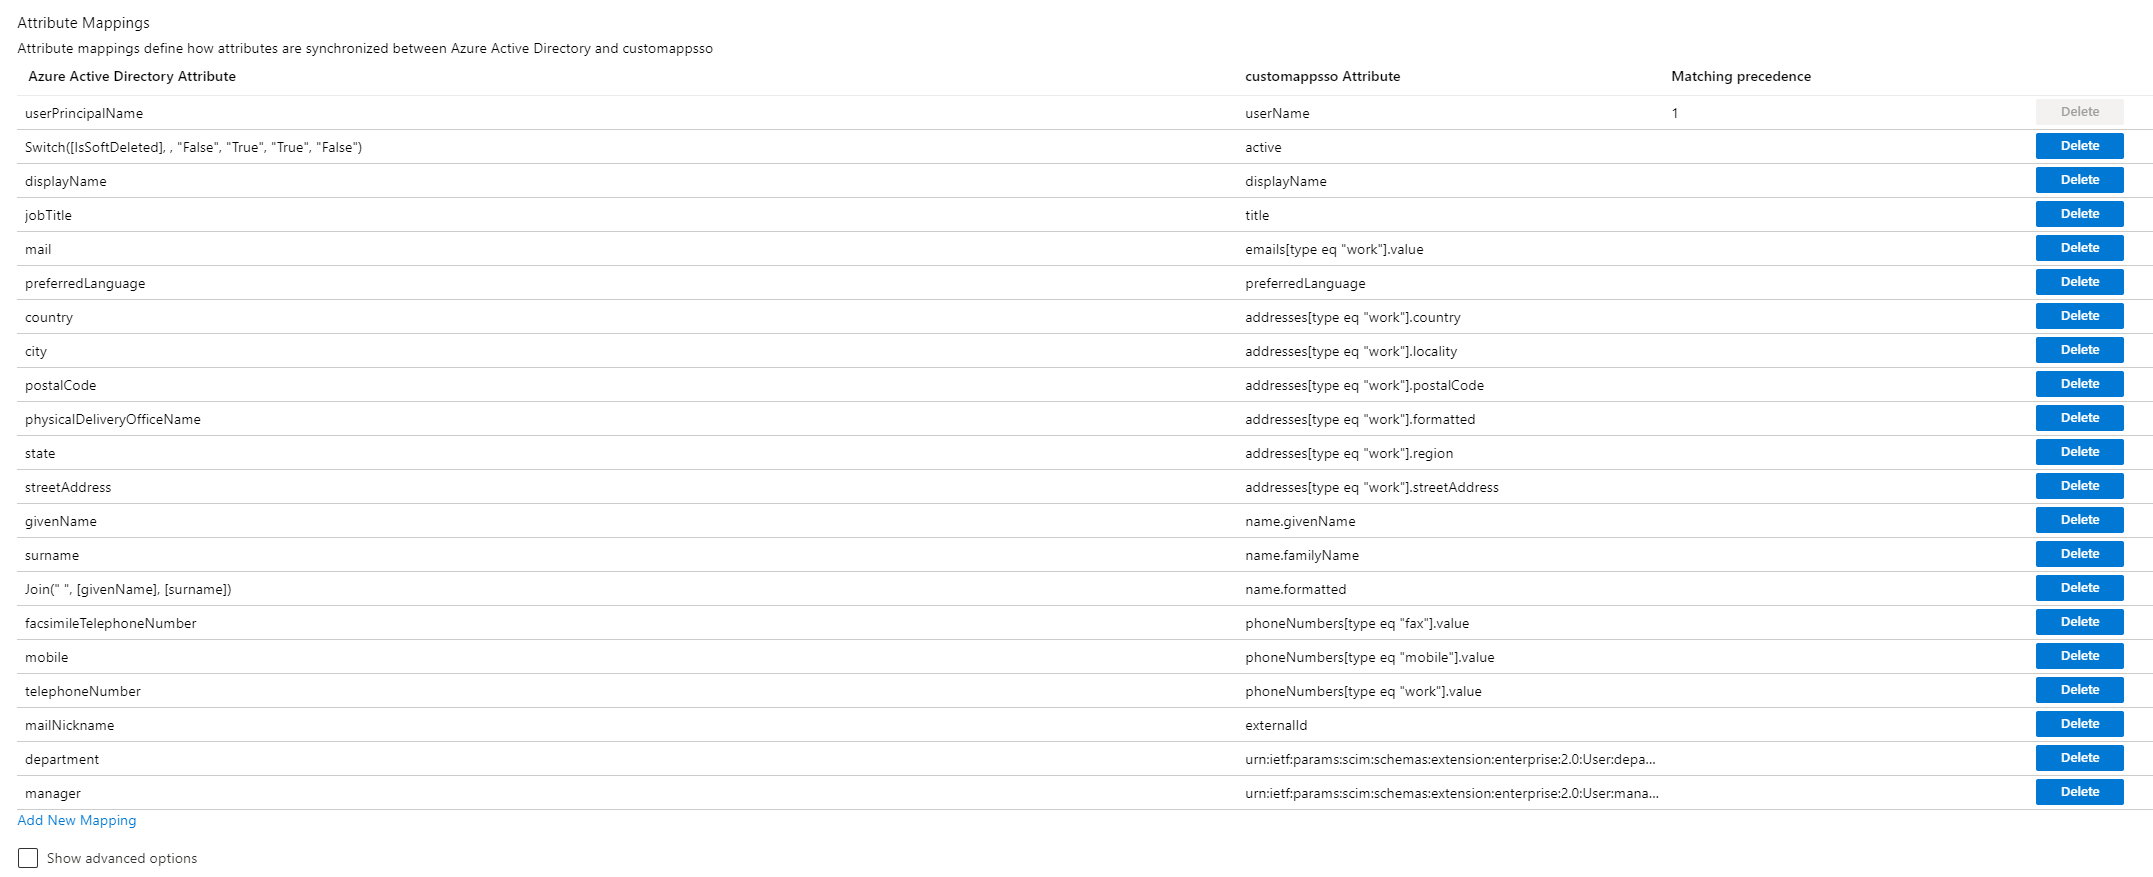
You will see that there are a LOT of different attribute mapped by default. Let’s remove a bounch of them to focus on roles:
Now click the “Show advanced options” checkbox, and click “Edit attribute list”.

What will appear now is essentially the default “user schema” provided by Azure AD. We can, and will, add custom attributes here.
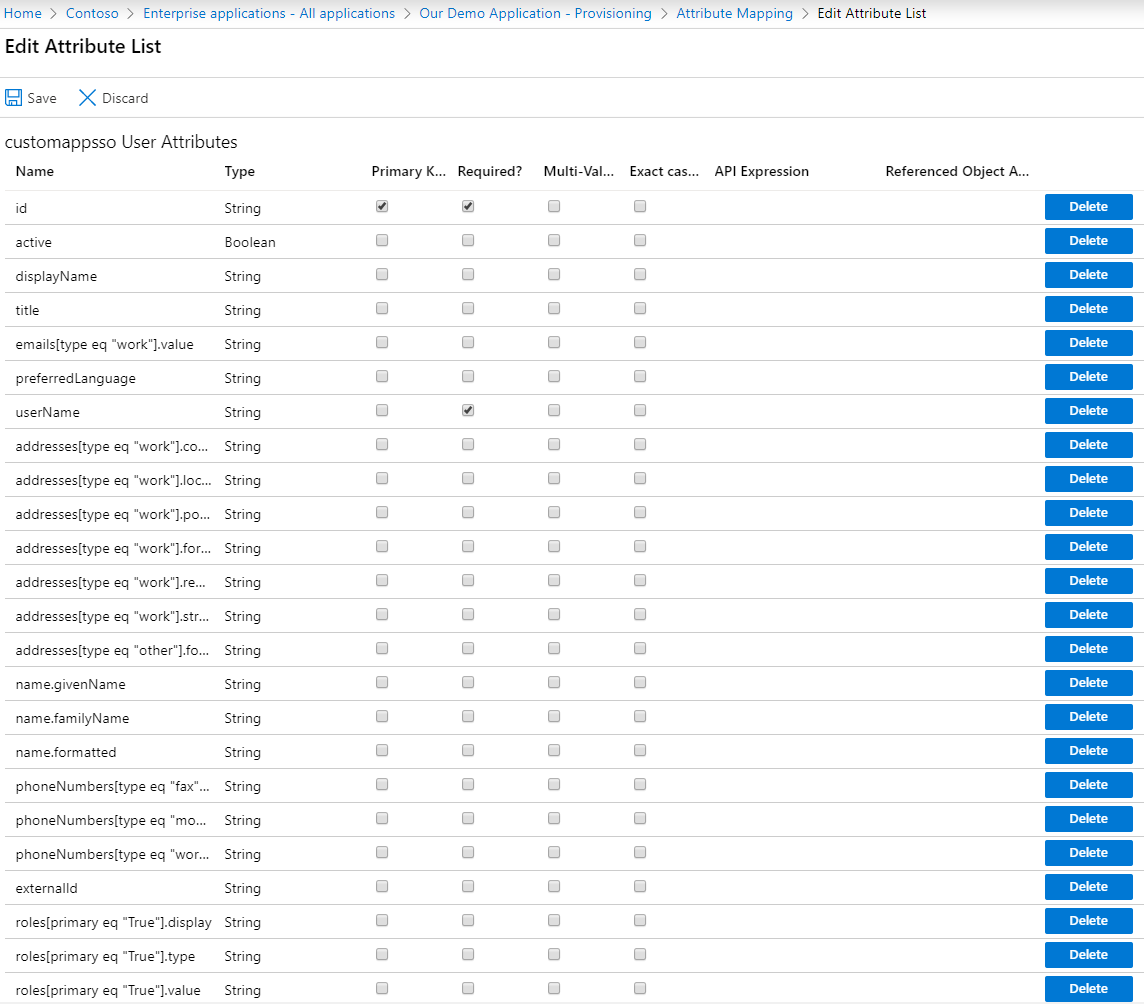
You’ll notice that the roles attribute looks weird, as doo adresses and phoneNumbers. These are complex types. However, I have through some product group contact found the best way to handle roles through SCIM:
First, add “roles” as an attribute, choose string and tell it to be multi valued. Then click “Add attribute” and hit “save”:

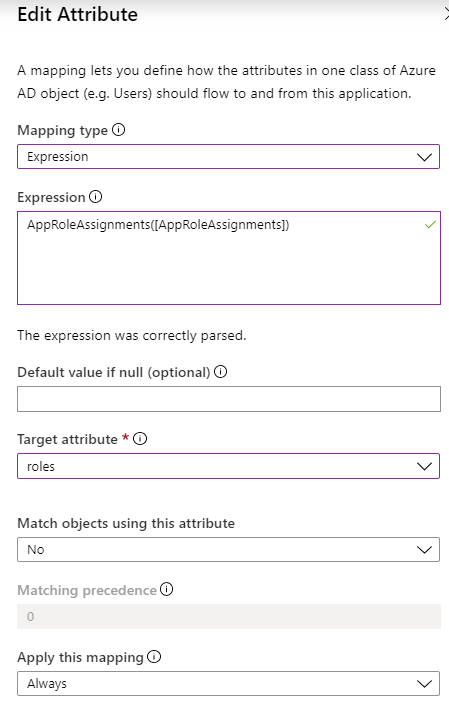
After this, refresh the browser and click “Add new mapping” on the attribute mappings page:

Use the mapping type “Expression”, use the expression AppRoleAssignments([AppRoleAssignments]) and target the role attribute:
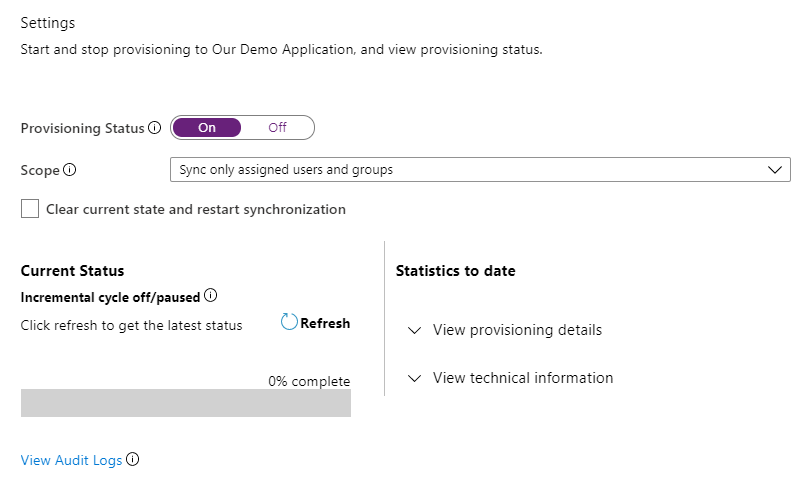
Save your changes and go back to the “Provisioning” tab of the application, set “Provisioning Status” to “On” and save.
You will now found that users are being sent to your application like this, just like we defined:
{
    "schemas": [
        "urn:ietf:params:scim:schemas:core:2.0:User",
        "urn:ietf:params:scim:schemas:extension:enterprise:2.0:User"
    ],
    "userName": "AllanD@M365x030202.OnMicrosoft.com",
    "active": true,
    "displayName": "AllanDeyoung",
    "meta": {
        "resourceType": "User"
    },
    "roles": [
        "Superuser",
        "User"
    ]
}
The value sent is the “value” from the appRole in the manifest, that we defined in the previous post.
You can also use the AppRoleAssignmentsComplex([AppRoleAssignments]) expression, to get both the value and the ID of the role.
That’s it, hope that helps someone both in implementing it and understanding that Azure AD has really powerful features!

2 thoughts on “Full IGA using Azure AD – Provisioning using SCIM”